强类型 长期保存 支持匿名用户
定义配置(profile)
 <?xml version="1.0"?><configuration xmlns="http://schemas.microsoft.com/.NetConfiguration/v2.0"> <appSettings/> <connectionStrings> <add name="Northwind" connectionString="Server=localhost;Integrated Security=True;Database=Northwind" providerName="System.Data.SqlClient"/> </connectionStrings> <system.web> <anonymousIdentification enabled="true" /> <profile> //定义配置(profile) <properties> <add name="Theme" allowAnonymous="true" /> <add name="LastVisit" type="System.DateTime" allowAnonymous="true" /> </properties> </profile><!-- <webParts> //定义配置(webParts) <personalization defaultProvider="AspNetSqlPersonalizationProvider"/> </webParts>--> <!-- Set compilation debug="true" to insert debugging symbols into the compiled page. Because this affects performance, set this value to true only during development. --> <compilation debug="true"> <expressionBuilders> <add expressionPrefix="Version" type="VersionExpressionBuilder"/> </expressionBuilders> </compilation> <!-- The <authentication> section enables configuration of the security authentication mode used by ASP.NET to identify an incoming user. --> <authentication mode="Windows"/> <!-- The <customErrors> section enables configuration of what to do if/when an unhandled error occurs during the execution of a request. Specifically, it enables developers to configure html error pages to be displayed in place of a error stack trace. --> <customErrors mode="RemoteOnly" defaultRedirect="GenericErrorPage.htm"> <!-- <error statusCode="403" redirect="NoAccess.htm"/> <error statusCode="404" redirect="FileNotFound.htm"/> --> </customErrors> </system.web></configuration>
使用配置(profile)
//increment the current user's post cout
profile.posts = profile.posts+1;
// update the current user's last post date
profile.lastpost = datetime.now;
个性化数据将存入数据库
Microsoft ASP.NET 2.0支持被称为Profile的新对象,它可以自动在多个Web应用程序的访问之间存储用户信息。一个User Profile中可以存储各种类型的信息,这些信息既可以是简单的string和integer类型,也可以是复杂的自定义类型。例如,你可以存储用户的姓、购物篮、用户属性或网站使用情况统计。
本文中,你将学习如何在一个应用中定义user profile。我们也会向你演示如何配置使用不同provider的profile。最后,你将学习如何管理和生成user profile的报告。
Profile 对象与Session对象十分相似,但是更好用一些。与Session相似的地方在于,Profile是相对于一个特定的用户的,也就是说,每个Web应用程序的用户都有他们自己的profile对象。与Session不同的是,Profile对象是持久对象。如果你向Session中添加一个项,在你离开网站时,该项就会消失。而Profile则完全不同,当你修改Profile的状态时,修改在多个访问之间均有效。
使用强类型是有它的道理的。例如,使用强类型,你就可以在Microsoft Visual Web Developer中使用智能感知技术,当你键入Profile和一个点的时候,智能感知会弹出你已经定义过的profile属性列表。
你既可以在machine.config中,也可以在web.config中定义一个user profile,由于你不能在应用程序的二级目录中创建一个包含文件profile节的web.config文件,这意味着你将无法在一个应用程序中定义两个以上的profile。
在列表1的web.config中,列举了一个简单的profile定义的实例,该profile有三个属性,FirstName, LastName和PageVisits。
<configuration>
<system.web>
<authentication mode="Forms" />
<anonymousIdentification enabled="true" />
<profile>
<properties>
<add
name="FirstName"
defaultValue="??"
allowAnonymous="true" />
<add
name="LastName"
defaultValue="??"
allowAnonymous="true" />
<add
name="PageVisits"
type="Int32"
allowAnonymous="true"/>
</properties>
</profile>
</system.web>
</configuration>
由于该profile需要同时被匿名用户和已认证用户使用,因此我们在web.config文件中增加包含一个< anonymousIdentification>元素,有了这个元素,系统就会自动为匿名用户生成唯一的ID。仔细看的话我们会发现,每一个 profile属性都有一个allowAnonymous特性,该特性表明这个profile属性是否允许被匿名用户使用。
当你定义好一个profile之后,系统会自动在下一次页面被调用时,生成一个与该profile相对应的类。这个类会被保存在"Temporary ASP.NET Files Directory"目录(该目录也用于存放用于动态生成页面的类)。你可以使用HttpContext的Profile属性(Property)调用该类。
当你定义好一个profile后,你可以使用如下方法为profile属性赋值。
Profile.FirstName = "Bill"
[C#]
Profile.FirstName
列表2演示了你该如何使用profile来持久化保存用户信息。这个页显示了FirstName,LastName, PageVisits三个属性的值,同时它包含了一个能够用于修改这三个属性的表单(form)。在Page_Load中更新PageVisits的值,这意味着每一次刷新页面,PageVisits的值都会改变。
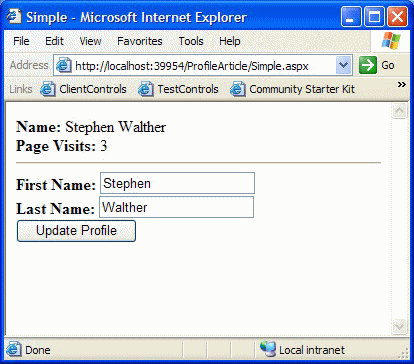
<script runat="server">
void Page_Load() {
Profile.PageVisits ++;
}
void UpdateProfile(Object s, EventArgs e) {
Profile.FirstName = txtFirstName.Text;
Profile.LastName = txtLastName.Text;
}
</script> <html>
<head>
<title>Simple</title>
</head>
<body>
<form id="form1" runat="server">
<b>Name:</b> <%= Profile.FirstName %> <%= Profile.LastName %>
<br />
<b>Page Visits:</b> <%= Profile.PageVisits %>
<hr />
<b>First Name:</b>
<asp:TextBox ID="txtFirstName" Runat="Server" />
<br />
<b>Last Name:</b>
<asp:TextBox ID="txtLastName" Runat="Server" />
<br />
<asp:Button ID="Button1"
Text="Update Profile"
OnClick="UpdateProfile"
Runat="server" />
</form>
</body>
</html>
<configuration>
<system.web>
<anonymousIdentification enabled="true" />
<profile>
<properties>
<group name="Address">
<add
name="Street"
allowAnonymous="true" />
<add
name="City"
allowAnonymous="true" />
</group>
<group name="Preferences">
<add
name="ReceiveNewsletter"
type="Boolean"
defaultValue="false"
allowAnonymous="true" />
</group>
</properties>
</profile>
</system.web>
</configuration>
当你用组来定义profile时,你应该使用组名来设置或读取profile属性。例如,在列表3中,你可以使用以下一些句子来完成三个profile属性的赋值。
Profile.Address.City
= "Modesto";Profile.Address.Street = "111 King Arthur Ln";
Profile.Preferences.ReceiveNewsletter = false;
举个例子,假设你现在需要在profile中存储一个购物篮,如果这样做的话,你就可以在每次访问网站时获得自己的购物篮。
列表4 声明了一个包含profile,这个profile包含一个名为ShoppingCart的属性,而该属性的type特性是一个叫ShoppingCart的类(我们接下来会创建该类),该类名是有效的。
我们还会注意到,该声明中包含一个serializeAs特性,该特性可以帮助ShoppingCart使用二进制序列化器(binary serializer)进行持久化,而不是使用xml序列化器。
<
configuration><system.web>
<anonymousIdentification enabled="true" />
<profile>
<properties>
<add
name="ShoppingCart"
type="ShoppingCart"
serializeAs="Binary"
allowAnonymous="true" />
</properties>
</profile>
</system.web>
</configuration>
列表5 中有一个简单购物篮的实现代码,该购物篮拥有添加和删除项(item)的方法(method),同时它还拥有两个属性(property),一个是用于获得该购物篮中的所有项的,一个是用于表示所有商品的总价的。
using
System;using System.Collections;
[Serializable]
{
public Hashtable _CartItems = new Hashtable();
// Return all the items from the Shopping Cart
//得到购物车中所有的元素
public ICollection CartItems
{
get { return _CartItems.Values; }
}
// The sum total of the prices
// 计算购物车中所有产品总价格
public decimal Total
{
get
{
decimal sum = 0;
foreach (CartItem item in _CartItems.Values)
sum += item.Price * item.Quantity;
return sum;
}
}
// Add a new item to the shopping cart
public void AddItem(int ID, string Name, decimal Price)
{
CartItem item = (CartItem)_CartItems[ID];
if (item == null)
_CartItems.Add(ID, new CartItem(ID, Name, Price));
else
{
item.Quantity++;
_CartItems[ID] = item;
}
}
// Remove an item from the shopping cart
public void RemoveItem(int ID)
{
CartItem item = (CartItem)_CartItems[ID];
if (item == null)
return;
item.Quantity--;
if (item.Quantity == 0)
_CartItems.Remove(ID);
else
_CartItems[ID] = item;
}
}
[Serializable]
{
private int _ID;
private string _Name;
private decimal _Price;
private int _Quantity = 1;
public int ID
{
get { return _ID; }
}
public string Name
{
get { return _Name; }
}
public decimal Price
{
get { return _Price; }
}
public int Quantity
{
get { return _Quantity; }
set { _Quantity = value; }
}
public CartItem(int ID, string Name, decimal Price)
{
_ID = ID;
_Name = Name;
_Price = Price;
}
}
如果你把列表5中的代码添加到应用程序的App_Code目录中,购物篮会自动被编译。
最后,列表6的页面显示了可以被添加到购物篮中的产品。购物篮是通过BindShoppingCart方法从Profile对象中载入,该方法把购物篮中的对象绑定到一个GridView对象上,这些对象可以通过ShoppingCart类的CartItems属性获得。
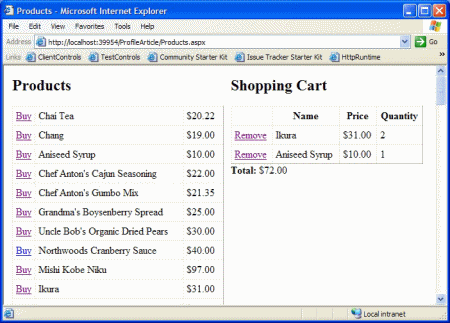
图2 在profile中存储购物篮
<%@ Page Language="C#" %>
<%@ Import Namespace="System.Globalization" %>
<script runat="server">
void Page_Load() {
if (!IsPostBack)
BindShoppingCart();
}
void BindShoppingCart()
{
if (Profile.ShoppingCart != null)
{
CartGrid.DataSource = Profile.ShoppingCart.CartItems;
CartGrid.DataBind();
lblTotal.Text = Profile.ShoppingCart.Total.ToString("c");
}
}
void AddCartItem(Object s, EventArgs e)
{
GridViewRow row = ProductGrid.SelectedRow;
int ID = (int)ProductGrid.SelectedDataKey.Value;
String Name = row.Cells[1].Text;
decimal Price = Decimal.Parse(row.Cells[2].Text,
NumberStyles.Currency);
if (Profile.ShoppingCart == null)
Profile.ShoppingCart = new ShoppingCart();
Profile.ShoppingCart.AddItem(ID, Name, Price);
BindShoppingCart();
}
void RemoveCartItem(Object s, EventArgs e)
{
int ID = (int)CartGrid.SelectedDataKey.Value;
Profile.ShoppingCart.RemoveItem(ID);
BindShoppingCart();
}
</script> <html>
<head>
<title>Products</title>
</head>
<body>
<form id=