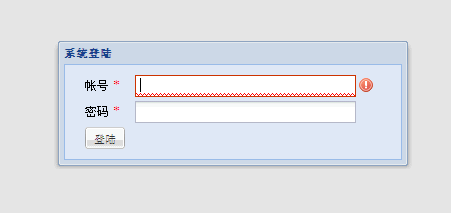
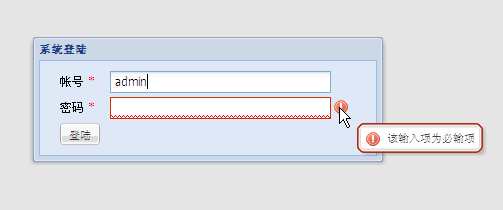
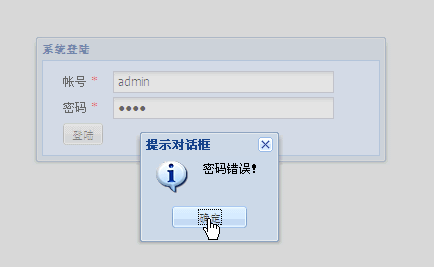
界面效果


一步一步创建界面
1. 首先每个使用ExtAspNet控件的页面都需要引入ext:PageManager控件。
2. 页面上放置一个没有关闭按钮的ext:Window,并且指定宽度为350px。
    <ext:PageManager ID="PageManager1" runat="server">
    </ext:PageManager>
    <ext:Window ID="Window1" runat="server" IsModal="true" Popup="true" EnableClose="false"
        Title="系统登陆" Width="350px">
    </ext:Window>
3. 在ext:Window内部放置一个ext:SimpleForm控件(ext:SimpleForm用来呈现那些只有一列的表单,如果需要更复杂的表单可以使用ext:From控件)。
    <ext:Window ID="Window1" runat="server" IsModal="true" Popup="true" EnableClose="false"
        Title="系统登陆" Width="350px">
        <ext:SimpleForm ID="SimpleForm1" runat="server" LabelWidth="45px" BodyPadding="10px 20px"
            EnableBackgroundColor="true" ShowBorder="false" ShowHeader="false">
            <ext:TextBox ID="tbxUserName" FocusOnPageLoad="true" runat="server" Label="帐号" Required="true"
                ShowRedStar="true" Text="">
            </ext:TextBox>
            <ext:TextBox ID="tbxPassword" TextMode="Password" runat="server" Required="true"
                ShowRedStar="true" Label="密码" Text="">
            </ext:TextBox>
            <ext:Button ID="btnSubmit" Type="Submit" runat="server" ValidateForms="SimpleForm1"
                OnClick="btnSubmit_Click" Text="登陆">
            </ext:Button>
        </ext:SimpleForm>
    </ext:Window>
注意这里有几个应用技巧:
- 默认的ext:SimpleForm中控件的Label占据60px的宽度(在Web.config中定义),这里我们可以通过LabelWidth="45px"来覆盖这种设置。
- 为了让用户名文本框在页面加载完毕后自动获取焦点,我们设置属性FocusOnPageLoad="true"
- 点击按钮时需要对文本框进行客户端验证,这里只需为ext:Button设置ValidateForms="SimpleForm1"属性即可(如果需要验证多个表单,比如ValidateForms="SimpleForm1,Form2")。
- 文本框的ShowRedStar="true"用来在标签旁边显示一个红色的星号,这个需要和Required="true"配合使用。
- 为了达到在表单内任意一个文本框内点击回车按键都能激发按钮的OnClick事件,需要设置ext:Button的Type="Submit"。
Asp.net表单身份验证
由于在AppBox中使用的Asp.net的表单身份验证,所以我们有必要来看一下Web.config配置文件:
在system.web配置节中:
    <authentication mode="Forms">
      <forms name=".ASPXFORMSAUTH" loginUrl="~/default.aspx" timeout="120" defaultUrl="~/main.aspx" protection="All" path="/"/>
    </authentication>
    <authorization>
      <deny users="?"/>
    </authorization>
同时由于Asp.net的表单身份验证在内部使用Response.Redirect进行页面跳转。为了使ExtAspNet兼容Response.Redirect,我们还必须在system.web下做如下配置:
    <httpModules>
      <add name="ScriptModule" type="ExtAspNet.ScriptModule, ExtAspNet"/>
    </httpModules>
具体原因可以参考这篇博客:ExtAspNet应用技巧(三) - 302与Asp.Net Ajax
后台登陆代码
其中我们使用SubSonic作为ORM的工具,使用log4net作为日志记录的工具,代码很简单就不解释了。
    protected void btnSubmit_Click(object sender, EventArgs e)
    {
        string userName = tbxUserName.Text.Trim();
        string password = tbxPassword.Text.Trim();
        XUser user = new Select().From<XUser>()
            .Where(XUser.NameColumn).IsEqualTo(userName)
            .And(XUser.EnabledColumn).IsEqualTo(true)
            .ExecuteSingle<XUser>();

        if (user != null)
        {
            if (PasswordUtil.ComparePasswords(user.Password, password))
            {
                // 登录成功
                logger.Info(String.Format("登录成功:用户“{0}”", user.Name));
                FormsAuthentication.RedirectFromLoginPage(userName, true);
                return;
            }
            else
            {
                logger.Warn(String.Format("登录失败:用户“{0}”密码错误", userName));
                Alert.Show("密码错误!");
                return;
            }
        }
        else
        {
            logger.Warn(String.Format("登录失败:用户“{0}”不存在", userName));
            Alert.Show("用户名不存在!");
            return;
        }
    }
如果你想运行本章中使用的代码,可以从 http://appbox.codeplex.com/SourceControl/ListDownloadableCommits.aspx 下载全部源代码。