转自:http://www.eefocus.com/ayayayaya/blog/12-02/238161_2d3e2.html
记录了为FS_S5PC100平台在Ubuntu下安装Android Eclipse开发环境的搭建过程。使用Ubuntu版本为10.10。
1、安装JDK
(1) 安装“Linux-Android\toolchain”目录下的“jdk.bin”,jdk.bin是Jdk1.5。Jdk1.5是编译Android2.1必须的工具,而且只能是1.5,其他版本(比如1.6)都不行。
把“jdk.bin”拷贝到“/usr”目录下,然后执行,按照提示安装即可。
#sudo ./jdk.bin
(2)安装结束后还要配置一下环境变量:
~$ sudo vim /etc/environment
将路径(红色字体)添加到PATH变量的最后面:
PATH="/usr/local/sbin:/usr/local/bin:/usr/sbin:/usr/bin:/sbin:/bin:/usr/games:/usr/local/arm/4.2.2-eabi/usr/bin:/usr/jdk1.5.0_21/bin

保存退出后执行:
source /etc/environment
2、安装SDK
说明:最新的sdk可以到http://developer.android.com/sdk/index.html下载。这里用得是安装包里的android-sdk-linux_x86-1.6_r1.tgz。后面也会在eclipse 安装完ADT后的Anroid SDK Manager中下载更新的SDK。
(1)解压android-sdk-linux_x86-1.6_r1.tgz到/home/linux下
(2)为了方便以后版本更新,创建一个软连接
#ln -s android-sdk-linux_x86-1.6_r1 android-sdk
(3)创建一个创建虚拟机平台 AVD
linux@ubuntu:~/android-sdk/tools$ ./android create avd -n fs100 -t 2
Android 1.6 is a basic Android platform.
Do you wish to create a custom hardware profile [no]y
Device ram size: The amount of physical RAM on the device, in megabytes.
hw.ramSize [96]:128
Touch-screen support: Whether there is a touch screen or not on the device.
hw.touchScreen [yes]:yes
Track-ball support: Whether there is a trackball on the device.
hw.trackBall [yes]:no
Keyboard support: Whether the device has a QWERTY keyboard.
hw.keyboard [yes]:n
DPad support: Whether the device has DPad keys
hw.dPad [yes]:y
GSM modem support: Whether there is a GSM modem in the device.
hw.gsmModem [yes]:n
Camera support: Whether the device has a camera.
hw.camera [no]:n
Maximum horizontal camera pixels
hw.camera.maxHorizontalPixels [640]:
Maximum vertical camera pixels
hw.camera.maxVerticalPixels [480]:
GPS support: Whether there is a GPS in the device.
hw.gps [yes]:
Battery support: Whether the device can run on a battery.
hw.battery [yes]:
Accelerometer: Whether there is an accelerometer in the device.
hw.accelerometer [yes]:
Audio recording support: Whether the device can record audio
hw.audioInput [yes]:
Audio playback support: Whether the device can play audio
hw.audioOutput [yes]:
SD Card support: Whether the device supports insertion/removal of virtual SD Cards.
hw.sdCard [yes]:
Cache partition support: Whether we use a /cache partition on the device.
disk.cachePartition [yes]:
Cache partition size
disk.cachePartition.size [66MB]:
Abstracted LCD density: Must be one of 120, 160 or 240. A value used to roughly describe the density of the LCD screen for automatic resource/asset selection.
hw.lcd.density [160]:
Created AVD 'fs100' based on Android 1.6, with the following hardware config:
hw.camera=no
hw.ramSize=128
hw.touchScreen=yes
hw.lcd.density=160
hw.gsmModem=no
hw.keyboard=no
hw.trackBall=no
hw.dPad=yes
(4)在主机上创建一个 sd card image
# sudo ./mksdcard 128M sdcard.img
(5)启动虚拟机
# sudo ./emulator -sdcard ./sdcard.img @fs100
3、安装Eclipse
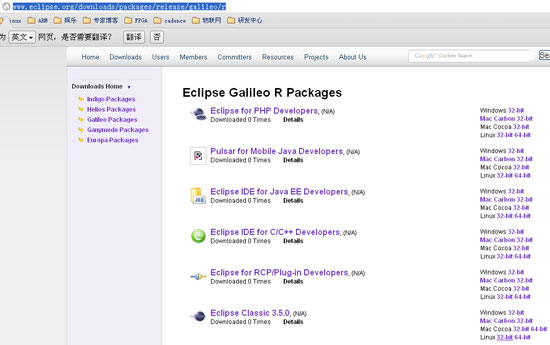
(1)http://www.eclipse.org/downloads/packages/release/galileo/r
下载eclipse-SDK-3.5-linux-gtk.tar.gz
解压至/home/linux目录下
(2)创建工作目录
#mkdir /home/linux/workspace
(3)启动eclipse
进入前面elipse的解压目录
#./eclipse


点击help→Install New Software

(注:https://dl-ssl.google.com/android/eclipse这个网址前段时间好像需要翻墙。今天试了是可以的。如果输入后,长时间看不到显示下图的Developer Tools,可能就需要翻墙了。或者把adt的压缩包下载下来,然后通过加archive的方法安装了。)
点击OK后,选择Developer Tools,

点击next,完成ADT安装后,重新启动Eclipse

(4)安装完毕ADT后选择重新启动
启动后会自动弹出下面的界面。或选择windows—>android sdk manager.
可以选择前面安装好的sdk路径/home/linux/android-sdk.
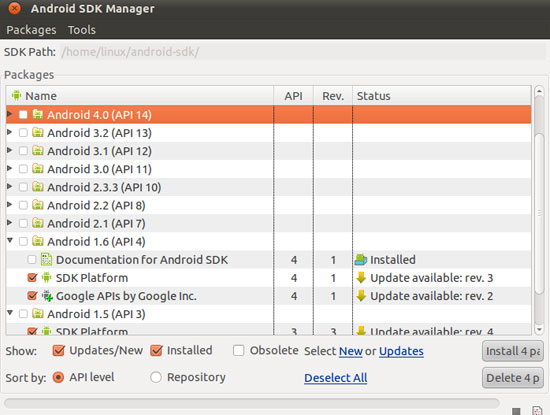
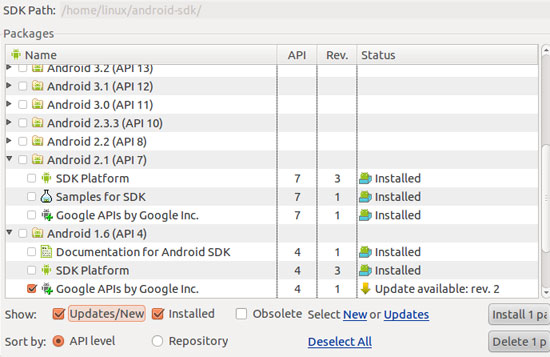
可见前面安装好的1.6的sdk已经显示安装了。还可以针对目标平台安装其它的sdk。这里增加2.1的sdk
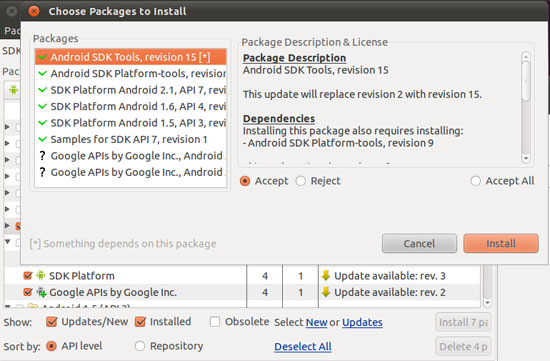
安装完成后显示下图:
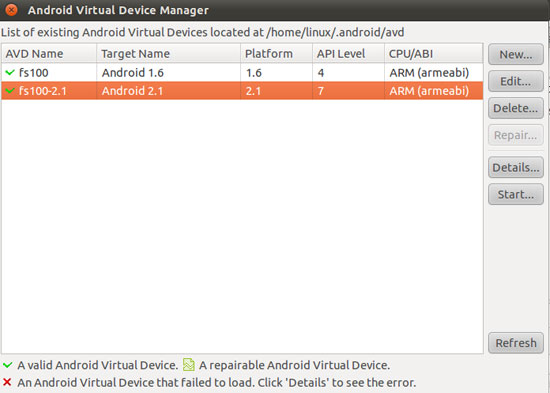
(5)创建新的AVD,支持2.1(前面创建的是1.6)
点击Windows—>AVD manager
4、创建HelloWord工程
(1)File→New→Project
选择"Android" , "Android Project",点击 next
命名为Hello World

点击Next,然后选择Android 2.1

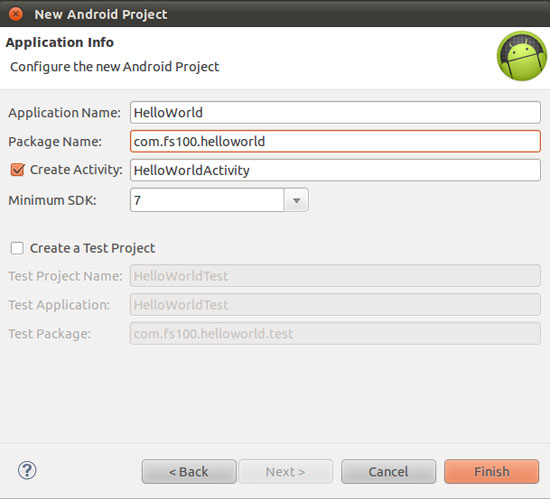
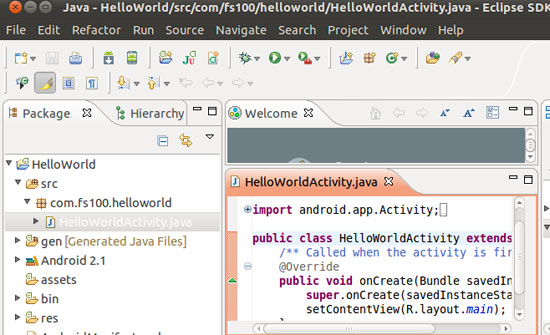
Finish以后就可以编辑工程了。使用默认的代码就可以测试。
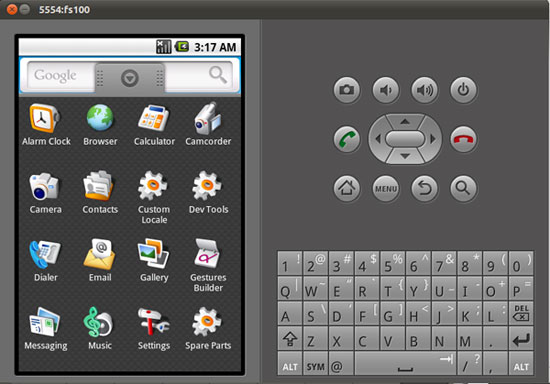
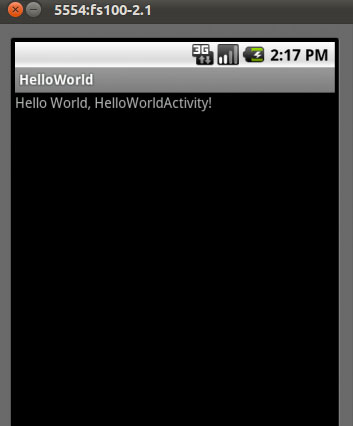
点击run按钮,avd中显示如下界面。
生成apk文件在工作目录下的位置:
