EarthSculptor是一款制作与着色高度图的软件,它主要运用于艺术项目、地理信息可视化、游戏开发等领域。
EarthSculptor可以让你从无到有的创作,或是从现有的高度图中创作并保存为16位的png格式的图片。
作为一款可视化软件,它能很好的与其它绘图软件一起编辑高度图与纹理。
--------------------------------------------------------------------------------------------------
摄像机控制
鼠标
鼠标右键近控制摄像机的方位,鼠标滑轮控制摄像机的缩放
ALT+左键 - 以鼠标点旋转
ALT+中键 - 平移视图
ALT+右键 - 缩放视图
按键
默认移动控制键(可以在menu->camera->keyboard controls里设置)
向前:E,8
向后:D,2
向左:S,4
向右:F,6
上升:A,7
下降:Z,9
--------------------------------------------------------------------------------------------------
工具控制
鼠标
左键 - 塑造地形,着色,增加细节
键盘
空格键 - 转变成顶点工具修改顶点
shift + 左键 - 上下移动鼠标,改变工具的半径
Caps Lock - 显示/隐藏工具窗口
Ctrl + Z - 撤消
Ctrl + shift + z - 重做
Page up/ Page down - 切换视图浏览视角
Home - 切换到450俯视视角
Ctrl - 特殊功能键
塑造时: 按下时反转上升/降低功能
着色时: 相当于吸色器,吸取当前鼠标位置的颜色
1 - 细节级别
2 - 线框模式
3 - 网格模式
4 - 着色模式
5 - 细节纹理
6 - 光照纹理
--------------------------------------------------------------------------------------------------
界面
EarthSculptor是依靠工具栏里的各种工具工作,选择不同的工具时,属性栏也会跟着改变,并通过拖动属性栏里各滑动块来改变各种参数.
菜单
File(文件)
New - 创建一个新的地图
Load - 载入已有的地图
Save/Save As. - 保存地图
Utility(功能)
Show stats - 显示桢数与多边形数
Screenshot - 截取当前视角视图,并保存到软件根目录里(...\EarthSculptor\Screenshots)
Reload Textures - 重新载入所有纹理
Reload HeightMap - 重新载入高度图
Import(导入)
Heightmap Image- 导入png, tga, bmp格式的图片并缩放到当前地图尺寸中
Export(导出)
Heightmap - 导出当前地形的png,tga 格式的高度图
Obj Export - 导出当前地形的三维obj格式文件
Generate(生成)
Detail height - 按调节后的高度比例喷上4种细节纹理
Perlin noise - 以柏林噪声的算法生成新的高度图,并与当前地形混合成一个新的地图
Camera(摄像机)
Camera Speed - 快,中,慢速
WASD keys - 设置摄像机移动按键为WSAD
Set keys - 设置摄像机移动按键
Undo/Redo(撤消/重做)
Help(帮助)
--------------------------------------------------------------------------------------------------
绘制纹理
Earthsculptor提供了两种可结合的喷涂纹理方式,一种方式是直接使用喷涂工具![]() 在地形上喷涂,另一种方式是通过设定细节纹理工具
在地形上喷涂,另一种方式是通过设定细节纹理工具![]() 来进行喷涂。
来进行喷涂。
着色图与细节纹理可以通过选择地形![]() 控制面板里的合并方式进行合并。
控制面板里的合并方式进行合并。
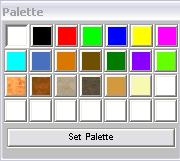
材质拾取器与调色板
Earthsculptor能够快速而实时的改变为所选择的颜色和纹理。材质拾取器与调色板是用来改变喷涂工具![]() 和其它一些(比如水,雾,背景等)的颜色和纹理。
和其它一些(比如水,雾,背景等)的颜色和纹理。
工具栏
地形工具的参数主要是控制LOD(细节级别)、雾的开关,设置LOD、地形高度、背景开关、背景纹理和天空盒子
|
LOD - 设置地形的细节级别,值越高越会降低显示效果,但会增强细节 Height- 设定地形的高度极限 Wireframe - 线框开关 Grid - 网格开关 Detail/Color/Lighting - 控制相应功能的开关 Color Mode - 设定地图的细节和颜色的相互作用:添加,添加减一半或者增加色彩值。 Fog - 雾开关 Underground - 设置地形以外的背景 Material - 选择背景的材质 |
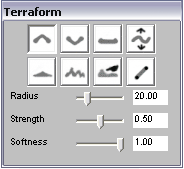
有8种地形编辑工具:上升,降低,水平,打滑,侵蚀,斜坡和推拉 .
EarthScultor会自动更新地形改变后的光照与阴影(如果开启),但在较大地形上运用时会影响光照的重新计算
|
工具名称直观的解释其作用,在运用中发现它们的作用。 柔软度控制工具半径中心与边界之间的力度关系,1为软 |
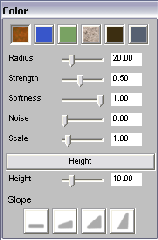
设定4或8个喷涂纹理(取决于地图创建时)
|
点选欲喷涂在地图上的的纹理 Height(高度)按钮开启后控制作用的高度范围 四个Slope(坡度)按钮限定在选定的坡度范围内喷涂(可以进行多个不同的组合来选择) |
通过调色板和材质拾取器来设置要喷涂的颜色和纹理。
|
颜色面板里可以储存6个纹理,并且可以单独调节其参数。 |
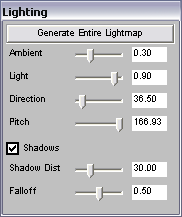
调整光线和阴影,产生新的地图光照纹理映射
光照工具开启时,屏幕中心出现一箭头,按住左键并移动鼠标,调整光的入射方向,并重新生成纹理或是地形的光照图
|
Generate Entire Lightmap - 重新生成光照纹理 Ambient/Light - 改变环境和光的强度 Direction/Pitch - 调整光的入射角度 Shadows - 阴影开关 Shadow Dist - 阴影区域的最大距离 Falloff - 调整阴影柔和的距离 |
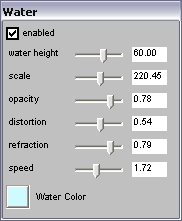
启用/禁用水和改变它的高度、规模、变形和颜色
|
可以通过调节软件根目录data/textures的法线贴图纹理的参数来改变水的样子。 也可以用photoshop里的Nvidia纹理工具来创建新的纹理。 |
--------------------------------------------------------------------------------------------------
To create a new map go to the menu file->new, you will be presented with the new map panel where you can select the size of the terrain and size of the color detail and lighting texture maps.
Texture splitting splits all the texture maps into 4 or 16 separate smaller sized textures by splitting the texturemap once(1) or twice(2) respectively, this improves performance painting the maps on large maps as only the affected textures needs to be updated.
Detail textures allows you to set the number of detail textures you can use in the terrain, 4 or 8
RGB lighting allows you to use RGB color to define the lighting of the lightmap alternatively to just grayscale lighting.
--------------------------------------------------------------------------------------------------
EarthSculptor outputs the maps as follows
mapName.map - this is an ascii file containing all the parameters, colors, texture names used in the map
mapName.png - this is a 16-bit grayscale png representing the height values of the map
mapName_l.png - this is the lightmap of the map
mapName_c.png - this is the colormap of the map
mapName_d.png - this is the detailmap texture of the map, each channel represents one of the four detail textures that make up the detail textures.
mapName_dd.png - this is the second detailmap texture of the map if your map is supporting 8 detail textures, each channel represents one of the four detail textures that make up the last 4 detail textures.
--------------------------------------------------------------------------------------------------
Working with external tools to change your terrain and color texture map
You can work with the terrain and color map in an external editor while you work in EarthSculptor. Open or create a new map, go to menu utility->explore, open the mapName.png and/or mapName_c.png in your favorite image editor, modify the map or colormap and save it in your image editor, in EarthSculptor go to menu utility->reload height map and/or utility->reload texture map. You can re-light the map and work between applications to create your terrain. This is also a quick method of importing heightmaps, geographic images and overlays into EarthSculptor from external sources.
Changing Existing Maps
All old maps will have to reset their ambient and light values in lighting and recalculate, since EarthSculptor switched to RGB color support for lightmaps (note that it still works with grayscale lightmaps as default).
Modifying Existing Maps
LightMap
To change lightmap RGB/Grayscale, simply open the lightmap .png in an image program and set the image to grayscale or RGB.
DetailMap
To have 8 detail textures, just create or remove an additional detailmap with the format detailmap_dd.png (it has two 'd's)
Texture Splitting
This is hard to do. You have to modify the .map file to have 1 or 2 divisions (default is 0), and split the tile texture manually for each lightmap, detailmap and colormap into (4 or 16 separate files) of the current size divided by 2 or 4 (1 and 2 divisions respectively)
Note that to simply change the content of any of the light/color/detail maps or any of the textures, you can always re-load them in the program from the utility menu. This makes for effective use of other image applications to modify your heightmap

