首先看几个关键术语:
aspect(方面):类似于JAVA编程语言中的类。方面定义切入点和通知,并由方面通知编译器来编译,以便将 横切(包含动态和静态)织入(interweave)现有对象中。
join point(连接点):是程序执行中的一个精确执行点,比如类中的一个方法或者一个异常抛出等等。连接点是个抽象的概念;不用主动的定义一个连接点。我们在上篇文章中Computer类的buy方法就是连接点!
point cut(切入点):本质上一个用于捕捉连接点的机构。切入点是用来捕捉连接点调用的方法,切入点需要在方面 中定义,也可以说是连接点的集合。
advice(通知):是切面的实际实现。
introduction(引入):引入允许你为已存在的类添加新方法和属性。
target(目标对象):是被通知的对象。
proxy(代理):代理是将 通知应用到目标对象后创建的对象。
weaving(织入):是将方面应用到目标对象,从而创建一个新的代理对象的过程。切面在指定接入点被织入到目标对象中。织入发生在对象生命周期中的多个点
而在Spring中所有的通知都是以JAVA类的形式编写,这意味着你可以旬开发普通JAVA开发那样在集成开发环境(IDE)中开发切面,而在什么地方应用切入点通常写在Spring配置文件中。这意味着切面代码和配置语法对于JAVA开发人员来说都是很熟悉的!
相对比AspectJ则需要写特定的语法来编写切面和定义切入点。而Spring则非常方便简单!
另外Spring AOP实现了AOP Allinace所有的规范接口!但它与JBOSS,AspectJ不同之处在于Spring它只支持方法切入点,而不支持属性做为切入点!
Spring的代理方式有二种;
第一种:如果目标对对象实现一个或多个接口,则使用java.lang.reflect.Proxy类创建代理!
第二种:如果目标对象没有实现任何的接口,则Spring使用CGLIB库生成目标对象的子类!
需要注意的是:
对接口创建代理优于对类创建代理,这样可以更加降低偶合
标记为final的方法不能被通知
Spring只支持方法做为连接点
通知有如下4种类型:
Around拦截目标方法的调用org.aopalliance.intercept.MethodInterceptor
Before在目标方法被调用之前调用org.springframework.aop.MethodBeforeAdvice
After在目标方法被调用之后调用org.springframework.aop.AfterReturningAdvice
Thorws在目标方法抛出异常时调用org.springframework.aop.ThrowsAdvice
我们可以使用最简单的方式也就是使用ProxyFactoryBean来创建AOP。
我们还是接着上一篇中的例子来创建一个!
Step1:我们重新建立一个代理类Subst.java让其继承MethodInterceptor接口!
让其可以在拦截目标方法的调用!
我们还是接着上一篇中的例子来创建一个!
Step1:我们重新建立一个代理类Subst.java让其继承MethodInterceptor接口!
 package fengyan.efly;
 /** *//**
 * authod:fengyan * date:2007-01-01 00:42
 */import org.aopalliance.intercept.MethodInterceptor;import org.aopalliance.intercept.MethodInvocation;public class Subst implements MethodInterceptor
  {
{
 public Object invoke(MethodInvocation arg0) throws Throwable { System.out.println("送鼠标"); Object result = arg0.proceed();//拦截方法arg0调用其进行proceed方法 return result;
 }}
}}Step2:编写applicationContext.xml文件!右键创建一个Bean,其id为subst bean class即为上一步创建的代理类。
Step3:在applicationContext.xml中配置我们的Computer1 Bean
Step4:然后我们再配置一个代理类的bean,继承自ProxyFactoryBean接口。如下: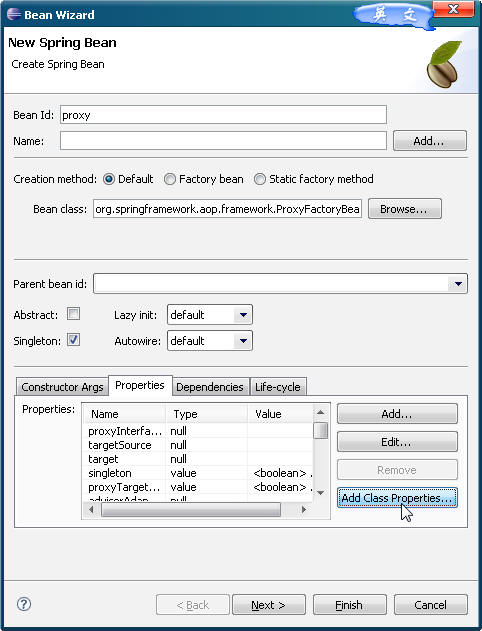
单击Add Class Properties一次性添加入类需要的属性,但我们需要改动一些,第一个就是你代理的是哪个类,我们已经有了Ipc接口,那么首先我们要设定代理类的接口是哪个。选中proxyInterface编辑: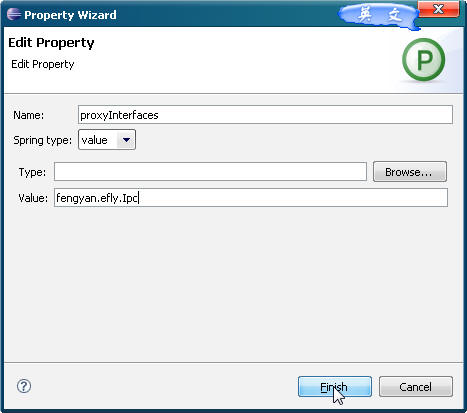
它是一个值,就是我们接口的包的路径
接下来就是我们这里面哪个是充当通知,就是我们前面建立的代理了,我们选中target编辑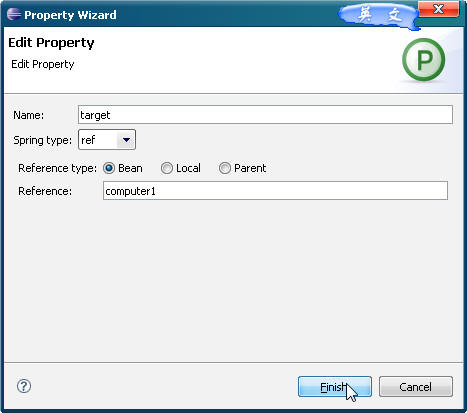
它的值为引用bean 就是前面我们创建的xomputer1
然后我再还需要设置一个要代理的目标类,编辑interceptorNames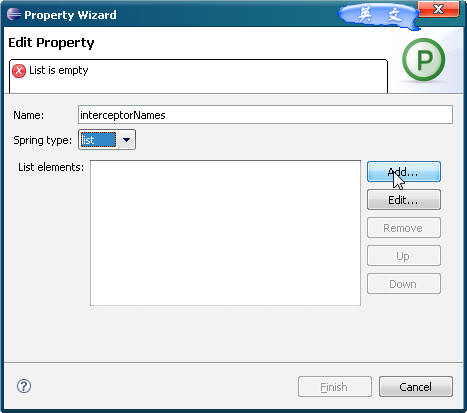
它是一个复数,所以是List,我们再添加其List elements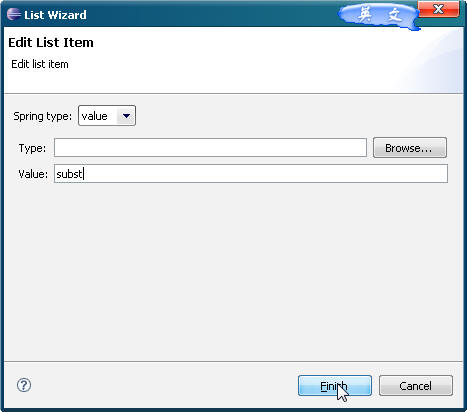
其值就是我们在Step2中建立的bean ID。单击完成后我们将 一些我们用不上的properties去掉!最后的配置文件代码如下:
<?xml version="1.0" encoding="UTF-8"?><!DOCTYPE beans PUBLIC "-//SPRING//DTD BEAN//EN" "http://www.springframework.org/dtd/spring-beans.dtd"><beans> <bean id="subst" class="fengyan.efly.Subst" abstract="false" singleton="true" lazy-init="default" autowire="default" dependency-check="default"> </bean> <bean id="computer1" class="fengyan.efly.Computer" abstract="false" singleton="true" lazy-init="default" autowire="default" dependency-check="default"> </bean> <bean id="proxy" class="org.springframework.aop.framework.ProxyFactoryBean" abstract="false" singleton="true" lazy-init="default" autowire="default" dependency-check="default"> <!-- 我们保留以下三属性 --> <!-- 对哪个对象进行代理 --> <property name="target"> <ref bean="computer1" /> </property> <!-- 谁是代理 --> <property name="interceptorNames"> <list> <value>subst</value> </list> </property> <!-- 原对象的接口是哪个 --> <property name="proxyInterfaces"> <value>fengyan.efly.Ipc</value> </property> <!-- 这就是使用ProxyFactoryBean作为的一种简单代理 --> </bean></beans>最后我们在主方法中这样调用:
import org.springframework.context.ApplicationContext;import org.springframework.context.support.FileSystemXmlApplicationContext;public class TestMain { public static void main(String[] args) { ApplicationContext context = new FileSystemXmlApplicationContext("src/fengyan/efly/applicationContext.xml"); //然后我们获取该对象 Ipc ipc = (Ipc)context.getBean("proxy");//获取代理Bean ipc.buy(); }}我们运行得到如下结果:
送鼠标
获取:IBM电脑一台
这时候我们看到功能和上一篇是一样的!这就是使用ProxyFactoryBean来做的代理。
那么现在如果我们的一个类中有很多方法同时要做切面,就是很多方法共有的东西我们一起做代理,如何做呢,我们首先改Ipc接口
package fengyan.efly;public interface Ipc { public void buyPC(); public void buySoft();}然后改下Computer类
public void buyPC() { System.out.println("获取:"+pcName+"电脑一台"); } public void buySoft() { System.out.println("江南收费系统"); }现在就是无论我买PC还是买收费系统软件都要送鼠标,如何实现?
这时候就需要在配置文件中添加一新的bean,继承org.springframework.aop.support.RegexpMethodPointcutAdvisor接口
并为其添加几个属性,第一个为advice 是引用要代理的Bean subst
第二个是我们哪些地方需要用到代理patterns我们给它一个值,而这值是正则表达式,
正则表达式符号有如下几种:
.匹配任意一个字符
+匹配前一个字符,一次或多次
*匹配前一个字符,零次或多次
\转义字符,把正则表达式中的字符转义
这样上面用.*buy.*表示所有buy方法
<bean id="buyadvicor" class="org.springframework.aop.support.RegexpMethodPointcutAdvisor" abstract="false" singleton="true" lazy-init="default" autowire="default" dependency-check="default"><!-- 通过方法拦截的类 --> <property name="advice"> <ref bean="subst" /> </property> <property name="patterns"> <value>.*buy.*</value><!-- 我们定义一个方法的切入点只要是带buy的 --> </property> </bean>这样有了它之后 我们原先的proxy要改动一下!
<!-- 谁是代理 --> <property name="interceptorNames"> <list> <value>buyadvicor</value><!-- subst换为buyadvicor --> </list> </property>这时无论我们是buyPC还是buySoft都会送鼠标了,
注意这里面用到了正则表达式,如果我们改下正则表达式如下:
<bean id="buyadvicor" class="org.springframework.aop.support.RegexpMethodPointcutAdvisor" abstract="false" singleton="true" lazy-init="default" autowire="default" dependency-check="default"><!-- 通过方法拦截的类 --> <property name="advice"> <ref bean="subst" /> </property> <property name="patterns"> <value>.*fengyan\.efly\.Ipc.*</value> <!-- .*buy.*改为.*fengyan\.efly\.Ipc.*则只要是该接口中的方法被调用都会切入 此时在接口中增加一个方法test依然会输出送鼠标 --> </property> </bean>则无论Ipc接口中的什么方法被调用都会切入!这是针对一个类中所有的方法进行拦截,这时就是只要你某个类中的方法被调用 它就会出一个通知。
现在再假设如果这是一个购物系统,我们希望当顾客购买东西之前做一件事情,以及买完后也做一优缺点 事情,这里简单的输出欢迎光临和欢迎下次再来!那么我们要将 我们的Subst.java类改为继承自MethodBeforeAdvice接口,并穿实现before方法,代码如下:
package fengyan.efly;import java.lang.reflect.Method;import org.springframework.aop.MethodBeforeAdvice;public class Subst implements MethodBeforeAdvice { public void before(Method arg0, Object[] arg1, Object arg2) throws Throwable { // TODO Auto-generated method stub System.out.println("欢迎光临本商店"); }}假设该代理是购买之前的,那么我们再写一个代理类是购买之后的,它则需要继承AfterReturningAdvice接口,如下
package fengyan.efly;import java.lang.reflect.Method;import org.springframework.aop.AfterReturningAdvice;public class After implements AfterReturningAdvice { public void afterReturning(Object arg0, Method arg1, Object[] arg2, Object arg3) throws Throwable { System.out.println("欢迎下次再来"); }}之后我们改动配置文件如下:
<?xml version="1.0" encoding="GBK"?><!DOCTYPE beans PUBLIC "-//SPRING//DTD BEAN//EN" "http://www.springframework.org/dtd/spring-beans.dtd"><beans> <bean id="subst" class="fengyan.efly.Sbust" abstract="false" singleton="true" lazy-init="default" autowire="default" dependency-check="default"> </bean> <bean id="computer1" class="fengyan.efly.Computer" abstract="false" singleton="true" lazy-init="default" autowire="default" dependency-check="default"> </bean> <bean id="proxy" class="org.springframework.aop.framework.ProxyFactoryBean" abstract="false" singleton="true" lazy-init="default" autowire="default" dependency-check="default"> <!-- 对哪个对象进行代理 --> <property name="target"> <ref bean="computer1" /> </property> <!-- 谁是代理 --> <property name="interceptorNames"> <list> <value>buyBeforeAdvicor</value><!-- 改为购买之前的代理 --> <value>buyAfterAdvicor</value><!-- 并加一个购买之后的代理 --> </list> </property> <!-- 原对象的接口是哪个 --> <property name="proxyInterfaces"> <value>fengyan.efly.Ipc</value> </property> </bean>