前面五篇文章:
在这五篇文章中,简单的分析了将SD卡插入的消息从底层传递到了上层的流程,但并没有深入分析毕竟我的目的是理清一条清晰的消息传递路线,最终目标是再系统的设置界面中显示出来,因此,本文将继续分析该流程。但是本文的分析又不同于前面五篇文章,因为本文是通过从上到下来分析,将分析流程反过来。
1.首先找到系统设置的源码。
路径:AndroidSorceCode2.3/package/app/Settings/src/com/android/settings/deviceinfo/Memory.java
该文件其实就是我们打开系统设置-存储的一个界面,如下图:
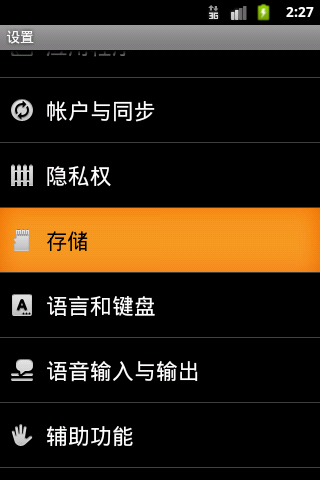
在设置中点击存储便进入到Memory的界面,如下:

如果已经插入SD卡并且系统已经挂载了的话,这里会有显示。也就是说我们的最终目标在这里,SD卡的挂载信息是如何传递到这里的。我们继续回到Memory.java文件中。我们要如何知道一步该做什么呢?我们先在Eclipse中的logcat添加TAG名为Memory的TAG,然后插入SD卡,我们会发现有以下log输出:

这就是我们需要的关键点,因为这句log是从Memory.java中输出的,因此我们首先要找到该log的出处:
- <span style="font-size:18px;"> StorageEventListener mStorageListener = new StorageEventListener() {
- @Override
- public void onStorageStateChanged(String path, String oldState, String newState) {
- Log.i(TAG, "Received storage state changed notification that " +
- path + " changed state from " + oldState +
- " to " + newState);
- updateMemoryStatus();
- }
- };</span>
从以上代码中可以知道,这里就是输出关键log的地方,换句话说当我们插入SD卡的时候,系统触发这个onStroageStateChanged()方法,在该方法中一并执行了updateMemoryStatus()方法,我们跟踪进入updateMemoryStatus()方法看看,根据这名字我们大致可以猜测其作用是更新存储设备的状态信息:
- <span style="font-size:18px;"> private void updateMemoryStatus() {
- String status = Environment.getExternalStorageState();
- String readOnly = "";
- if (status.equals(Environment.MEDIA_MOUNTED_READ_ONLY)) {
- status = Environment.MEDIA_MOUNTED;
- readOnly = mRes.getString(R.string.read_only);
- }
- if (status.equals(Environment.MEDIA_MOUNTED)) {
- if (!Environment.isExternalStorageRemovable()) {
- // This device has built-in storage that is not removable.
- // There is no reason for the user to unmount it.
- if (mSdMountToggleAdded) {
- mSdMountPreferenceGroup.removePreference(mSdMountToggle);
- mSdMountToggleAdded = false;
- }
- }
- try {
- File path = Environment.getExternalStorageDirectory();
- StatFs stat = new StatFs(path.getPath());
- long blockSize = stat.getBlockSize();
- long totalBlocks = stat.getBlockCount();
- long availableBlocks = stat.getAvailableBlocks();
- mSdSize.setSummary(formatSize(totalBlocks * blockSize));
- mSdAvail.setSummary(formatSize(availableBlocks * blockSize) + readOnly);
- mSdMountToggle.setEnabled(true);
- mSdMountToggle.setTitle(mRes.getString(R.string.sd_eject));
- mSdMountToggle.setSummary(mRes.getString(R.string.sd_eject_summary));
- } catch (IllegalArgumentException e) {
- // this can occur if the SD card is removed, but we haven't received the
- // ACTION_MEDIA_REMOVED Intent yet.
- status = Environment.MEDIA_REMOVED;
- }
- } else {
- mSdSize.setSummary(mRes.getString(R.string.sd_unavailable));
- mSdAvail.setSummary(mRes.getString(R.string.sd_unavailable));
- if (!Environment.isExternalStorageRemovable()) {
- if (status.equals(Environment.MEDIA_UNMOUNTED)) {
- if (!mSdMountToggleAdded) {
- mSdMountPreferenceGroup.addPreference(mSdMountToggle);
- mSdMountToggleAdded = true;
- }
- }
- }
- if (status.equals(Environment.MEDIA_UNMOUNTED) ||
- status.equals(Environment.MEDIA_NOFS) ||
- status.equals(Environment.MEDIA_UNMOUNTABLE) ) {
- mSdMountToggle.setEnabled(true);
- mSdMountToggle.setTitle(mRes.getString(R.string.sd_mount));
- mSdMountToggle.setSummary(mRes.getString(R.string.sd_mount_summary));
- } else {
- mSdMountToggle.setEnabled(false);
- mSdMountToggle.setTitle(mRes.getString(R.string.sd_mount));
- mSdMountToggle.setSummary(mRes.getString(R.string.sd_insert_summary));
- }
- }
- File path = Environment.getDataDirectory();
- StatFs stat = new StatFs(path.getPath());
- long blockSize = stat.getBlockSize();
- long availableBlocks = stat.getAvailableBlocks();
- findPreference("memory_internal_avail").setSummary(formatSize(availableBlocks * blockSize));
- }</span>
果然不出我们所料,这里也就是真正更新设置-存储界面里面信息的方法。
2.跟着源码中的Memory.java顺藤摸瓜
我们回到StorageEventListener实例化对象的地方:
- <span style="font-size:18px;"> StorageEventListener mStorageListener = new StorageEventListener() {
- @Override
- public void onStorageStateChanged(String path, String oldState, String newState) {
- Log.i(TAG, "Received storage state changed notification that " +
- path + " changed state from " + oldState +
- " to " + newState);
- updateMemoryStatus();
- }
- };</span>
通过代码我们可以知道,StorageEventListener是一个抽象类,在这里通过实例化自己的对象并用匿名内部类实现了自己定义中的抽象方法。我接着回到Memory.java中的onCreate()方法中:
- <span style="font-size:18px;"> if (mStorageManager == null) {
- mStorageManager = (StorageManager) getSystemService(Context.STORAGE_SERVICE);
- mStorageManager.registerListener(mStorageListener);
- }</span>
在这里我们可以看到,StorageEventListener的对象mStorageListener通过StorageManager的方法registerListener()完成注册。这里我们需要详细了解一下这个注册的过程,因为这里所谓的注册就为后面的触发埋下了伏笔,注册存储事件监听器(StorageEventListener)的目的就是为了在存储设备状态发生改变并触发事件的时候,接收并处理这些事件。
(1).mStorageManager初始化
- <span style="font-size:18px;">mStorageManager = (StorageManager) getSystemService(Context.STORAGE_SERVICE);</span>
我直接跟踪getSystemService()方法,首先会跳转到Activity.java中的getSystemService()方法中:
- <span style="font-size:18px;"> @Override
- public Object getSystemService(String name) {
- if (getBaseContext() == null) {
- throw new IllegalStateException(
- "System services not available to Activities before onCreate()");
- }
- if (WINDOW_SERVICE.equals(name)) {
- return mWindowManager;
- } else if (SEARCH_SERVICE.equals(name)) {
- ensureSearchManager();
- return mSearchManager;
- }
- return super.getSystemService(name);
- }</span>
这里因为不满足if的判断条件,因此会返回调用父类的getSystemService方法。接下来继续跟踪到其父类中的getSystemService方法中查看,这里的Activity继承了ContextThemeWrapper这个类:
- <span style="font-size:18px;"> @Override public Object getSystemService(String name) {
- if (LAYOUT_INFLATER_SERVICE.equals(name)) {
- if (mInflater == null) {
- mInflater = LayoutInflater.from(mBase).cloneInContext(this);
- }
- return mInflater;
- }
- return mBase.getSystemService(name);
- }</span>
根据if的判断条件来看,这里还是不会满足判断条件。如果这里我们继续点击getSystemService()方法去跟踪的话我们会发现,我们来到了一个抽象类Context类中。该类中的getSystemService()方法也是一个抽象方法,那么到这里我们已经无法分析了吗?非也非也。如果细心的话我们会发现这里的getSystemService()方法前面有一个mBase对象,该对象是Context的,因为抽象类不可能有自己的实例化对象,因此根据多态性可以知道,这里的mBase肯定是其子类的对象,因此我们需要找到该子类。
(2)getSystemService()峰回路转
我们首先看看这个mBase的定义,直接跳转过去可以看到:
- <span style="font-size:18px;"> private Context mBase;
- ...
- public ContextThemeWrapper(Context base, int themeres) {
- super(base);
- mBase = base;
- mThemeResource = themeres;
- }
- @Override protected void attachBaseContext(Context newBase) {
- super.attachBaseContext(newBase);
- mBase = newBase;
- }</span>
这里只截取了其中部分,但我已经可以看到给mBase赋值的地方有两处,这里该怎么断定呢?按照常理我们先去跟踪ContextThemeWrapper构造方法的调用处,直接在Eclipse对该方法点击右键,选择Open Call Hierarchy,这样就会出现调用该方法的地方,这样一步步跟踪下去似乎越来越乱,因为调转点实在是太多了,因此先就此打住。我们回过头先查看这里的attachBaseContext方法,通过同样的方法(因为自己也是第一次分析,很多东西都不懂,只能自己摸着石头过河,高手请勿见笑)。我们直接跳转会来到Activity中的attach()方法中:
- <span style="font-size:18px;"> final void attach(Context context, ActivityThread aThread,
- Instrumentation instr, IBinder token, int ident,
- Application application, Intent intent, ActivityInfo info,
- CharSequence title, Activity parent, String id,
- Object lastNonConfigurationInstance,
- HashMap<String,Object> lastNonConfigurationChildInstances,
- Configuration config) {
- attachBaseContext(context);//这里调用</span>
这里截取了部分代码,只抓取了我们需要的部分,这里发现如果调用了attach()方法的话会传递一个Context的对象,那么我们继续跟踪,在Activity的performLaunchActivity方法中我们发现了attach()方法的调用处:
- <span style="font-size:18px;">activity.attach(appContext, this, getInstrumentation(), r.token,
- r.ident, app, r.intent, r.activityInfo, title, r.parent,
- r.embeddedID, r.lastNonConfigurationInstance,
- r.lastNonConfigurationChildInstances, config);</span>
通过以上代码我们可以发现这里传递了一个appContext参数,跟踪此参数,可以看到:
- <span style="font-size:18px;">ContextImpl appContext = new ContextImpl();</span>
原来是ContextImpl的对象,原来应该传入的对象是Context的,这里传入的却是ContextImpl的对象,因此不用想我们也知道,ContextImpl肯定是Context的子类,跟踪过去一看,果不其然:
- <span style="font-size:18px;">class ContextImpl extends Context</span>
既然ContextImpl继承了Context类,并将自己的对象作为参数传递进去,那么前面的mBase对象就应该是ContextImpl的对象,因此调用的getSystemService()方法也应该在ContextImpl类中有覆写。直接搜索可以找到:
- <span style="font-size:18px;"> @Override
- public Object getSystemService(String name) {
- if (WINDOW_SERVICE.equals(name)) {
- return WindowManagerImpl.getDefault();
- } else if (LAYOUT_INFLATER_SERVICE.equals(name)) {
- synchronized (mSync) {
- LayoutInflater inflater = mLayoutInflater;
- if (inflater != null) {
- return inflater;
- }
- mLayoutInflater = inflater =
- PolicyManager.makeNewLayoutInflater(getOuterContext());
- return inflater;
- }
- } else if (SENSOR_SERVICE.equals(name)) {
- return getSensorManager();
- ......
- } else if (STORAGE_SERVICE.equals(name)) {
- return getStorageManager();//这里是我们所需要的
- } else if (USB_SERVICE.equals(name)) {
- return getUsbManager();
- } else if (VIBRATOR_SERVICE.equals(name)) {
- return getVibrator();
- }
- ......
- return null;
- }</span>
原来,我们梦里寻她千百度,蓦然回首,getSystemService()竟然藏在此处。因为我们在Memory.java中传递过来的是STORAGE_SERVICE,因此这里会执行getStorageManager()方法。
(3).继续探索getStorageManager()
继续跟踪getStorageManager()方法我们会看到:
- <span style="font-size:18px;"> private StorageManager getStorageManager() {
- synchronized (mSync) {
- if (mStorageManager == null) {
- try {
- mStorageManager = new StorageManager(mMainThread.getHandler().getLooper());
- } catch (RemoteException rex) {
- Log.e(TAG, "Failed to create StorageManager", rex);
- mStorageManager = null;
- }
- }
- }
- return mStorageManager;
- }</span>
通过该方法可以看到,返回的是一个StorageManager对象。但我们需要关注的是StorageManager(mMainThread.getHandler().getLooper())在这个方法中传递的参数是ActivityThread的handler中的looper。继续跟踪此方法就可以来到StorageManager的带参构造函数:
- <span style="font-size:18px;"> public StorageManager(Looper tgtLooper) throws RemoteException {
- mMountService = IMountService.Stub.asInterface(ServiceManager.getService("mount"));
- if (mMountService == null) {
- Log.e(TAG, "Unable to connect to mount service! - is it running yet?");
- return;
- }
- mTgtLooper = tgtLooper;
- mBinderListener = new MountServiceBinderListener();
- mMountService.registerListener(mBinderListener);
- }</span>
在该方法中,首先初始化了IMountService的对象,因为目前自己对Binder这一块还不是很熟悉,因此只能凭借自己的理解来分析。我们先去看看ServiceManager.getService("mount")方法:
- <span style="font-size:18px;"> public static IBinder getService(String name) {
- try {
- IBinder service = sCache.get(name);
- if (service != null) {
- return service;
- } else {
- return getIServiceManager().getService(name);
- }
- } catch (RemoteException e) {
- Log.e(TAG, "error in getService", e);
- }
- return null;
- }</span>
“该方法将返回一个服务的引用,这个服务的名称就是我们传递进去的参数名称。如果这个服务不存在的话将返回null。”源码注释里面是这么说的,但我们就从代码中可以知道,实际上返回的是一个IBinder的对象。
接着调用回到StorageManager的构造函数中的IMountService.Stub.asInterface()方法:
- <span style="font-size:18px;"> public static IMountService asInterface(IBinder obj) {
- if (obj == null) {
- return null;
- }
- IInterface iin = obj.queryLocalInterface(DESCRIPTOR);
- if (iin != null && iin instanceof IMountService) {
- return (IMountService) iin;
- }
- return new IMountService.Stub.Proxy(obj);
- }</span>
“该方法将一个IBinder对象转换成一个IMountService接口,如果必要的话将通过代理来实现”,这里所说的代理指的是Proxy()方法。
这里又需要跳转到obj.queryLocaIInterface()方法中(PS:大家不要觉得枯燥,作为一个新手很多东西我也是第一次接触因此可能会走很多弯路,但过程还是很精彩的):
- <span style="font-size:18px;">public IInterface queryLocalInterface(String descriptor);</span>
很明显,这是一个在IBinder中的接口,因为Binder类实现了IBinder接口,因此我们直接去Binder类中查找该方法:
- <span style="font-size:18px;"> public IInterface queryLocalInterface(String descriptor) {
- if (mDescriptor.equals(descriptor)) {
- return mOwner;
- }
- return null;
- }</span>
以上方法的作用是,根据传入的描述符返回一个IInterface的mOwner对象,该mOwner对象在Binder类中有方法带参数传递如下:
- <span style="font-size:18px;"> public void attachInterface(IInterface owner, String descriptor) {
- mOwner = owner;
- mDescriptor = descriptor;
- }</span>
分析到这一步,我相信大家都头都晕了吧(不管你晕不晕,我反正是晕了,休息休息...)。
*************************************************分割线*********************************************************
休息好了,我们继续分析吧。
因为IInterface实际上也是一个接口,因此不可能实例化对象来传递,所以这里我们也不用想,只要找到其子类那么传递的对象就是其子类实例化的对象。但是要怎么找呢?我们这里的descriptor是“IMountService”因此我们可以在IMountService.java中寻找线索:
- <span style="font-size:18px;">public interface IMountService extends IInterface {
- /** Local-side IPC implementation stub class. */
- public static abstract class Stub extends Binder implements IMountService {
- private static class Proxy implements IMountService {
- private IBinder mRemote;
- Proxy(IBinder remote) {
- mRemote = remote;
- }
- ...省略
- /** Construct the stub at attach it to the interface. */
- public Stub() {
- attachInterface(this, DESCRIPTOR);
- }
- ...省略</span>
这里可以看到IMountService继承了IInterface并且其内部类Stub还继承了Binder并实现了IMountService。(这里会涉及到了Android中的AIDL即Android Interface Defenition Language的知识,关于AIDL我会在博客中另起文章介绍并结合源码分析。
虽然通过以上代码的分析,但似乎已经是死胡同了,那么接下来该肿么办呢?
(4).切莫误入歧途
我们回到StorageManager的带参构造函数中(别忘了我们从这里开始分支的):
- <span style="font-size:18px;"> public StorageManager(Looper tgtLooper) throws RemoteException {
- mMountService = IMountService.Stub.asInterface(ServiceManager.getService("mount"));
- if (mMountService == null) {
- Log.e(TAG, "Unable to connect to mount service! - is it running yet?");
- return;
- }
- mTgtLooper = tgtLooper;
- mBinderListener = new MountServiceBinderListener();
- mMountService.registerListener(mBinderListener);
- }</span>