前言:
我们知道CI里面是不提倡使用模板引擎的,说是为了执行效率,但大多项目中,我们还是为了灵活性和使用的习惯性,加入Smarty。那么如何加入呢?很简单。
步骤:
1.下载codeignier最新的稳定版(本人是用的2.1.0),解压缩到apache的运行目录里面,可以删除user_guide帮助文件夹和license.txt记事本文件。
2.下载smarty最新的稳定版(本人是用的3.1.8),把smarty解压缩以后把libs文件夹改名为smarty放到在codeignier的application文件夹里的libraries文件夹里,
在 libraries文件夹中新建php文件命名为Smarty.php,文件配置内容如下(可根据需要自己更改,已加备注):
if (!defined('BASEPATH')) exit('No direct script access allowed');
require_once('smarty/Smarty.class.php');
class CI_Smarty extends Smarty{
        function __construct() {
                parent::__construct();
                $this->template_dir =  APPPATH."views"; //模板存放目录,本人直接用的是CI的views目录,当然可以用templates也行。
                $this->compile_dir = APPPATH."templates_c"; //编译目录,在application下需要新建此目录
                $this->cache_dir = APPPATH."cache";//缓存目录。
                $this->caching = 0;
                //$this->cache_lifetime = 120; //缓存更新时间
                $this->debugging = true;
                $this->compile_check = true; //检查当前的模板是否自上次编译后被更改;如果被更改了,它将重新编译该模板。
                //$this->force_compile = true; //强制重新编译模板
                //$this->allow_php_templates= true; //开启PHP模板
                $this->left_delimiter = "{"; //左定界符
                $this->right_delimiter = "}"; //右定界符
                $this->smarty->assign('base_url', base_url()); ////非常重要,静态页面的css以及js路径
       }
}
/* End of file Smarty.php */
/* Location: ./application/libraries/Smarty.php */
3. 新建默认控制器Home,在默认Home控制器里输入如下代码:
if ( ! defined('BASEPATH')) exit('No direct script access allowed');
class Home extends CI_Controller {
        function __construct()
        {
                parent::__construct();
        }
        function index()
        {
                $this->load->library('smarty');
                $this->smarty->assign("title","恭喜你smarty安装成功!");
                $this->smarty->assign("body","欢迎使用smarty模板引擎");
                $arr = array(1=>'zhang',2=>'xing',3=>'wang');
                $this->smarty->assign("myarray",$arr);
                $this->smarty->display('index_2.html');
        }
}
/* End of file home.php */
/* Location: ./application/controllers/home.php */
4.在views模板文件夹里新建文件index_2.html输入如下代码:
<!DOCTYPE html PUBLIC "-//W3C//DTD XHTML 1.0 Transitional//EN" "http://www.w3.org/TR/xhtml1/DTD/xhtml1-transitional.dtd">
<html xmlns="http://www.w3.org/1999/xhtml">
<head>
 <meta http-equiv="Content-Type" content="text/html; charset=utf-8" />
 <script src='<!--{$base_url}-->js/jquery.min.js' type='text/javascript' ></script>
 <link href="<!--{$base_url}-->css/login.css" rel="stylesheet" type="text/css" />
 <title>smarty安装测试</title>
</head>
<body>
<h1>{$title}</h1>
<p>{$body}</p>
<ul>
        {foreach from=$myarray item=v}
        <li>{$v}</li>
       {/foreach}
</ul>
</body>
</html>
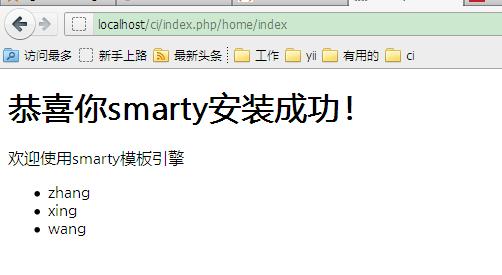
5.打开浏览器输入:http://localhost/ci/index.php/home/index 出现以下,恭喜,成功!

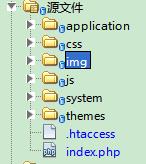
6.附上结构图
