-
怎么用旋转关节(rotation joints)
-
怎么用连接关节(weld joints)
-
怎么让视角跟随抛射物
-
怎么根据碰撞检测判断力量来消除敌人
-
和很多其他的

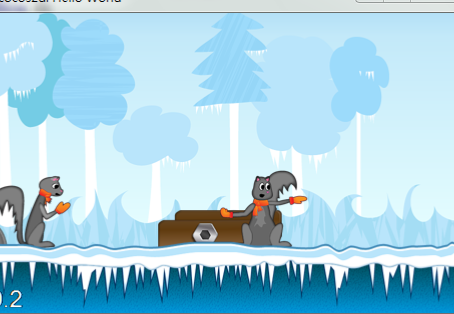
CCSprite *sprite = CCSprite::spriteWithFile("bg.png"); //背景图
sprite->setAnchorPoint(CCPointZero);
this->addChild(sprite, -1);
CCSprite *sprite = CCSprite::spriteWithFile("catapult_base_2.png"); //投射器底部后面那块
sprite->setAnchorPoint(CCPointZero);
sprite->setPosition(CCPointMake(181.0, FLOOR_HEIGHT));
this->addChild(sprite, 0);
sprite = CCSprite::spriteWithFile("squirrel_1.png"); //左边松鼠
sprite->setAnchorPoint(CCPointZero);
sprite->setPosition(CCPointMake(11.0, FLOOR_HEIGHT));
this->addChild(sprite, 0);
sprite = CCSprite::spriteWithFile("catapult_base_1.png"); //投射器底部前面那块
sprite->setAnchorPoint(CCPointZero);
sprite->setPosition(CCPointMake(181.0, FLOOR_HEIGHT));
this->addChild(sprite, 9);
sprite = CCSprite::spriteWithFile("squirrel_2.png"); //右边松鼠
sprite->setAnchorPoint(CCPointZero);
sprite->setPosition(CCPointMake(240.0, FLOOR_HEIGHT));
this->addChild(sprite, 9);
sprite = CCSprite::spriteWithFile("fg.png"); //带冰的地面
sprite->setAnchorPoint(CCPointZero);
this->addChild(sprite, 10);
#define FLOOR_HEIGHT 62.0f
private:
b2World* m_world;
b2Body* m_groundBody;
b2Vec2 gravity;
gravity.Set(0.0f, -10.0f);
bool doSleep = true;
m_world = new b2World(gravity);
m_world->SetAllowSleeping(doSleep);
m_world->SetContinuousPhysics(true);
// Define the ground body.
b2BodyDef groundBodyDef;
groundBodyDef.position.Set(0, 0); // bottom-left corner
// Call the body factory which allocates memory for the ground body
// from a pool and creates the ground box shape (also from a pool).
// The body is also added to the world.
m_groundBody = m_world->CreateBody(&groundBodyDef);
b2EdgeShape groundBox;
// bottom
groundBox.Set(b2Vec2(0,FLOOR_HEIGHT/PTM_RATIO), b2Vec2(screenSize.width*2.0f/PTM_RATIO,FLOOR_HEIGHT/PTM_RATIO));
m_groundBody->CreateFixture(&groundBox, 0);
// top
groundBox.Set(b2Vec2(0,screenSize.height/PTM_RATIO), b2Vec2(screenSize.width*2.0f/PTM_RATIO,screenSize.height/PTM_RATIO));
m_groundBody->CreateFixture(&groundBox, 0);
// left
groundBox.Set(b2Vec2(0,screenSize.height/PTM_RATIO), b2Vec2(0,0));
m_groundBody->CreateFixture(&groundBox, 0);
// right
groundBox.Set(b2Vec2(screenSize.width*1.5f/PTM_RATIO,screenSize.height/PTM_RATIO), b2Vec2(screenSize.width*1.5f/PTM_RATIO,0));
m_groundBody->CreateFixture(&groundBox, 0);
private:
b2Fixture *m_armFixture;
b2Body *m_armBody;
// Create the catapult's arm
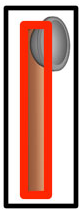
CCSprite *arm = CCSprite::spriteWithFile("catapult_arm.png");
this->addChild(arm, 1);
b2BodyDef armBodyDef;
armBodyDef.type = b2_dynamicBody;
armBodyDef.linearDamping = 1;
armBodyDef.angularDamping = 1;
armBodyDef.position.Set(230.0f/PTM_RATIO, (FLOOR_HEIGHT+91.0f)/PTM_RATIO);
armBodyDef.userData = arm;
m_armBody = m_world->CreateBody(&armBodyDef);
b2PolygonShape armBox;
b2FixtureDef armBoxDef;
armBoxDef.shape = &armBox;
armBoxDef.density = 0.3F;
armBox.SetAsBox(11.0f/PTM_RATIO, 91.0f/PTM_RATIO);
m_armFixture = m_armBody->CreateFixture(&armBoxDef);
void tick(cocos2d::ccTime dt);
void HelloWorld::tick(ccTime dt)
{
int velocityIterations = 8;
int positionIterations = 1;
m_world->Step(dt, velocityIterations, positionIterations);
//Iterate over the bodies in the physics world
for (b2Body* b = m_world->GetBodyList(); b; b = b->GetNext())
{
if (b->GetUserData() != NULL) {
//Synchronize the AtlasSprites position and rotation with the corresponding body
CCSprite* myActor = (CCSprite*)b->GetUserData();
myActor->setPosition( CCPointMake( b->GetPosition().x * PTM_RATIO, b->GetPosition().y * PTM_RATIO) );
myActor->setRotation( -1 * CC_RADIANS_TO_DEGREES(b->GetAngle()) );
}
}
}
schedule(schedule_selector(Catapult::tick));
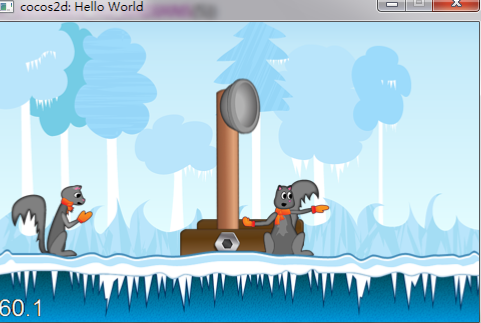
b2RevoluteJoint *m_armJoint;
b2RevoluteJointDef armJointDef;
armJointDef.Initialize(m_groundBody, m_armBody, b2Vec2(233.0f/PTM_RATIO, FLOOR_HEIGHT/PTM_RATIO));
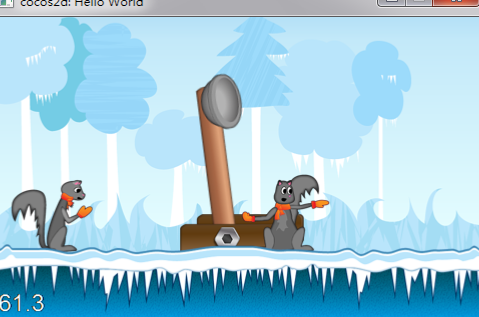
armJointDef.enableMotor = true;
armJointDef.enableLimit = true;
armJointDef.motorSpeed = -10; //-1260;
armJointDef.lowerAngle = CC_DEGREES_TO_RADIANS(9);
armJointDef.upperAngle = CC_DEGREES_TO_RADIANS(75);
armJointDef.maxMotorTorque = 700;
m_armJoint = (b2RevoluteJoint*)m_world->CreateJoint(&armJointDef);
private:
b2MouseJoint *m_mouseJoint;
public:
virtualvoid ccTouchesBegan(cocos2d::CCSet* touches, cocos2d::CCEvent* event);
virtualvoid ccTouchesMoved(cocos2d::CCSet* touches, cocos2d::CCEvent* event);
virtualvoid ccTouchesEnded(cocos2d::CCSet* touches, cocos2d::CCEvent* event);
void Catapult::ccTouchesBegan(cocos2d::CCSet* touches, cocos2d::CCEvent* event)


{


if (m_mouseJoint != NULL)   {       return;     }


    CCTouch *touch = (CCTouch *)touches->anyObject();


    CCPoint location = touch->locationInView(touch->view());


    location = CCDirector::sharedDirector()->convertToGL(location);


    b2Vec2 locationWorld = b2Vec2(location.x/PTM_RATIO, location.y/PTM_RATIO);


if (locationWorld.x < m_armBody->GetWorldCenter().x + 150.0/PTM_RATIO)


    {


        b2MouseJointDef md;


        md.bodyA = m_groundBody;


        md.bodyB = m_armBody;


        md.target = locationWorld;


        md.maxForce = 2000;


        m_mouseJoint = (b2MouseJoint *)m_world->CreateJoint(&md);