免费的存储服务器软件有FreeNAS 和 Openfiler。 其中Freenas的网站上只有i386及amd64的版本,也就是说Freenas不能支持64位版本的Intel CPU,而Openfiler则提供更全面的版本支持,在其网站上可以看到支持多网卡、多CPU,以及硬件Raid的支持,还有10Gb网卡的支持。
Freenas 官网地址:http://freenas.org/doku.php
Openfiler 官网:http://www.openfiler.com/
Openfiler是在rPath Linux基础上开发的,它能够作为一个独立的Linux操作系统发行。Openfiler是一款非常好的存储管理操作系统,开源免费,通过web界面对存储磁盘的管理,支持现在流行的网络存储技术IP-SAN和NAS,支持iSCSI(Internet Small Computer System Interface, 学名ISCSI HBA)、NFS、SMB/CIFS及FTP等协议。
一. 安装openfiler
先下载一个Openfiler 软件,然后安装到我们的虚拟机上。 Openfiler是基于Linux的存储平台,安装过程和安装一般的Linux系统一样。
下载地址:http://www.openfiler.com/community/download/
安装的第一个界面:

这里有一个磁盘的配置。 我选择了手动配置。 我给openfiler 是40g 的磁盘空间。 系统占2G,交换区1G。 剩下的空间没有分配。
安装完成之后的界面如下:
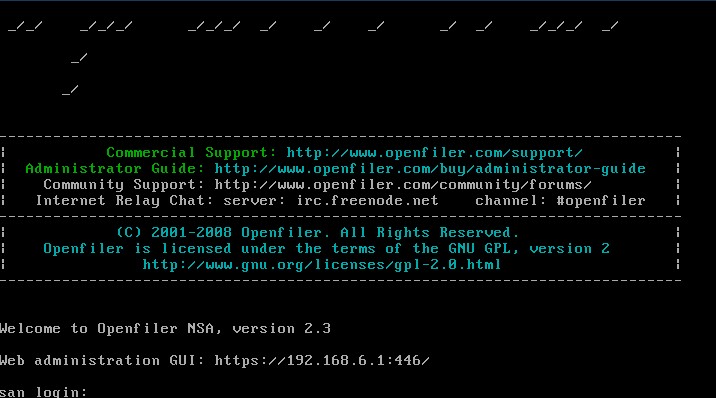
在这里有提示我们通过web进行访问。 并且提示了访问的地址:
Https://192.168.1.1:446/. 默认账户是openfiler密码为password. 我们登陆之后可以修改用户的密码。
二. 存储端(target)配置
Openfiler 的配置,可以参考Oracle 的这遍文档:
http://www.oracle.com/technology/global/cn/pub/articles/hunter_rac10gr2_iscsi.html#9
http://www.oracle.com/technetwork/cn/articles/hunter-rac11gr2-iscsi-083834-zhs.html#11
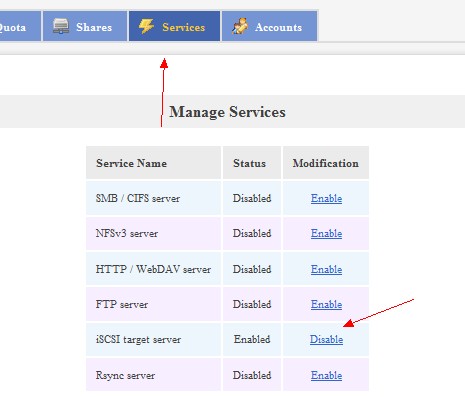
2.1 启动iscsi target 服务
在Service 里面启动iscsi target。 启动之后,下次重启会自动启该服务。
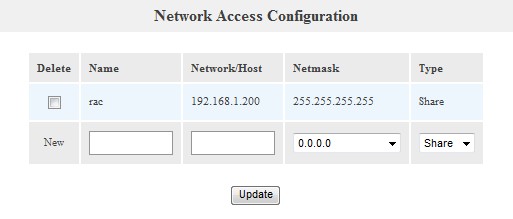
2.2 配置iscsi initiator 访问IP
只有配置了IP 才有权限访问openfiler 存储。在system 选项的最下面有配置选项,把IP 写上即可。 注意这里的子网掩码,写的是255.255.255.255
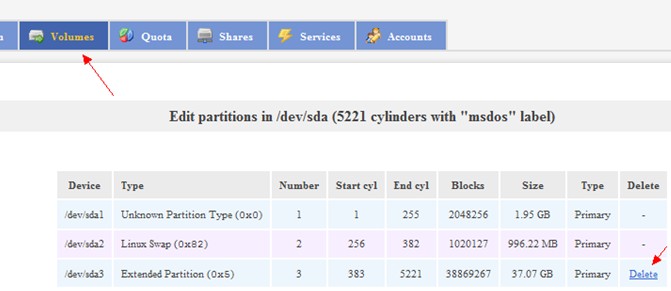
2.3 创建卷设备
现在我们来配置共享设备。 先对我们没有格式的分区格式化成扩展分区,一定要扩展分区:
[root@san ~]# fdisk /dev/sda
The number of cylinders for this disk is set to 5221.
There is nothing wrong with that, but this is larger than 1024,
and could in certain setups cause problems with:
1) software that runs at boot time (e.g., old versions of LILO)
2) booting and partitioning software from other OSs
(e.g., DOS FDISK, OS/2 FDISK)
Command (m for help): n
Command action
e extended
p primary partition (1-4)
e
Partition number (1-4): 3
First cylinder (383-5221, default 383):
Using default value 383
Last cylinder or +size or +sizeM or +sizeK (383-5221, default 5221):
Using default value 5221
Command (m for help): w
The partition table has been altered!
Calling ioctl() to re-read partition table.
WARNING: Re-reading the partition table failed with error 16: Device or resource busy.
The kernel still uses the old table.
The new table will be used at the next reboot.
Syncing disks.
[root@san ~]# fdisk -l
Disk /dev/sda: 42.9 GB, 42949672960 bytes
255 heads, 63 sectors/track, 5221 cylinders
Units = cylinders of 16065 * 512 = 8225280 bytes
Device Boot Start End Blocks Id System
/dev/sda1 * 1 255 2048256 83 Linux
/dev/sda2 256 382 1020127+ 82 Linux swap / Solaris
/dev/sda3 383 5221 38869267+ 5 Extended
格式化之后,我们在openfiler的网页中就能看到这个磁盘信息,如果不格式化,或者格式化错误,是无法编辑的。
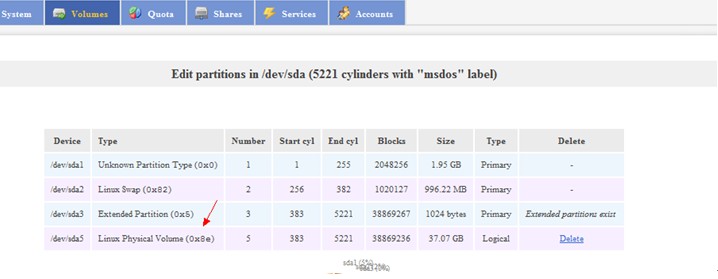
页面网下拉,我们能看到创建分区:

把所有空间全部创建成一个分区,这个就是一个卷。 之后窗口会显示:
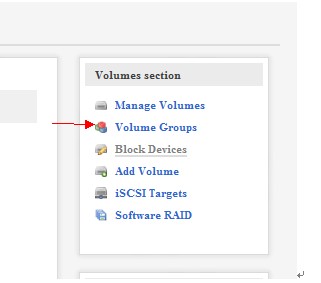
创建完成后, 选择volume Groups。
然后输入vg名称和对应的设备,确定即可。
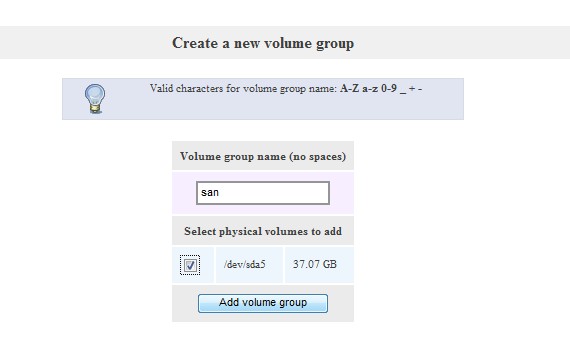
至此,我们已经创建完成了一个叫san的卷组。 但是我们在环境中使用的是卷。 所以我们还需要在这个卷组里创建它的卷。
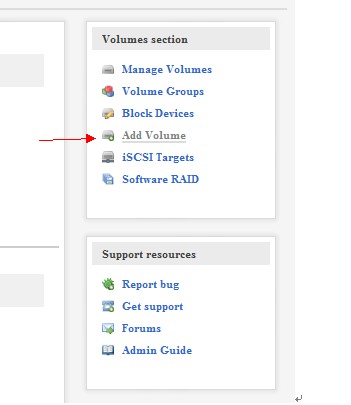
点击旁边的add volume选项:
在这个页面往下拉,我们可以看到创建卷的选项:
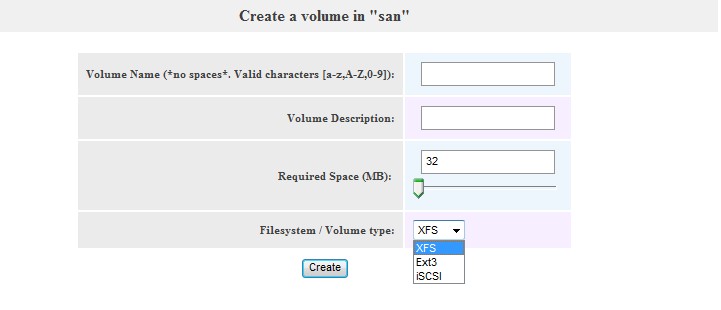
这里我把所有的空间都创建到一个逻辑卷里。

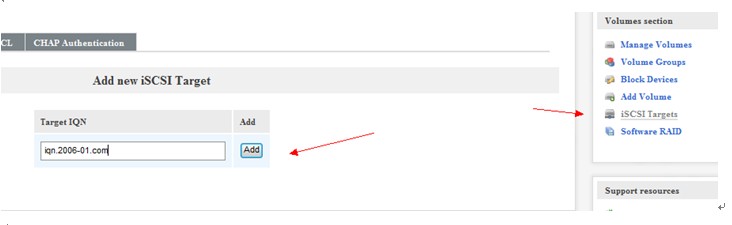
逻辑卷创建完成以后,我们需要创建一个iscsi target, 然后把逻辑卷和这个target 映射起来,这样就可以通过这个target 与服务器进行连接。 点机iSCSI Target,创建Target IQN:
选择LUN Mapping, 将ISCSI 和 逻辑卷对应起来

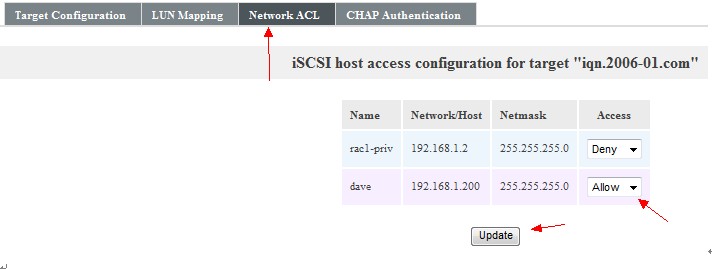
配置能够访问逻辑卷的Network ACL 权限,这个ip 是在system 的选项里设置的。 这个之前已经配置过。 这里可以设置多个IP, 可以控制哪个IP 允许访问哪个逻辑卷。从而可以多个用户同时使用存储而互不影响。
至此, 存储的服务端已经配置完成。 在这一步,我们创建了一个逻辑卷然后与ISCSI target 进行了对应。 客户端的服务器就通过这个ISCSI target 进行连接。
Openfiler target的配置文件是: /etc/ietd.conf。
[root@san etc]# cat /etc/ietd.conf
##### WARNING!!! - This configuration file generated by Openfiler. DO NOT MANUALLY EDIT. #####
Target iqn.2006-01.com.san
HeaderDigest None
DataDigest None
MaxConnections 1
InitialR2T Yes
ImmediateData No
MaxRecvDataSegmentLength 131072
MaxXmitDataSegmentLength 131072
MaxBurstLength 262144
FirstBurstLength 262144
DefaultTime2Wait 2
DefaultTime2Retain 20
MaxOutstandingR2T 8
DataPDUInOrder Yes
DataSequenceInOrder Yes
ErrorRecoveryLevel 0
Lun 0 Path=/dev/san/racshare,Type=blockio,ScsiSN=4YMdbG-SGED-jqHA,ScsiId=4YMdbG-SGED-jqHA,IOMode=wt
[root@san etc]#
重启iscsi-target 服务:
#service iscsi-target restart
三. 服务器端(initiator) 配置
iSCSI 客户端可以是提供 iSCSI 支持(驱动程序)的任何系统(Linux、Unix、MS Windows、Apple Mac 等)。
3.1安装 iSCSI(启动器)服务
这个安装包在系统的安装包里。 找到iscsi-initiator-utils-6.2.0.871-0.10.el5.x86_64.rpm包。 安装上。
[root@centos ~]# rpm -Uvh iscsi-initiator-utils-6.2.0.871-0.10.el5.x86_64.rpm
warning: iscsi-initiator-utils-6.2.0.871-0.10.el5.x86_64.rpm: Header V3 DSA signature: NOKEY, key ID e8562897
Preparing... ########################################### [100%]
1:iscsi-initiator-utils ########################################### [100%]
[root@centos ~]# rpm -qa | grep iscsi-initiator-utils
iscsi-initiator-utils-6.2.0.871-0.10.el5
3.2 配置 iSCSI(启动器)服务
刚才已经安装了initiator 包。 现在我们来启动initiator 服务(iscsid),并使其在系统引导时自动启动。在配置 iscsi 服务自动启动,使其在系统启动时自动登录 iSCSI 目标。
[root@centos ~]# service iscsid start
[ OK ]off network shutdown. Starting iSCSI daemon: [ OK ]
[ OK ]
[root@centos ~]# chkconfig iscsid on
[root@centos ~]# chkconfig iscsi on
用iscsiadm命令检查网络存储服务器上的所有可用目标:
[root@centos ~]# iscsiadm -m discovery -t sendtargets -p 192.168.1.1
192.168.1.1:3260,1 iqn.2006-01.com.san
手动登录 iSCSI 目标
[root@centos ~]# iscsiadm -m node -T iqn.2006-01.com.san -p 192.168.1.1 -l
Logging in to [iface: default, target: iqn.2006-01.com, portal: 192.168.1.1,3260]
Login to [iface: default, target: iqn.2006-01.com, portal: 192.168.1.1,3260]: successful
配置自动登录
在计算机引导(或 iSCSI 启动器服务启动/重新启动)时,客户端将自动登录上面列出的每个目标。和上面描述的手动登录过程一样,不过在这里加了2个参数。
[root@centos ~]# iscsiadm -m node -T iqn.2006-01.com.san -p 192.168.1.1 --op update -n node.startup -v automatic
3.3 创建永久性本地 SCSI 设备名称
查看/dev/disk/by-path 文件,来确定文件被映射到了哪个文件上:
[root@centos by-path]# ls /dev/disk/by-path -al
total 0
drwxr-xr-x 2 root root 180 Oct 28 12:48 .
drwxr-xr-x 6 root root 120 Oct 28 05:54 ..
lrwxrwxrwx 1 root root 9 Oct 28 12:48 ip-192.168.1.1:3260-iscsi-iqn.2006-01.com-lun-0 -> ../../sdc
lrwxrwxrwx 1 root root 9 Oct 28 05:54 pci-0000:00:07.1-ide-0:0 -> ../../hdc
lrwxrwxrwx 1 root root 9 Oct 28 05:54 pci-0000:00:10.0-scsi-0:0:0:0 -> ../../sda
lrwxrwxrwx 1 root root 10 Oct 28 05:54 pci-0000:00:10.0-scsi-0:0:0:0-part1 -> ../../sda1
lrwxrwxrwx 1 root root 10 Oct 28 05:54 pci-0000:00:10.0-scsi-0:0:0:0-part2 -> ../../sda2
lrwxrwxrwx 1 root root 9 Oct 28 05:54 pci-0000:00:10.0-scsi-0:0:1:0 -> ../../sdb
lrwxrwxrwx 1 root root 10 Oct 28 05:54 pci-0000:00:10.0-scsi-0:0:1:0-part1 -> ../../sdb1