http://mobiforge.com/developing/story/programming-apple-push-notification-services
One of the key limitations of the iPhone is its constraint on running applications in the background. Because of this, applications cannot keep running in the background when the user switches to another application. So, applications that require a constant state of connectivity (such as social networking applications) will not be able to receive timely updates.
To remedy this limitation, Apple released the Apple Push Notification Service (APNs). The APNs is a service that allows your device to be constantly connected to Apple's push notification server. When you want to send a push notification to an application installed on the users' devices, you (the provider) can contact the APNs so that it can deliver a push message to the particular application installed on the intended device.
In this article, you will learn how to perform the various steps needed to create an iPhone application that uses the APNs.
Generating a Certificate Request
The first step to using the APNs is to generate a certificate request file so that you can use it to request for a development SSL certificate later on.
1. Launch the Keychain Access application in your Mac OS X.
2. Select Keychain Access'Certificate Assistant'Request a Certificate From a Certificate Authority (see Figure 1):
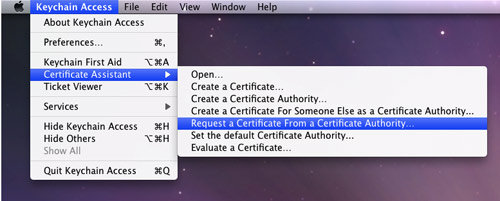
Figure 1. Generating a certificate request
3. Enter the information required and check the Saved to disk option. Click Continue (see Figure 2).
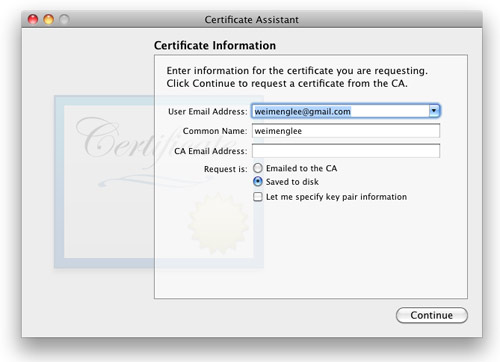
Figure 2. Saving the certificate request to disk
4. Save the certificate request using the suggested name and click Save (see Figure 3): Click Done in the next screen.
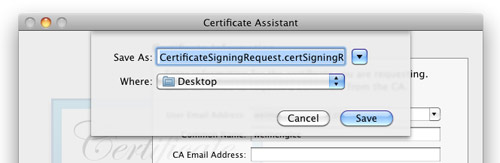
Figure 3. Naming the certificate request
Creating an App ID
Each iPhone applications that uses the APNs must have a unique application ID that uniquely identifies itself. In this step, you will learn how to create an App ID for push notification.
1. Sign in to the iPhone Developer Program at: http://developer.apple.com/iphone/. Click on the iPhone Developer Program Portal on the right of the page (see Figure 4).
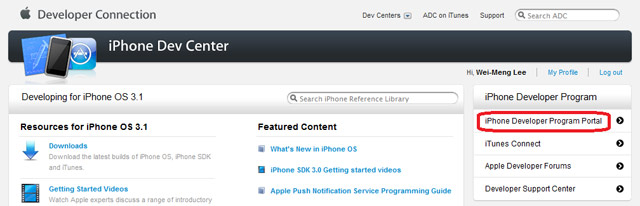
Figure 4. Launching the iPhone Developer Program Portal
2. You should see the welcome page (see Figure 5).

Figure 5. The welcome screen of the iPhone Developer Program Portal
3. Click on the App IDs tab on the left and then click on the New App ID button (see Figure 6).
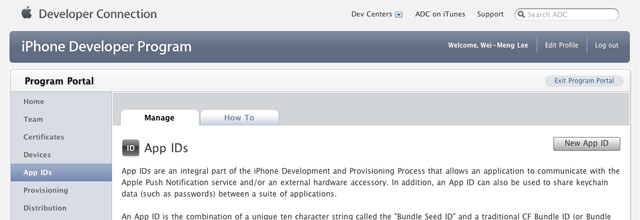
Figure 6. Clicking on the App ID tab
4. Enter "PushAppID" for the Description and select Generate New for the Bundle Seed ID. For the Bundle Identifier, enter net.learn2develop.MyPushApp. Click Submit (see Figure 7).
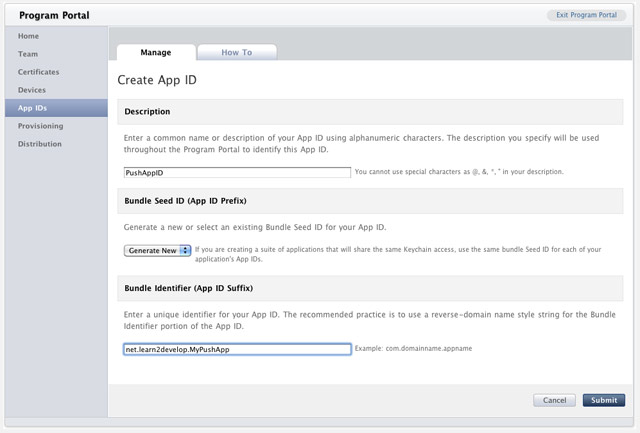
Figure 7. Creating a new App ID
5. You should now see the App ID that you have created (together with those you have previously created) (see Figure 8).

Figure 8. Viewing the newly created App ID
Configuring an App ID for Push Notifications
Once an App ID is created, you need to configure it for push notifications.
1. To configure an App ID for push notification, you need to click the Configure link displayed to the right of the App ID. You will now see the option (see Figure 9).
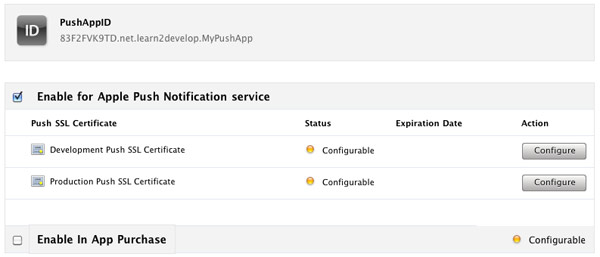
Figure 9. Configuring an App ID for push notification service
Check the Enable for Apple Push Notification service option and click the Configure button displayed to the right of the Development Push SSL Certificate.
2. You will now see the Apple Push Notification service SSL Certificate Assistant screen. Click Continue (see Figure 10).
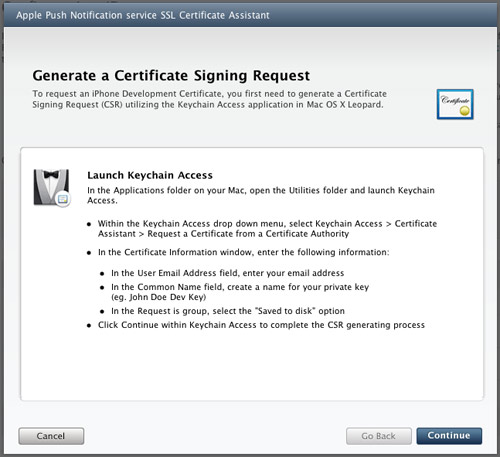
Figure 10. The Apple Push Notification service SSL Certificate Assistant screen
3. Click the Choose File button to locate the Certificate Request file that you have saved earlier. Click Generate (see Figure 11).

Figure 11. Generating the SSL certificate
4. Your SSL Certificate will now be generated. Click Continue (see Figure 12).
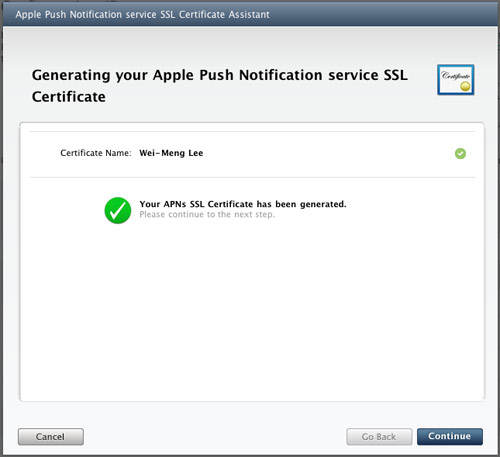
Figure 12. The APNs SSL certificate that is generated
5. Click the Download Now button to download the SSL Certificate. Click Done (see Figure 13).
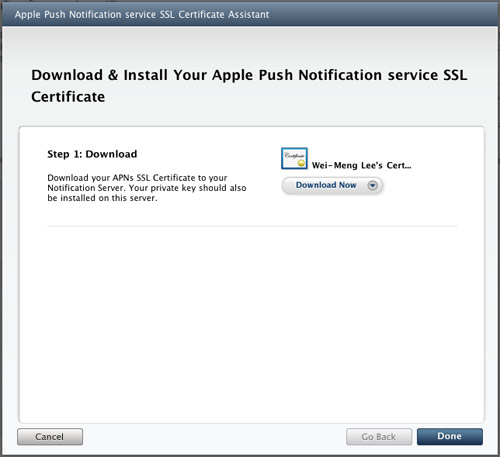
Figure 13. Downloading the certificate generated
6. The SSL Certificate that you download is named aps.developer.identity.cer. Double-click on it to install it in the Keychain Access application (see Figure 14). The SSL certificate will be used by your provider application so that it can contact the APNs to send push notifications to your applications.
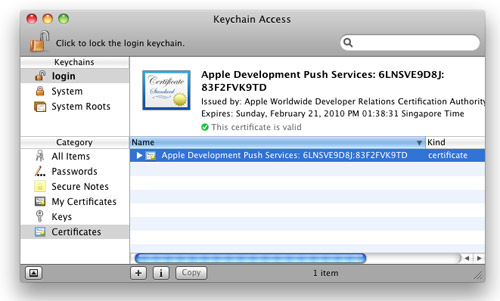
Figure 14. Installing the generated certificate into the Keychain Access application
Creating a Provisioning Profile
The next step is to create a provisioning profile so that your application can be installed onto a real device.
1. Back in the iPhone Development Program Portal, click on the Provisioning tab and click on the New Profile button (see Figure 15).
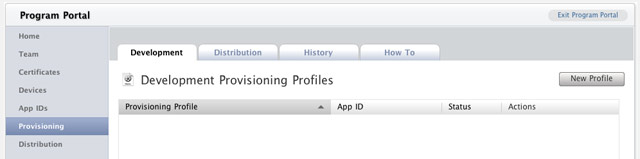
Figure 15. Selecting the Provisioning tab
2. Type in MyDevicesProfile as the profile name. Select PushAppID as the App ID. Finally, check all the devices that you want to provision (you can register these devices with the iPhone Developer Program Portal through the Devices tab). Click Submit (see Figure 16).
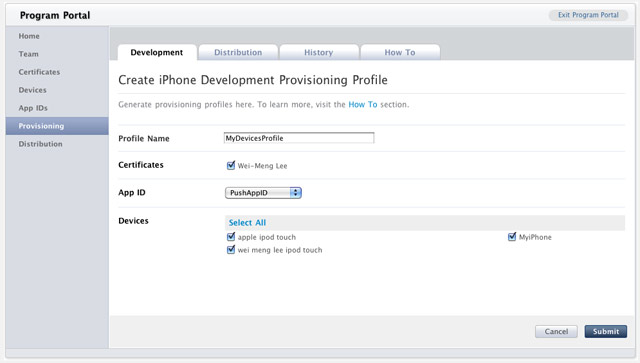
Figure 16. Creating a new provisioning profile
3. The provisioning profile will now be pending approval. After a while, you will see it appear. Click on the Download button to download the provisioning profile (see Figure 17).
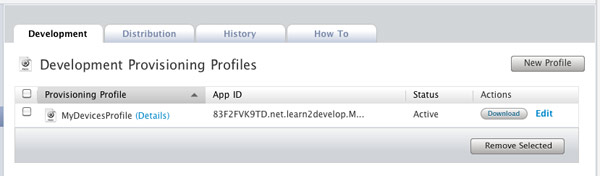
Figure 17. Pending the approval of the provisioning profile
4. The downloaded provisioning profile is named MyDevicesProfile.mobileprovision.
Provisioning a Device
With the provision profile created, you will now install it onto a real device.
1. Connect your iPhone or iPod Touch to your Mac.
2. Drag and drop the downloaded MyDevicesProfile.mobileprovision file onto the Xcode icon on the Dock.
3. Launch the Organizer application from within Xcode and select the device currently connected to your Mac. You should see the MyDevicesProfile installed on the device (see Figure 18).
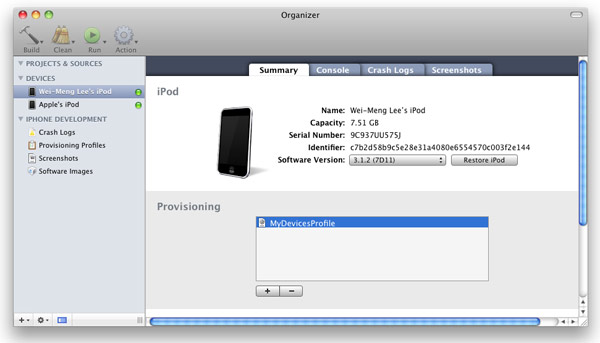
Figure 18. Viewing the installed provisioning profile
Creating the iPhone Application
1. In Xcode, create a new View-Based Application project and name it as ApplePushNotification.
2. Drag and drop a WAV file (shown as beep.wav in this example) onto the Resources folder in Xcode (see Figure 19).
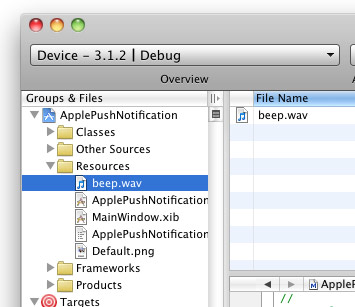
Figure 19. Adding a WAV file to the project
3. Expand on the Targets item in Xcode and select the ApplePushNotification item. Press Command-I. In the Info window, click the Properties tab (see Figure 20).
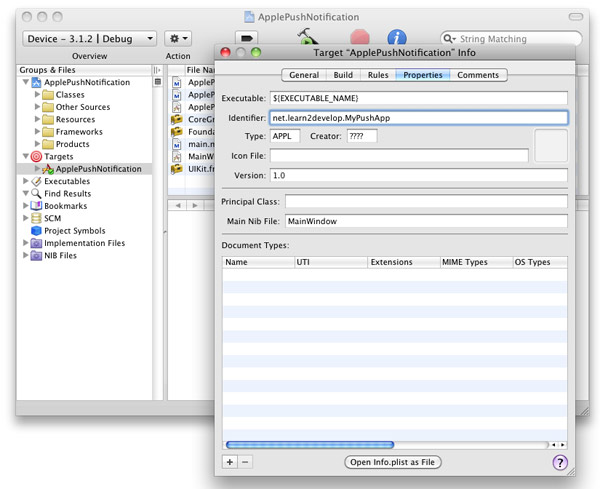
Figure 20. Entering the App ID for the application
In the Identifier textbox, type <net.learn2develop.MyPushApp.
4. Click on the Build tab and type "Code Signing" in the search box. In the Any iPhone OS Device item, select the profile as shown in Figure 21:
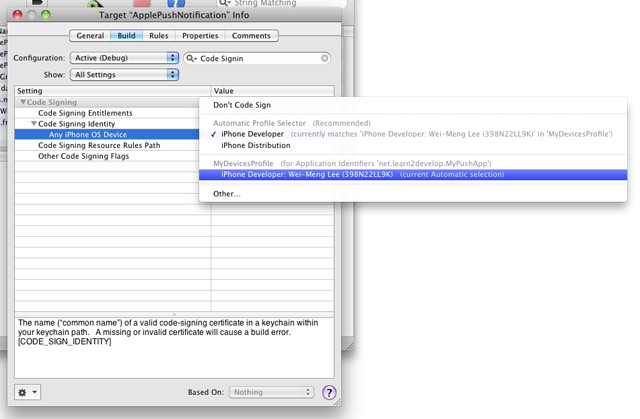
Figure 21. Selecting the profile for code signing
5. In the ApplePushNotificationAppDelegate.m file, type the following code in bold:
#import "ApplePushNotificationAppDelegate.h"
#import "ApplePushNotificationViewController.h"

@implementation ApplePushNotificationAppDelegate

@synthesize window;
@synthesize viewController;

- (void)applicationDidFinishLaunching:(UIApplication *)application {
    [window addSubview:viewController.view];
    [window makeKeyAndVisible];

    NSLog(@"Registering for push notifications...");
    [[UIApplication sharedApplication]
        registerForRemoteNotificationTypes:
        (UIRemoteNotificationTypeAlert |
         UIRemoteNotificationTypeBadge |
         UIRemoteNotificationTypeSound)];

}

- (void)application:(UIApplication *)app didRegisterForRemoteNotificationsWithDeviceToken:(NSData *)deviceToken {

    NSString *str = [NSString
        stringWithFormat:@"Device Token=%@",deviceToken];
    NSLog(str);

}

- (void)application:(UIApplication *)app didFailToRegisterForRemoteNotificationsWithError:(NSError *)err {

    NSString *str = [NSString stringWithFormat: @"Error: %@", err];
    NSLog(str);

}

- (void)application:(UIApplication *)application didReceiveRemoteNotification:(NSDictionary *)userInfo {

    for (id key in userInfo) {
        NSLog(@"key: %@, value: %@", key, [userInfo objectForKey:key]);
    }

}

- (void)dealloc {
    [viewController release];
    [window release];
    [super dealloc];
}

@end
6. Press Command-R to test the application on a real device. Press Shift-Command-R in Xcode to display the Debugger Console window. Observe carefully the device token that is printed (see Figure 22). In the figure below, the token is:38c866dd bb323b39 ffa73487 5e157ee5 a85e0b7c e90d56e9 fe145bcc 6c2c594b. Record down this device token (you might want to cut and paste it into a text file).
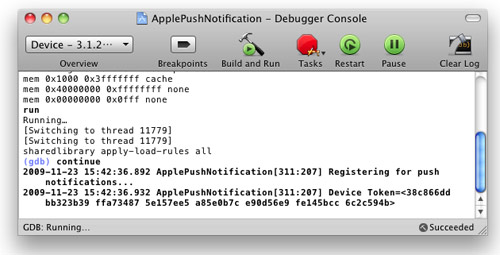
Figure 22. Viewing the device token for push notification
7. If you go to the Settings application on your iPhone/iPod Touch, you will notice that you now have the Notifications item (see Figure 23).
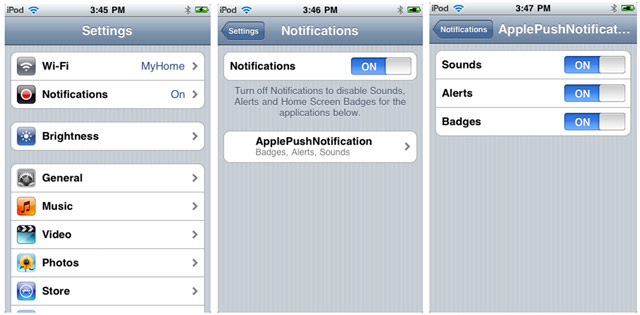
Figure 23. Viewing the Notifications item in the Settings application
Creating the Push Notification Provider
A Push Notification provider is an application written by the application's developer to send push notifications to the iPhone application through the APNs.
Here are the basic steps to send push notifications to your applications via the Apple Push Notification Service (APNs):
1. Communicate with the APNs using the SSL certificate you have created earlier.
2. Construct the payload for the message you want to send.
3. Send the push notification containing the payload to the APNs.
The APNs is a stream TCP socket that your provider can communicate using a SSL secured communication channel. You send the push notification (containing the payload) as a binary stream. Once connected to the APNs, you should maintain the connection and send as many push notifications as you want within the duration of the connection.
Tip: Refrain from opening and closing the connections to the APNs for each push notification that you want to send. Rapid opening and closing of connections to the APNs will be deemed as a Denial-of-Service (DOS) attack and may prevent your provider from sending push notifications to your applications.
The format of a push notification message looks like Figure 24 (figure from Apple's documentation):
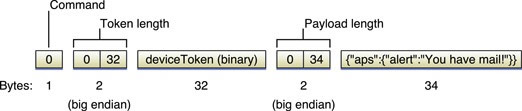
Figure 24. Format of a push notification message
For more details, please refer to Apple Push Notification Service Programming Guide.
The payload is a JSON formatted string (maximum 256 bytes) carrying the information you want to send to your application. An example of a payload looks like this:
{
    "aps": {
        "alert" : "You got a new message!" ,
        "badge" : 5,
        "sound" : "beep.wav"},
     "acme1" : "bar",
     "acme2" : 42
}
To save yourself the trouble in developing a push notification provider from scratch, you can use the PushMeBabyapplication (for Mac OS X) written by Stefan Hafeneger (Get it here).
1. Open the PushMeBaby application in Xcode.
2. Right-click on the Resources folder in Xcode and select Add Existing Files…. Select theaps.developer.identity.cer file that you have downloaded earlier (see Figure 25).
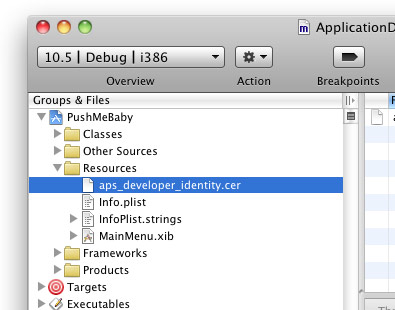
Figure 25. Adding the SSL certificate to the application
3. In the ApplicationDelegate.m file, modify the code as shown in bold below:
- (id)init {
    self = [super init];
    if(self != nil) {
        self.deviceToken = @"38c866dd bb323b39 ffa73487 5e157ee5 a85e0b7c e90d56e9 fe145bcc 6c2c594b";

        self.payload = @"{/"aps/":{/"alert/":/"You got a new message!/",/"badge/":5,/"sound/":/"beep.wav/"},/"acme1/":/"bar/",/"acme2/":42}";

        self.certificate = [[NSBundle mainBundle]
            pathForResource:@"aps_developer_identity" ofType:@"cer"];
    }
    return self;
}
4. Press Command-R to test the application. You will be asked to grant access to the certificate. Click Always Allow (see Figure 26):
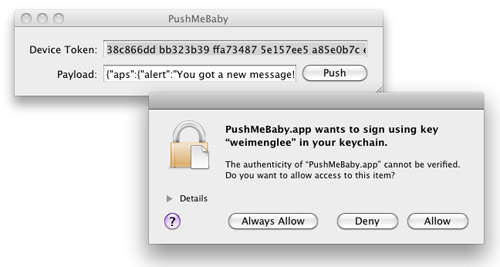
Figure 26. Granting access to the SSL certificate
On the iPhone/iPod Touch, ensure that the ApplePushNotification application is not running. To send a message to the device, click the Push button. The server essentially sends the following message to the Apple Push Notification server:
{
    "aps": {
        "alert" : "You got a new message!" ,
        "badge" : 5,
        "sound" : "beep.wav"},
     "acme1" : "bar",
     "acme2" : 42
}
5. If the message is pushed correctly, you should see the notification as shown in Figure 27.
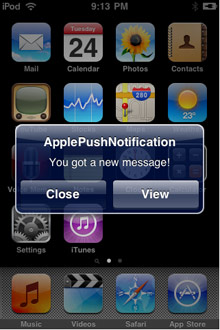
Figure 27. Receiving a Push Notification message
6. If you now debug the ApplePushNotification application by pressing Command-R and send a push message from the PushMeBaby application, the Debugger Console window will display the following outputs:
2009-11-24 21:11:49.182 ApplePushNotification[1461:207] key: acme1, value: bar
2009-11-24 21:11:49.187 ApplePushNotification[1461:207] key: aps, value: {
    alert = "You got a new message!";
    badge = 5;
    sound = "beep.wav";
}
2009-11-24 21:11:49.191 ApplePushNotification[1461:207] key: acme2, value: 42
Summary
In this article, you have seen the various steps required to build an iPhone application that utilizes Apple's Push Notification service. I am interested to know how you are using the APNs for your application. Use the comment feature below to share with us!
Apple’s has announced a push notification service for the iPhone that it’ll provide to all developers. It’ll maintain a persistent IP connection to the phone and let a 3rd party server ping Apple’s notification service in order to push out notifications to users device, which can be in the form of badges, sounds or custom textual alerts. According to Apple, the service will preserve battery life and maintain performance, not to mention work over WiFi or cellular.
What is Push Notification and How does it work?
Let’s say you’re running a 3rd party IM (instant message) client on iPhone 2.0. When you exit the app, you no longer know if you’re receiving more messages. (Sure, there are work around over SMS and Email, but the app itself is dead to you).
With Apple’s Push Notification Service on iPhone OS 3.0, anytime someone sends you a new IM, an alert can be sent from the IM developer’s servers (yes, they’ll have to keep a session open for you on their end), to Apple’s Push Notification Service (APNS) servers.
Apple’s PNS server will have a persistent TCP/IP connection to your iPhone . Once Apple PNS gets the alert from the developer server, APNS will “PUSH” it out to your iPhone 3.0.
Apple PNS currently supports 3 kinds of alerts: badges with a number (like Mail uses to show you unread messages), custom sounds (like a beep or bell or anything already built into the app by the developer), or modal message boxes (like the kind that pop up to tell you your battery is at 20%).
Apple isn’t making any promises on up-time for the service, and any new service will have delays and downtime.
What APNS doesn’t solve, however, is the lack of good notifications on the iPhone, and applications that require multitasking for something other than notification (i.e. streaming internet radio apps).
Imagine if 10 apps try to push out 10 alerts at the same time, how will Apple manage those on your device? Will you have to “cancel” or “accept” 50 modal message dialogs, or be hit by a cacophony of 30 random sounds? We don’t know yet, but hopefully Apple will address this.
Generate APNS SSL Certificate
To get started with APNS we need to generate an certificate unique to each applications which will support APNS. We need to log into our iPhone developer portal with “Team Agent” access. Only users with “Team Agent” access can do the below mentioned process. The iPhone developer portal with “Team Agent ” has a detailed steps to generate an APNS certificate. You should be able to see the screen shown below in the portal to start creating your APNS certificate. Follow the steps mentioned below:-

Fig 1: APNS Development Certificate
(1) You need to create an App ID without .* in the iPhone developer Portal. An App ID without .* means its unique and works only for a single application
(2) Generate a certificate signing request from your Mac’s keychain (You should be an Team Agent to have access to the wizard shown in Figure 1) as shown in figure 2 and save to disk
(3) Upload the CertificateSigningRequest.certSigningRequest to the Program Portal
(4) Wait for the generation of cert (about 1 min). Download the certificate (aps_developer_identity.cer) from the Program Portal
(5) Keep (or rename them if you want) these 2 files (steps 2 and 4) in a safe place. You might need the CertificateSigningRequest.certSigningRequest file to request a production cert in the future or renew it again.
(6) Suppose you have imported the aps_developer_identity.cer to the keychain. Then you have to export these new cert and the private key of this cert (not the public key) and saved as .p12 files.
(7) Then you use these commands to generate the cert and key in Mac’s Terminal for PEM format (Privacy Enhanced Mail Security Certificate)
openssl pkcs12 -clcerts -nokeys -out cert.pem -in cert.p12
openssl pkcs12 -nocerts -out key.pem -in key.p12
(8) The cert.pem and key.pem files will be used by your own program communicating with APNS.
(9) If you want to remove the passphase of private key in key.pem, do this
openssl rsa -in key.pem -out key.unencrypted.pem
Then combine the certificate and key
cat cert.pem key.unencrypted.pem > ck.pem
But please set the file permission of this unencrypted key by using chmod 400 and is only readable by root in a sever configuration.
(10) The testing APNS is at ssl://gateway.sandbox.push.apple.com:2195

Fig 2: Request Certificate From Keychain Access
(11) For the source codes to push payload message to the APNS, you can find them in the Developer Forum. This is the one that I used, for php. Run this (after obtaining the device token from the testing device and with iPhone Client program setup)php -f apns.php "My Message" 2
or if you put this php script and the ck.pem in a local web server, you can use this to testhttp://127.0.0.1/apns/apns.php?message=Hello%20from%20macoscoders&badge=2&sound=received5.caf
apns.php
<?php
$deviceToken = '02da851dXXXXXXXXb4f2b5bfXXXXXXXXce198270XXXXXXXX0d3dac72bc87cd60'; // masked for security reason
// Passphrase for the private key (ck.pem file)
// $pass = '';
// Get the parameters from http get or from command line
$message = $_GET['message'] or $message = $argv[1] or $message = 'Message received from javacom';
$badge = (int)$_GET['badge'] or $badge = (int)$argv[2];
$sound = $_GET['sound'] or $sound = $argv[3];
// Construct the notification payload
$body = array();
$body['aps'] = array('alert' => $message);
if ($badge)
$body['aps']['badge'] = $badge;
if ($sound)
$body['aps']['sound'] = $sound;
/* End of Configurable Items */
$ctx = stream_context_create();
stream_context_set_option($ctx, 'ssl', 'local_cert', 'ck.pem');
// assume the private key passphase was removed.
// stream_context_set_option($ctx, 'ssl', 'passphrase', $pass);
$fp = stream_socket_client('ssl://gateway.sandbox.push.apple.com:2195', $err, $errstr, 60, STREAM_CLIENT_CONNECT, $ctx);
if (!$fp) {
print "Failed to connect $err $errstrn";
return;
}
else {
print "Connection OKn";
}
$payload = json_encode($body);
$msg = chr(0) . pack("n",32) . pack('H*', str_replace(' ', '', $deviceToken)) . pack("n",strlen($payload)) . $payload;
print "sending message :" . $payload . "n";
fwrite($fp, $msg);
fclose($fp);
?>
(12) For iPhone Client Program, you need to edit the bundle identifier to the App ID that you created and imported the new provisioning profile for that APP ID to the XCode and iPhone. Then implement the following methods in AppDelegate to Build & Go
AppDelegate.m
- (void)applicationDidFinishLaunching:(UIApplication *)application {
NSLog(@"Registering Remote Notications");
// For beta 2
// [[UIApplication sharedApplication] registerForRemoteNotifications];
[[UIApplication sharedApplication] registerForRemoteNotificationTypes:(UIRemoteNotificationTypeBadge | UIRemoteNotificationTypeSound)]; // For beta 3
// other codes here
}
- (BOOL)application:(UIApplication *)application didFinishLaunchingWithOptions:(NSDictionary *)launchOptions {
NSLog(@"%@",[[[launchOptions objectForKey:@"UIApplicationLaunchOptionsRemoteNotificationKey"] objectForKey:@"aps"] objectForKey:@"alert"]);
return YES;
}
- (void)application:(UIApplication *)application didRegisterForRemoteNotificationsWithDeviceToken:(NSData *)deviceToken {
NSLog(@"deviceToken: %@", deviceToken);
}
- (void)application:(UIApplication *)application didFailToRegisterForRemoteNotificationsWithError:(NSError *)error {
NSLog(@"Error in registration. Error: %@", error);
}
(13) Additional tips
- The feedback service is currently unavailable.
- Send your messages to gateway.sandbox.push.apple.com:2195 during the beta period.
- Devices must be set up as new iPhones in iTunes in order to generate device tokens. Restoring from backup is not currently supported.
-Make sure the audio file received5.caf is included in your application resource.
(13a) Registering an App ID for Apple Push Notification service
1. In the App ID section of the Program Portal, locate the App ID you wish to use with the Apple Push Notification service. Only App IDs with a specific bundle ID can be used with the APNs. You cannot use a “wild-card” application ID. You must see “Available” under the Apple Push Notification service column to register this App ID and configure a certificate for this App ID.
2. Click the ‘Configure’ link next to your desired App ID.
3. In the Configure App ID page, check the Enable Push Notification Services box and click the Configure button. Clicking this button launches the APNs Assistant, which guides you through the next series of steps that create your App ID specific Client SSL certificate.
4. Download the Client SSL certificate file to your download location. Navigate to that location and double-click the certificate file (which has an extension of cer) to install it in your keychain.
5. When you are finished, click Done in the APNS Assistant.
6. Double-clicking the file launches Keychain Access. Make sure you install the certificate in your login keychain on the computer you are using for provider development. The APNs SSL certificate should be installed on your notification server.
7. When you finish these steps you are returned to the Configure App ID page of the iPhone Dev Center portal. The certificate should be badged with a green circle and the label “Enabled”.
8. To complete the APNs set-up process, you will need to create a new provisioning profile containing your APNs-enabled App ID.
About Me: Anish:
Mac OS X software development is my bread winner with over 6 years of experience. Expertise in Color Management, TWAIN Scanner drivers on Mac OS X, Photoshop Filter and Import Plugin development on Mac OS X, iPhone. As an hobby I love to work on PHP, Flex, AIR, Photoshop. Check the 'About' page for more.