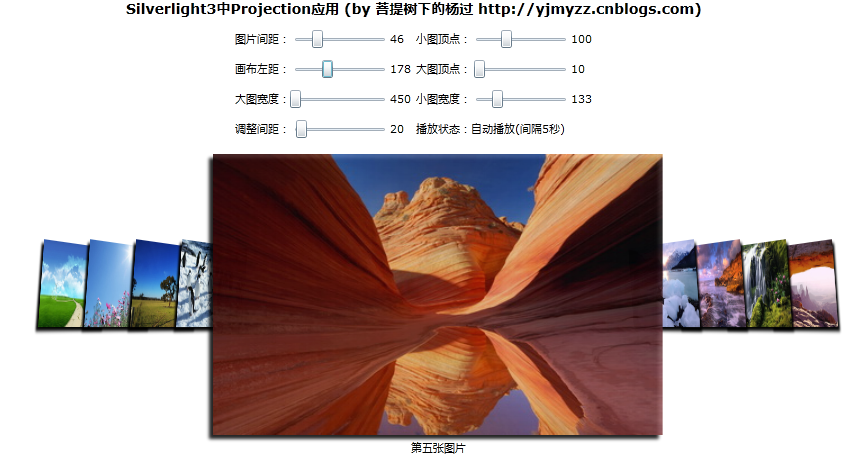
上一篇里,已经知道了“伪3D”是怎么回事,今天结合以前的做的图片广告轮换,又弄了一个图片切换的小东东,不知道以后有什么用,先贴在这里备份:
效果图:
因为silverlight的xml读取策略等其它原因,没办法直接在博客中贴出来,下面是在线示例地址:
http://images.24city.com/jimmy/projection/default.htm
思路:
1.将每个图片以及下面的标题文字,封装成控件
1 <UserControl x:Class="ControlTest.model.ImgItem"
2 xmlns="http://schemas.microsoft.com/winfx/2006/xaml/presentation"
3 xmlns:x="http://schemas.microsoft.com/winfx/2006/xaml"
4 xmlns:d="http://schemas.microsoft.com/expression/blend/2008"
5 xmlns:mc="http://schemas.openxmlformats.org/markup-compatibility/2006"
6 mc:Ignorable="d" >
7
8 <UserControl.Resources>
9 <Storyboard x:Name="sbShow">
10 <DoubleAnimationUsingKeyFrames BeginTime="00:00:00" Storyboard.TargetName="img" Storyboard.TargetProperty="(UIElement.Opacity)">
11 <EasingDoubleKeyFrame KeyTime="00:00:00" Value="0.0"/>
12 <EasingDoubleKeyFrame KeyTime="00:00:01" Value="1.0"/>
13 </DoubleAnimationUsingKeyFrames>
14 </Storyboard>
15 </UserControl.Resources>
16
17 <StackPanel Orientation="Vertical">
18 <Image x:Name="img" Width="300" Cursor="Hand" Grid.Row="0">
19 <Image.Projection>
20 <PlaneProjection RotationY="60" RotationZ="4" x:Name="pp"></PlaneProjection>
21 </Image.Projection>
22 </Image>
23
24 <TextBlock x:Name="txtTitle" Text="Image's Title" TextAlignment="Center" TextWrapping="Wrap" Grid.Row="0" Visibility="Collapsed" HorizontalAlignment="Center" Margin="0,5,0,0">
25 </TextBlock>
26 </StackPanel>
27
28 </UserControl>
 <UserControl x:Class="ControlTest.model.ImgItem"
2
 xmlns="http://schemas.microsoft.com/winfx/2006/xaml/presentation"
3
 xmlns:x="http://schemas.microsoft.com/winfx/2006/xaml"
4
 xmlns:d="http://schemas.microsoft.com/expression/blend/2008"
5
 xmlns:mc="http://schemas.openxmlformats.org/markup-compatibility/2006"
6
 mc:Ignorable="d" >
7

8
 <UserControl.Resources>
9
 <Storyboard x:Name="sbShow">
10
 <DoubleAnimationUsingKeyFrames BeginTime="00:00:00" Storyboard.TargetName="img" Storyboard.TargetProperty="(UIElement.Opacity)">
11
 <EasingDoubleKeyFrame KeyTime="00:00:00" Value="0.0"/>
12
 <EasingDoubleKeyFrame KeyTime="00:00:01" Value="1.0"/>
13
 </DoubleAnimationUsingKeyFrames>
14
 </Storyboard>
15
 </UserControl.Resources>
16

17
 <StackPanel Orientation="Vertical">
18
 <Image x:Name="img" Width="300" Cursor="Hand" Grid.Row="0">
19
 <Image.Projection>
20
 <PlaneProjection RotationY="60" RotationZ="4" x:Name="pp"></PlaneProjection>
21
 </Image.Projection>
22
 </Image>
23

24
 <TextBlock x:Name="txtTitle" Text="Image's Title" TextAlignment="Center" TextWrapping="Wrap" Grid.Row="0" Visibility="Collapsed" HorizontalAlignment="Center" Margin="0,5,0,0">
25
 </TextBlock>
26
 </StackPanel>
27

28
 </UserControl>
2.动态加载xml数据源,xml配置如下:
1 <?xml version="1.0" encoding="utf-8" ?>
2 <data>
3 <item src="img/001.jpg" title="第一张图片(点击将跳转到百度)" link="http://www.baidu.com/" />
4 <item src="img/002.jpg" title="第二张图片" link="img/002.jpg" />
5 <item src="img/003.jpg" title="第三张图片(点击将跳转到我的博客)" link="http://yjmyzz.cnblogs.com/" />
6 <item src="img/004.jpg" title="第四张图片" link="img/004.jpg" />
7 <item src="img/005.jpg" title="第五张图片" link="img/005.jpg" />
8 <item src="img/006.jpg" title="第六张图片" link="img/006.jpg" />
9 <item src="img/007.jpg" title="第七张图片" link="img/007.jpg" />
10 <item src="img/008.jpg" title="第八张图片" link="img/008.jpg" />
11 <item src="img/009.jpg" title="第九张图片" link="img/009.jpg" />
12 <config canvasleft="150" smallImgTop="100" smallImgWidth="240" bigImgTop="10" bigImgWidth="500" itemSpace="80" midIndex="4" adjustWidth="70"/>
13 </data>
14
 <?xml version="1.0" encoding="utf-8" ?>
2
 <data>
3
 <item src="img/001.jpg" title="第一张图片(点击将跳转到百度)" link="http://www.baidu.com/" />
4
 <item src="img/002.jpg" title="第二张图片" link="img/002.jpg" />
5
 <item src="img/003.jpg" title="第三张图片(点击将跳转到我的博客)" link="http://yjmyzz.cnblogs.com/" />
6
 <item src="img/004.jpg" title="第四张图片" link="img/004.jpg" />
7
 <item src="img/005.jpg" title="第五张图片" link="img/005.jpg" />
8
 <item src="img/006.jpg" title="第六张图片" link="img/006.jpg" />
9
 <item src="img/007.jpg" title="第七张图片" link="img/007.jpg" />
10
 <item src="img/008.jpg" title="第八张图片" link="img/008.jpg" />
11
 <item src="img/009.jpg" title="第九张图片" link="img/009.jpg" />
12
 <config canvasleft="150" smallImgTop="100" smallImgWidth="240" bigImgTop="10" bigImgWidth="500" itemSpace="80" midIndex="4" adjustWidth="70"/>
13
 </data>
14

3.动态生成1中封装的控件,然后动态加载到主界面中的Canvas 中
详情见源代码
仍有很多改进之外,比如图片太多时,横向可考虑用左右箭头移动,而且现在这种直接渐变出大图的效果也很粗糙,如果有朋友抽空改进了,记得通知我一起分享(目前国内的silverlight研究氛围太淡,需要更多人的关注...)
源代码:http://files.cnblogs.com/yjmyzz/Projection.rar
转载请注明来自菩提树下的杨过(http://www.cnblogs.com/yjmyzz/archive/2009/10/31/1593643.html)
