本文将解析spring bean定义标签和自定义标签的解析实现原理。
这里说的标签仅限于以xml作为bean定义描述符的spring容器,继承AbstractXmlApplicationContext的一些子 容器,如XmlApplicationContext、ClassPathXmlApplicationContext、 FileSystemXmlApplicationContext等。同时也仅限于描述schema作为标签定义的情况。
Spring xml ioc 容器常用标签和自定义标签
以 Xml 资源定义的容器配置是我们最常见的一种方式。
Spring 容器需要解析 xml 的标签,并把 xml 里 bean 的定义转化为内部的结构 BeanDifinition 。
Spring 的标签有很多种,其支持的常见的标签有:
| 标签 | 说明 | 例子 |
| <bean> | 最常用的,定义一个普通bean。 |
Java代码
|
| <tx> | 如<tx: advice> 等,提供事务配置通用支持。 |
<tx:advice id="txAdvice" transaction-manager="transactionManager"> <tx:attributes> <tx:method name="save*"/> <tx:method name="remove*"/> <tx:method name="*" read-only="true"/> </tx:attributes> </tx:advice> |
| <aop> | <aop:config>,<aop: aspectj-autoproxy> 等提供代理 bean 通用配置支持。 |
Java代码
|
| <util> | 提供在容器内配置一些JDK自带的工具类、集合类和常量的支持。 |
Java代码
|
| <p> | 属性的简单访问 |
Java代码
|
| <lang> | <lang:groovy><lang:jruby>等,提供对动态脚本的支持。 |
Java代码
|
| <jee > | <jee:jndi-lookup/>等,对一些javaEE规范的bean配置的简化,如jndi等。 |
Java代码
|
基本上每一种标签都是用来定义一类 bean 的(P标签除外)。以上都是 spring 自带的一些标签,当然 spring 也支持自定义标签。其实 <tx><aop> 这些也可以认为是自定义标签,不过是由 spring 扩展的而已。
其实所有的bean定义都可以用bean标签来实现定义的。而衍生这种自定义标签来定义 bean 有几个好处:
1. 见名知意。
2. 对于同一类的通用 bean 。封装不必要的配置,只给外部暴露一个简单易用的标签和一些需要配置的属性。很多时候对于一个框架通用的 bean ,我们不需要把 bean 的所有配置都暴露出来,甚至像类名、默认值等我们都想直接封装,这个时候就可以使用自定义标签了,如: <services:property-placeholder /> 可能这个标签就默认代表配置了一个支持 property placeholder 的通用 bean ,我们都不需要去知道配这样一个 bean 的类路径是什么。
可以说自定义标签是 spring 的 xml 容器的一个扩展点,本身 spring 自己的很多标签也是基于这个设计上面来构造出来的。
Spring 对于自定义(声明式)bean标签解析如何设计
Bean 的定义方式有千千万万种,无论是何种标签,无论是何种资源定义,无论是何种容器,最终的 bean 定义内部表示都将转换为内部的唯一结构: BeanDefinition 。外部的各种定义说白了就是为了方便配置。
Spring 提供对其支持的标签解析的天然支持。所以只要按照 spring 的规范编写 xml 配置文件。所有的配置,在启动时都会正常的被解析成 BeanDefinition 。但是如果我们要实现一个自定义标签,则需要提供对自定义标签的全套支持。
我们知道要去完成一个自定义标签,需要完成的事情有:
1. 编写自定义标签 schema 定义文件,放在某个 classpath 下。
2. 在 classpath 的在 META-INF 下面增加 spring.schemas 配置文件,指定 schema 虚拟路径和实际 xsd 的映射。我们在 xml 里的都是虚拟路径,如:
- <?xml version="1.0" encoding="UTF-8"?>
- <beans xmlns="http://www.springframework.org/schema/beans"
- xmlns:xsi="http://www.w3.org/2001/XMLSchema-instance" xmlns:context="http://www.springframework.org/schema/context"
- xmlns:p="http://www.springframework.org/schema/p"
- xsi:schemaLocation="
- http://www.springframework.org/schema/beans http://www.springframework.org/schema/beans/spring-beans-2.5.xsd
- http://www.springframework.org/schema/context http://www.springframework.org/schema/context/spring-context-2.5.xsd
- ">
- <bean id="otherBean" class="com.test.OtherBean" scope="prototype"/>
- <bean id="myBean" class="com.test.MyBean" lazy-init="true"/>
- <bean id="singletonBean" class="com.test.SingletonBean"/>
- </beans>
头部的
- http://www.springframework.org/schema/beans http://www.springframework.org/schema/beans/spring-beans-2.5.xsd
就是一个虚拟路径,其对应的真实路径在spring jar包里的META-INF/spring.schemas里面有映射到classpath定义:
- http\://www.springframework.org/schema/beans/spring-beans-2.5.xsd=org/springframework/beans/factory/xml/spring-beans-2.5.xsd
3. 增加一个 NamespaceHandler 和 BeanDefinitionParser ,用于解析自定义的标签,将自定义标签的 bean解析成一个 BeanDefinition 返回。
4. 在 classpath 的在 META-INF 下面增加 spring.handlers 配置文件,指定标签命名空间和 handlers 的映射。
为什么要做以上几个事情?我们来看看设计:
Spring 对标签解析的设计的过程如下:
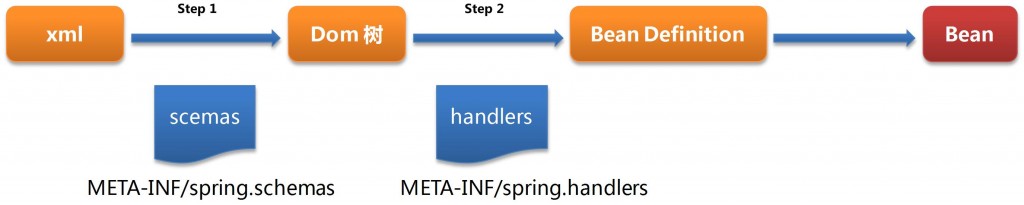
解释:
Step 1: 将 xml 文件解析成 Dom 树。将 xml 文件解析成 dom 树的时候,需要 xml 标签定义 schema 来验证文件的语法结构。 Spring 约定将所有的 shema 的虚拟路径和真是文件路径映射定义在 classpath 的在 META-INF/spring.schemas 下面。在容器启动时 Spring 会扫描所有的 META-INF/spring.schemas 并将映射维护到一个 map 里。
如 spring jar 包里会有自带的标签的 schemas 映射,可以看一下部分配置:
- http\://www.springframework.org/schema/aop/spring-aop-2.0.xsd = org/springframework/aop/config/spring-aop-2.0.xsd
- http\://www.springframework.org/schema/aop/spring-aop-2.5.xsd = org/springframework/aop/config/spring-aop-2.5.xsd
- http\://www.springframework.org/schema/aop/spring-aop.xsd = org/springframework/aop/config/spring-aop-2.5.xsd
- http\://www.springframework.org/schema/beans/spring-beans-2.0.xsd = org/springframework/beans/factory/xml/spring-beans-2.0.xsd
- http\://www.springframework.org/schema/beans/spring-beans-2.5.xsd = org/springframework/beans/factory/xml/spring-beans-2.5.xsd
- http\://www.springframework.org/schema/beans/spring-beans.xsd = org/springframework/beans/factory/xml/spring-beans-2.5.xsd
- http\://www.springframework.org/schema/context/spring-context-2.5.xsd = org/springframework/context/config/spring-context-2.5.xsd
- http\://www.springframework.org/schema/context/spring-context.xsd = org/springframework/context/config/spring-context-2.5.xsd
- http\://www.springframework.org/schema/jee/spring-jee-2.0.xsd = org/springframework/ejb/config/spring-jee-2.0.xsd
- http\://www.springframework.org/schema/jee/spring-jee-2.5.xsd = org/springframework/ejb/config/spring-jee-2.5.xsd
- ......
等号左边是虚拟路径,右边是真是路径(classpath下的)。
虚拟路径用在我们的bean定义配置文件里,如:
- <beans xmlns="http://www.springframework.org/schema/beans"
- xmlns:xsi="http://www.w3.org/2001/XMLSchema-instance" xmlns:context="http://www.springframework.org/schema/context"
- xmlns:p="http://www.springframework.org/schema/p"
- xsi:schemaLocation="
- http://www.springframework.org/schema/beans http://www.springframework.org/schema/beans/spring-beans-2.5.xsd
- http://www.springframework.org/schema/context http://www.springframework.org/schema/context/spring-context-2.5.xsd>
- <bean>
- </beans>
beans里面的
- http://www.springframework.org/schema/beans http://www.springframework.org/schema/beans/spring-beans-2.5.xsd
就是个虚拟路径。
Step 2: 将 dom 树解析成 BeanDifinition 。将定义 bean 的标签和 xml 定义解析成 BeanDefinition 的过程。如果是默认的 bean 标签, spring 会直接进行解析。而如果不是默认的 bean 标签,包括自定义和 spring 扩展的 <aop> 、 <p> 、 <util> 等标签,则需要提供专门的 xmlparser 来处理。 paorser由自己定义和编写,并通过handler注册到容器。Spring 约定了 META-INF/spring.handlers 文件,在这里面定义了标签命名空间和handler 的映射。容器起来的时候会加载 handler , handler 会向容器注册该命名空间下的标签和解析器。在解析的自定义标签的时候, spring 会根据标签的命名空间和标签名找到一个解析器。由该解析器来完成对该标签内容的解析,并返回一个 BeanDefinition 。
以下是 spring jar 包自带的一些自定义标签扩展的 spring.handlers 文件,可以看到定义了 aop\p 等其扩展标签的 handlers 。
- http\://www.springframework.org/schema/aop=org.springframework.aop.config.AopNamespaceHandler
- http\://www.springframework.org/schema/context=org.springframework.context.config.ContextNamespaceHandler
- http\://www.springframework.org/schema/jee=org.springframework.ejb.config.JeeNamespaceHandler
- http\://www.springframework.org/schema/jms=org.springframework.jms.config.JmsNamespaceHandler
- http\://www.springframework.org/schema/lang=org.springframework.scripting.config.LangNamespaceHandler
- http\://www.springframework.org/schema/p=org.springframework.beans.factory.xml.SimplePropertyNamespaceHandler
- http\://www.springframework.org/schema/tx=org.springframework.transaction.config.TxNamespaceHandler
- http\://www.springframework.org/schema/util=org.springframework.beans.factory.xml.UtilNamespaceHandler
META-INF/spring.handlers
看看UtilNamespaceHandler的代码实现
- public void init() {
- registerBeanDefinitionParser("constant", new ConstantBeanDefinitionParser());
- registerBeanDefinitionParser("property-path", new PropertyPathBeanDefinitionParser());
- registerBeanDefinitionParser("list", new ListBeanDefinitionParser());
- registerBeanDefinitionParser("set", new SetBeanDefinitionParser());
- registerBeanDefinitionParser("map", new MapBeanDefinitionParser());
- registerBeanDefinitionParser("properties", new PropertiesBeanDefinitionParser());
- }
实现了标签和对应parser的映射注册。
ListBeanDefinitionParser的实现如下:
- private static class ListBeanDefinitionParser extends AbstractSingleBeanDefinitionParser {
- protected Class getBeanClass(Element element) {
- return ListFactoryBean.class;
- }
- protected void doParse(Element element, ParserContext parserContext, BeanDefinitionBuilder builder) {
- String listClass = element.getAttribute("list-class");
- List parsedList = parserContext.getDelegate().parseListElement(element, builder.getRawBeanDefinition());
- builder.addPropertyValue("sourceList", parsedList);
- if (StringUtils.hasText(listClass)) {
- builder.addPropertyValue("targetListClass", listClass);
- }
- String scope = element.getAttribute(SCOPE_ATTRIBUTE);
- if (StringUtils.hasLength(scope)) {
- builder.setScope(scope);
- }
- }
- }
这里父类代码不贴了,主要完成的是beanDifinition的生成。
源码实现
Spring 对于自定义(声明式)bean标签源码实现大概的源码结构如下:

XmlBeanDefinitionReader 是核心类,它接收 spring 容器传给它的资源 resource 文件,由它负责完成整个转换。它调用 DefaultDocumentLoader 来完成将 Resource 到 Dom 树的转换。调用DefaultBeanDefinitionDocumentReader 完成将 Dom 树到 BeanDefinition 的转换。
具体的代码流程细节完全可以基于这个结构去阅读,下面就贴几个核心源码段:
源码段 1 : 加载 spring.shemas,在PluggableSchemaResolver.java里实现:
- public class PluggableSchemaResolver implements EntityResolver {
- /***定义schema location的映射文件路径***/
- public static final String DEFAULT_SCHEMA_MAPPINGS_LOCATION = "META-INF/spring.schemas";
- private static final Log logger = LogFactory.getLog(PluggableSchemaResolver.class);
- private final ClassLoader classLoader;
- private final String schemaMappingsLocation;
- /** Stores the mapping of schema URL -> local schema path */
- private Properties schemaMappings;
- public PluggableSchemaResolver(ClassLoader classLoader) {
- this.classLoader = classLoader;
- this.schemaMappingsLocation = DEFAULT_SCHEMA_MAPPINGS_LOCATION;
- }
- public PluggableSchemaResolver(ClassLoader classLoader, String schemaMappingsLocation) {
- Assert.hasText(schemaMappingsLocation, "'schemaMappingsLocation' must not be empty");
- this.classLoader = classLoader;
- this.schemaMappingsLocation = schemaMappingsLocation;
- }
- /**==========中间省略部分代码=========**/
- /***此处完成schema的加载***/
- protected String getSchemaMapping(String systemId) {
- if (this.schemaMappings == null) {
- if (logger.isDebugEnabled()) {
- logger.debug("Loading schema mappings from [" + this.schemaMappingsLocation + "]");
- }
- try {
- this.schemaMappings =
- PropertiesLoaderUtils.loadAllProperties(this.schemaMappingsLocation, this.classLoader);
- if (logger.isDebugEnabled()) {
- logger.debug("Loaded schema mappings: " + this.schemaMappings);
- }
- }
- catch (IOException ex) {
- throw new FatalBeanException(
- "Unable to load schema mappings from location [" + this.schemaMappingsLocation + "]", ex);
- }
- }
- return this.schemaMappings.getProperty(systemId);
- }
- }
源码段 2 : 加载 spring.handlers,在 DefaultNamespaceHandlerResolver里实现:
- public class DefaultNamespaceHandlerResolver implements NamespaceHandlerResolver {
- /**
- * The location to look for the mapping files. Can be present in multiple JAR files.
- */
- public static final String DEFAULT_HANDLER_MAPPINGS_LOCATION = "META-INF/spring.handlers";
- /** Logger available to subclasses */
- protected final Log logger = LogFactory.getLog(getClass());
- /** ClassLoader to use for NamespaceHandler classes */
- private final ClassLoader classLoader;
- /** Resource location to search for */
- private final String handlerMappingsLocation;
- /** Stores the mappings from namespace URI to NamespaceHandler class name / instance */
- private Map handlerMappings;
- public DefaultNamespaceHandlerResolver() {
- this(null, DEFAULT_HANDLER_MAPPINGS_LOCATION);
- }
- public DefaultNamespaceHandlerResolver(ClassLoader classLoader) {
- this(classLoader, DEFAULT_HANDLER_MAPPINGS_LOCATION);
- }
- public DefaultNamespaceHandlerResolver(ClassLoader classLoader, String handlerMappingsLocation) {
- Assert.notNull(handlerMappingsLocation, "Handler mappings location must not be null");
- this.classLoader = (classLoader != null ? classLoader : ClassUtils.getDefaultClassLoader());
- this.handlerMappingsLocation = handlerMappingsLocation;
- }
- /**==========中间省略部分代码=========**/
- /************************
- * Load the specified NamespaceHandler mappings lazily.
- * 此处加载延迟加载spring.handlers,只有第一次自定义标签被解析到,才会被加载。
- ****************************/
- private Map getHandlerMappings() {
- if (this.handlerMappings == null) {
- try {
- Properties mappings =
- PropertiesLoaderUtils.loadAllProperties(this.handlerMappingsLocation, this.classLoader);
- if (logger.isDebugEnabled()) {
- logger.debug("Loaded mappings [" + mappings + "]");
- }
- this.handlerMappings = new HashMap(mappings);
- }
- catch (IOException ex) {
- IllegalStateException ise = new IllegalStateException(
- "Unable to load NamespaceHandler mappings from location [" + this.handlerMappingsLocation + "]");
- ise.initCause(ex);
- throw ise;
- }
- }
- return this.handlerMappings;
- }
- }
源码段3 : xml 到 dom 树的解析。
在 XmlBeanDefinitionReader .java 的 doLoadBeanDefinitions 方法里,调用 DefaultDocumentLoader 完成。
- protected int doLoadBeanDefinitions(InputSource inputSource, Resource resource)
- throws BeanDefinitionStoreException {
- try {
- int validationMode = getValidationModeForResource(resource);
- Document doc = this.documentLoader.loadDocument(
- inputSource, getEntityResolver(), this.errorHandler, validationMode, isNamespaceAware());
- return registerBeanDefinitions(doc, resource);
- }
- catch (BeanDefinitionStoreException ex) {
- throw ex;
- }
- catch (SAXParseException ex) {
- throw new XmlBeanDefinitionStoreException(resource.getDescription(),
- "Line " + ex.getLineNumber() + " in XML document from " + resource + " is invalid", ex);
- }
- catch (SAXException ex) {
- throw new XmlBeanDefinitionStoreException(resource.getDescription(),
- "XML document from " + resource + " is invalid", ex);
- }
- catch (ParserConfigurationException ex) {
- throw new BeanDefinitionStoreException(resource.getDescription(),
- "Parser configuration exception parsing XML from " + resource, ex);
- }
- catch (IOException ex) {
- throw new BeanDefinitionStoreException(resource.getDescription(),
- "IOException parsing XML document from " + resource, ex);
- }
- catch (Throwable ex) {
- throw new BeanDefinitionStoreException(resource.getDescription(),
- "Unexpected exception parsing XML document from " + resource, ex);
- }
- }
其中的
- getEntityResolver()
会完成spring.schemas的装载,里面会间接调用源码段1。穿进去的entityResolver作为标签解析使用。
源码段4 : dom 树到 Beandifinition:
在 XmlBeanDefinitionReader .java 的 doLoadBeanDefinitions 方法里,调用 BeanDefinitionDocumentReader完成。
- public int registerBeanDefinitions(Document doc, Resource resource) throws BeanDefinitionStoreException {
- // Support old XmlBeanDefinitionParser SPI for backwards-compatibility.
- if (this.parserClass != null) {
- XmlBeanDefinitionParser parser =
- (XmlBeanDefinitionParser) BeanUtils.instantiateClass(this.parserClass);
- return parser.registerBeanDefinitions(this, doc, resource);
- }
- // Read document based on new BeanDefinitionDocumentReader SPI.
- BeanDefinitionDocumentReader documentReader = createBeanDefinitionDocumentReader();
- int countBefore = getRegistry().getBeanDefinitionCount();
- documentReader.registerBeanDefinitions(doc, createReaderContext(resource));
- return getRegistry().getBeanDefinitionCount() - countBefore;
- }
具体细节这里不在累述。
总结
spring标签的扩展性做得还是不错的。在我们公司很多框架的一些通用配置都基于spring的声明式标签来实现。中间的一些约定和设计思想值得学习。 本文很多代码细节没办法累述,有兴趣可以去看看。文章中若有不对的地方请大家指出,一起探讨。
后续的spring源码学习可能会是代理的具体实现,欢迎一起探讨!