主要参考文章:
http://blog.csdn.net/forestarmy
http://blog.chinaunix.net/space.php?uid=25153965&do=blog&id=160561
1、安装OpenSUSE 11.4
2、打开防火墙的一些端口,以使能SSH等:
# vi /ete/sysconfig/Susefirewall2
FW_SERVICES_EXT_TCP="ssh 445 139 389 telnet 80 81 82 "
FW_SERVICES_EXT_UDP="137 138 "
# rcSuSEfirewall2 restart
3、搭建OBS
obs(opensuse build system)是meego源码编译的重要工具,也可以说是必备工具,有了它我们可以方便的对源码中各个包进行编译,进而做出meego镜像,所以搭建一个自己的obs系统是meego开发的重要部分。
cd /etc/zypp/repos.d/;
wget http://download.opensuse.org/repositories/openSUSE:/Tools/openSUSE_11.4/openSUSE:Tools.repo
zypper ref
安装obs-server和相关的包
zypper in obs-server obs-signd obs-utils createrepo nfs-client obs-api memcached lighttpd
设置数据库
默认开机开启:
chkconfig --add mysql
rcmysql start
注意,chkconfig --add mysql可能会失败:
linux-ubai:/obs # chkconfig --level 35 mysql on
insserv: FATAL: service network is missed in the runlevels 2 to use service mysql
insserv: exiting now!
/sbin/insserv failed, exit code 1
解决办法是,将"network"的level2打开:chkconfig --level 2 network on。
使用系统提供的工具安装数据库:
/usr/bin/mysql_secure_installation
在这里可以输入自己数据库密码,默认是空的
创建数据库:
mysql -u root -p
mysql> create database api_production;
mysql> create database webui_production;
将obs的用户信息加到数据库中:
GRANT all privileges
ON api_production.*
TO 'obs'@'%', 'obs'@'localhost' IDENTIFIED BY 'obspasswd';
GRANT all privileges
ON webui_production.*
TO 'obs'@'%', 'obs'@'localhost' IDENTIFIED BY 'obspasswd';
FLUSH PRIVILEGES;
在这里设置obs的密码:obspasswd
为了使用数据库,需要配置OBS:
vi /srv/www/obs/api/config/database.yml
#change the production section
production:
adapter: mysql
database: api_production
username: obs
password: obspasswd
vi /srv/www/obs/webui/config/database.yml
#change the production section
production:
adapter: mysql
database: webui_production
username: obs
password: obspasswd
填充数据库:
cd /srv/www/obs/api/
RAILS_ENV="production" rake db:setup

cd /srv/www/obs/webui/
RAILS_ENV="production" rake db:setup
设置lighttpd
- 网页形式显现出来
-
# vi /etc/lighttpd/lighttpd.conf include_shell "cat /etc/lighttpd/vhosts.d/*.conf" vi /etc/lighttpd/vhosts.d/obs.conf $SERVER["socket"] == ":80" { rails_app = "webui" rails_root = "/srv/www/obs/webui" rails_procs = 3 # production/development are typical values here rails_mode = "production" log_root = "/srv/www/obs/webui/log" include "vhosts.d/rails.inc" } $SERVER["socket"] == ":81" { rails_app = "api" rails_root = "/srv/www/obs/api" rails_procs = 3 # production/development are typical values here rails_mode = "production" log_root = "/srv/www/obs/api/log" include "vhosts.d/rails.inc" } $SERVER["socket"] == ":82" { server.name = "192.168.129.140" # IP地址改成自己服务器的地址,比如“192.168.129.140” server.document-root = "/srv/obs/repos/" dir-listing.activate = "enable" } -
# vi /etc/lighttpd/modules.conf
server.modules = (
"mod_access",
# "mod_alias",
# "mod_auth",
# "mod_evasive",
# "mod_redirect",
"mod_rewrite",
# "mod_setenv",
# "mod_usertrack",
)

##
## mod_magnet
##
include "conf.d/magnet.conf"

##
## FastCGI (mod_fastcgi)
##
include "conf.d/fastcgi.conf"
- 服务器地址确认,修改相关文件的服务器地址:
# vi /srv/www/obs/webui/config/environments/production.rb
FRONTEND_HOST = "192.168.129.140"
FRONTEND_PORT = 81
FRONTEND_PROTOCOL = 'http'
BUGZILLA_HOST = nil
DOWNLOAD_URL = "http://192.168.129.140:82"
ICHAIN_MODE = "off"
BASE_NAMESPACE = nil
# vi /srv/www/obs/api/config/environments/production.rb
SOURCE_HOST = "192.168.129.140"
- 设置服务器开机启动选项
chkconfig --add memcached lighttpd obsapidelayed obswebuidelayed
chkconfig --add obsrepserver obssrcserver obsscheduler obsdispatcher obspublisher obswarden obssigner
修改网页使用权限
chown -R lighttpd.lighttpd /srv/www/obs/{api,webui}
配置obs服务器
# vi /usr/lib/obs/server/BSConfig.pm

my $hostname = '192.168.129.140';
our $repodownload = "http://$hostname:82/";
启动obs服务器
# rcmemcached start
# rclighttpd start
# rcobsapidelayed start
# rcobswebuidelayed start
注意:如果rcobsapidelayed start报错:
/srv/www/obs/api/lib/custom_logger.rb:7:in `format_message': undefined method `[]' for #<NoMethodError:0xb675a984> (NoMethodError)
…
from /srv/www/obs/api/script/delayed_job.api:7
重启服务器这个问题就消失。
这里就可以在网页上打开我们的obs了(http://192.168.129.140), 80端口是主界面,81端口是接口,82端口是仓库(现在还没任何数据产生)
如果访问82端口时碰到HTTP 404错误,需要做如下操作:
# mkdir /srv/obs/repos
# chown -R obsrun:obsrun /srv/obs/repos
4、搭建客户端
准确的说,obs-worker也属于obs服务器的一部分,我们在使用obs的时候是不会去操作它的,它只是服务器上的用于实现它工作的工具.
安装obs-worker及相关的工具:
1.zypper in obs-worker qemu-svn mount-static bash-static
修改服务器IP地址,是它只想我们所在的服务器:
# vi /etc/sysconfig/obs-worker
OBS_SRC_SERVER="'192.168.129.140:5352"
OBS_REPO_SERVERS="'192.168.129.140:5252"
开机默认启动obs-worker:
chkconfig --add obsworker
rcobsworker start
注意:如果rcobsworker start 报错:
-
chmod: cannot access `bs_worker': No such file or directory
重启服务器后这个问题就消失了。
5、导入MeeGo基础数据
mkdir -p /obs/imports
mkdir -p /obs/build
ln -s /obs/build /srv/obs/build
想要编译修改后的meego源码包,我们必须先把基础的包全部预先存放在obs服务器上。obs会根据依赖去调用这些包。这里使用脚本去完成这些工作会更方便:
修改调度器:
对于MeeGo1.2,其arch是armv7hl,对应的调度器arch是armv8el:
# vi /etc/sysconfig/obs-server
OBS_SCHEDULER_ARCHITECTURES="i586 armv5el armv8el"
wget http://stskeeps.subnetmask.net/meego/import-meego-release.sh
mv import-meego-release.sh /usr/sbin/
chmod +x /usr/sbin/import-meego-release.sh
注意,这个import-meego-release.sh可能需要做修改。比如用MeeGo1.2时,需要用armv7hl/armv8el;并且里面的IP地址需要改成服务器的IP。
下载Meego1.2的prjconf:
git clone http://git.gitorious.org/meego-developer-tools/obs-project-config.git
我们输入的参数是由ftp://mirrors.kernel.org/meego/上的目录结构决定的,我们根据需要的版本修改,
例如: 目标为ftp://mirrors.kernel.org/meego/builds/1.1.90/1.1.90.5.20110301.7/repos/oss/ia32/packages/
则参数为 1.1.90.5.20110301.7 rsync://mirrors.kernel.org/meego/builds/1.1.90/
import-meego-release.sh 1.2.90.0.0.20110824.2 rsync://mirrors.kernel.org/meego/builds/1.2.90/ /home/tvos/obs-project-config/MeeGo_1.2
注意MeeGo版本的说明:1.2.90.x表示该版本是1.3的beta版。而1.2.0则是MeeGo发布的第一个1.2版本。 首次执行上述命令时,在成功下载到所有所需RPM包后,会打印:HTTP401错误。原因是/root/.oscrc中的user和pass是有问题的:user = <project name="MeeGo:1.2.90.0.0.20110824.2:Core">
pass = opensuse:Admin正确的应该是:
user = Admin
pass = opensuse
-
成功执行上述命令后,会打印:
Sending meta data...
WARNING: SSL certificate checks disabled. Connection is insecure!
Done.
Sending meta data...
WARNING: SSL certificate checks disabled. Connection is insecure!
Done.
/srv/obs/events/armv8el/.scanrepo::MeeGo:1.2.90.0.0.20110824.2:Core::standard11721: No such file or directory
MeeGo:1.2.90.0.0.20110824.2:Core imported into OBS, after rescan is done.
表明MeeGo被成功导入OBS。
-
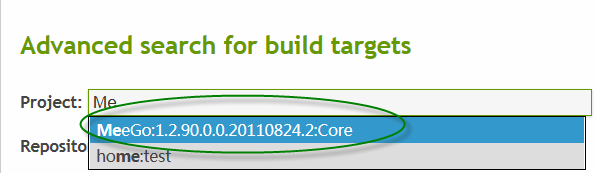
只有成功导入OBS,在Add repository时,键入"Mxxx"时才会显示MeeGo:1.2.90.....: