UIImagePickerController是一种导航控制器,使用它,用户可以打开系统的图片选取器或者打开相机进行拍照。实现协议UIImagePickerDelegate中定义的委托方法可以对选定后的结果进行操作,或是没有选择取消的操作。
UIImagePickerController有三个图片源:
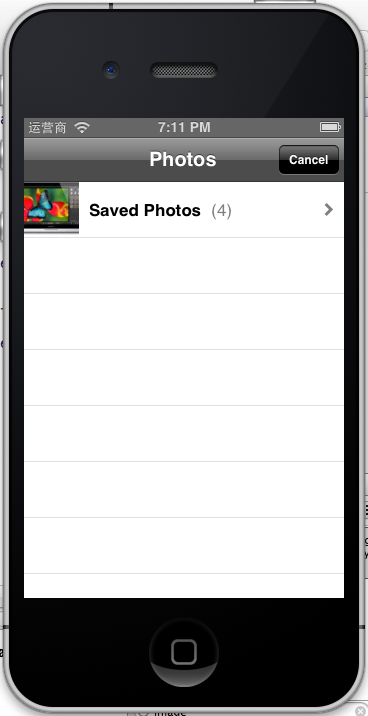
UIImagePickerControllerSourceTypePhotoLibrary:照片库
UIImagePickerControllerSourceTypeCamera:使用相机拍摄的新图片
UIImagePickerControllerSourceTypeSavedPhotosAlbum:相机胶卷
另外,显示选择图像视图器之前要确保图像源是否可用,可以使用isSourceTypeAvailable方法来检验
详情在代码中有注释,上代码:
ViewController.h
#import <UIKit/UIKit.h>

@interface ViewController : UIViewController<UIImagePickerControllerDelegate,UINavigationControllerDelegate]]>//打开模态视图控制器用到了导航控制器的委托方法
@property (retain, nonatomic) IBOutletUIImageView *imageView;

@end

ViewController.m
#import "ViewController.h"

@interface ViewController ()
{

}
@end
@implementation ViewController
@synthesize imageView;
- (void)viewDidLoad
{
[superviewDidLoad];
// 通过代码构建按钮
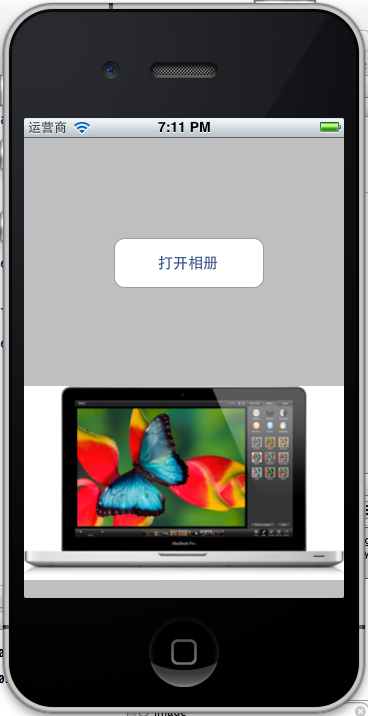
UIButton *pickerImageBtn = [UIButton buttonWithType:UIButtonTypeRoundedRect];
pickerImageBtn.frame = CGRectMake(90, 100, 150, 50);
[pickerImageBtn setTitle:@"打开相册" forState:UIControlStateNormal];
//指定单击事件
[pickerImageBtn addTarget:self action:@selector(openImage) forControlEvents:UIControlEventTouchUpInside];
[self.viewaddSubview:pickerImageBtn];
}
/*
点击按钮后的事件
*/
-(void)openImage
{
//把状态栏隐藏起来
// UIApplication *app = [UIApplication sharedApplication];
// app.statusBarHidden = YES;
//构建图像选择器
UIImagePickerController *pickerController = [[UIImagePickerControlleralloc] init];
//设置代理为本身(实现了UIImagePickerControllerDelegate协议)
pickerController.delegate = self;
//是否允许对选中的图片进行编辑
pickerController.allowsEditing = YES;
//设置图像来源类型(先判断系统中哪种图像源是可用的)
if ([UIImagePickerController isSourceTypeAvailable:UIImagePickerControllerSourceTypeCamera]) {
pickerController.sourceType = UIImagePickerControllerSourceTypeCamera;
}elseif([UIImagePickerController isSourceTypeAvailable:UIImagePickerControllerSourceTypePhotoLibrary]){
pickerController.sourceType = UIImagePickerControllerSourceTypePhotoLibrary;
}else {
pickerController.sourceType = UIImagePickerControllerSourceTypeSavedPhotosAlbum;
}
//打开模态视图控制器选择图像
[selfpresentModalViewController:pickerController animated:YES];
}
/*
选取成功后在界面上进行显示
*/
-(void)editedImage:(UIImage *)image
{
NSLog(@"选择成功");
[imageViewsetImage:image];
}
#pragma -
#pragma Delegate methods
-(void)imagePickerController:(UIImagePickerController *)picker didFinishPickingImage:(UIImage *)image editingInfo:(NSDictionary *)editingInfo
{
[picker dismissModalViewControllerAnimated:YES];
[selfperformSelector:@selector(editedImage:) withObject:image afterDelay:.5];
}
-(void)imagePickerControllerDidCancel:(UIImagePickerController *)picker
{
NSLog(@"取消选择");
[picker dismissModalViewControllerAnimated:YES];
}
- (void)viewDidUnload
{
[selfsetImageView:nil];
[superviewDidUnload];
// Release any retained subviews of the main view.
}
- (BOOL)shouldAutorotateToInterfaceOrientation:(UIInterfaceOrientation)interfaceOrientation
{
return (interfaceOrientation != UIInterfaceOrientationPortraitUpsideDown);
}
- (void)dealloc {
[imageViewrelease];
[superdealloc];
}
@end
最后看看运行效果:

对Android&IOS感兴趣的朋友可以加入我们的讨论QQ群,在这里,我们只讨论干货:
iOS群:220223507
Android群:282552849
欢迎关注我的新浪微博和我交流:@唐韧_Ryan