运用脚本javascript在网页上实现多张图片按一定时间轮流淡入和淡出的效果,并且加入多个div对象事件控制当前图片。思路:通过建立一图片数组预放置需要的图片,建立更替图片函数,通过滤镜blendTrans实现淡入淡出的效果,插入document.getElementById('apDiv1').onclick控制当前图片。下面是具体的代码与注释:
<html >
<head>
<title>abc</title>
<script language="javascript">
var time=5000;//设定图片时间间隔
var t;//图片编号
var n;//总图片数
var duration=3;// 滤镜blendTrans参数
//图片集数组对象
function ImgArray(len){this.length=len;
}
//设定具体参与轮换的图片集,注意他们的路径
ImgName=new ImgArray(11);
ImgName[0]="image/01.jpg";
ImgName[1]="image/02.jpg";
ImgName[2]="image/03.jpg";
ImgName[3]="image/04.jpg";
t=0;//初始图片编号为0
n=4;//总数为4张(从0号开始的)
//轮换图片的主函数
function playImg(){
//图片编号的具体轮换
if(t==n)
{t=0;}else{t++;}
img.style.filter="blendTrans(Duration=duration)"; //将图片的style属性设置为滤镜blendTrans
document.getElementById('apDiv1').onclick=function() {
window.clearTimeout(mytimeout);
t=0;
img.filters[0].apply();
img.src=ImgName[t];
img.filters[0].play();
mytimeout=setTimeout("playImg()",time);
return ;
}
//当id为apDiv1的对象被点击时,淡化到图片1
document.getElementById('apDiv2').onclick= function(){
window.clearTimeout(mytimeout);
t=1;
img.filters[0].apply();
img.src=ImgName[t];
img.filters[0].play();
mytimeout=setTimeout("playImg()",time);
return ;
}
//当id为apDiv2的对象被点击时,淡化到图片2
document.getElementById('apDiv3').onclick=function() {
window.clearTimeout(mytimeout);
t=2;
img.filters[0].apply();
img.src=ImgName[t];
img.filters[0].play();
mytimeout=setTimeout("playImg()",time);
return ;
}
document.getElementById('apDiv4').onclick=function() {
window.clearTimeout(mytimeout);
t=3;
img.filters[0].apply();
img.src=ImgName[t];
img.filters[0].play();
mytimeout=setTimeout("playImg()",time);
return ;
}
img.filters[0].apply();//运用blendTrant滤镜
img.src=ImgName[t];//用图片编号变量ImgName定义页面图片路径
img.filters[0].play();
mytimeout=setTimeout("playImg()",time); //延迟time时间调用playImg()函数实现循环目的
}
</script>
<style type="text/css">
<!--
.ap {
width:50px;
height:20px;
z-index:1;
left: 829px;
top: 18px;
float: left;
border: thin solid #666;
background-color: #CCC;
}
#apDivall {
position: absolute;
left: 586px;
top: 267px;
height: 28px;
}//定义各个div的css
-->
</style>
</head>
<body bgcolor="#ffffff" onload="playImg()">
<center>
<img src="01.jpg" width="300" height="250" name="img" >
<div id="apDivall">
<div id="apDiv1" class="ap">01</div>
<div id="apDiv2" class="ap">02</div>
<div id="apDiv3" class="ap">03</div>
<div id="apDiv4" class="ap">04</div>
<br style="clear:both">
</div>
</center>
</body>
</html>
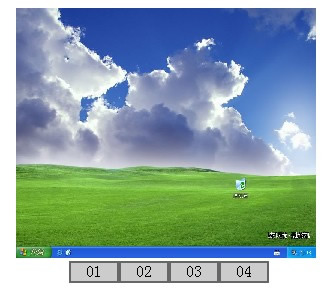
这是效果图,因为是绝对定位div,所以可以将数字行浮在图片上方,这就一个类似flash相册的js实现。