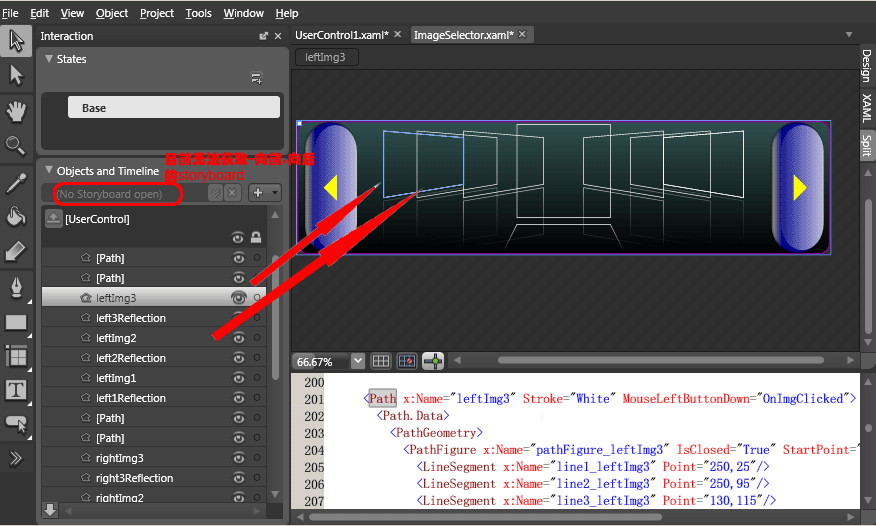
在SnipperImages中为了进行图片列表导航(前后方向)设计了ImageSelector控件,而这个控件不同于
之前介绍过的Button, CheckBox, Slider,主要是其xaml中的UI元素变得数量庞大且行为更加复杂。所以通过
了解这个控件,我们能够更好的熟悉StoryBoard,Path,ImageBrush,ScaleTransform,TranslateTransform
等对象及属性的使用场景。
首先来看一下DEMO运行效果:

显示一张图片所使用的ui元素如下所示(其中之一):
<Path x:Name="leftImg3" Stroke="White" MouseLeftButtonDown="OnImgClicked">
<Path.Data>
<PathGeometry>
<PathFigure x:Name="pathFigure_leftImg3" IsClosed="True" StartPoint="130,15">
<LineSegment x:Name="line1_leftImg3" Point="250,25"/>
<LineSegment x:Name="line2_leftImg3" Point="250,95"/>
<LineSegment x:Name="line3_leftImg3" Point="130,115"/>
</PathFigure>
</PathGeometry>
</Path.Data>
<Path.Fill>
<ImageBrush x:Name="leftImg3Brush" Stretch="Fill"/>
</Path.Fill>
</Path>
大家发现了,上面的内容只是可以正常显示一个图像(通过设置leftImg3Brush的ImageSource属性)而
在每一个图片下方都会有一个倒影效果,其使用的就是ScaleTransform,其代码布局如下:
<Path x:Name="left3Reflection" Stroke="White">
<Path.Data>
<PathGeometry>
<PathFigure x:Name="pathFigure_left3Reflection" IsClosed="True" StartPoint="130,120">
<LineSegment x:Name="line1_left3Reflection" Point="250,100"/>
<LineSegment x:Name="line2_left3Reflection" Point="250,170"/>
<LineSegment x:Name="line3_left3Reflection" Point="130,190"/>
</PathFigure>
</PathGeometry>
</Path.Data>
<Path.Fill>
<ImageBrush x:Name="leftReflection3Brush" Stretch="Fill">
<ImageBrush.RelativeTransform>
<TransformGroup>
<!--实现投影效果-->
<ScaleTransform ScaleX="1" ScaleY="-1" />
<TranslateTransform Y="1" />
</TransformGroup>
</ImageBrush.RelativeTransform>
</ImageBrush>
</Path.Fill>
<Path.OpacityMask>
<LinearGradientBrush StartPoint="0.5,0" EndPoint="0.5,1">
<LinearGradientBrush.GradientStops>
<GradientStop Offset="0.0" Color="#2F000000" />
<GradientStop Offset="1.0" Color="#00000000" />
</LinearGradientBrush.GradientStops>
</LinearGradientBrush>
</Path.OpacityMask>
</Path>
而有关如何实现倒影效果可以参考这篇文章。当然如果使用BLEND来制作倒影效果会更容易,但不知道为
什么,目前的BLEND还无法实现对子对象的属性设置(因为上面的XAML代码被放在了PATH对象中,而BLEND
在可视状态下只能看到PATH那一层的对象,而无法设置ImageBrush="leftReflection2Brush"这个对象)。
有了7个path对象加载图像(使用里面的ImageBrush的ImageSource属性)。还有7个path对象分别对应
实现7个图像的倒影效果。也就是下图中所显示的:

当然除此以外,还有2组PATH对象分别是:
lastImgBrush,lastReflectionBrush:用于当点击右侧导航按钮时,设置为当前分页下最右侧图像,以
避免出现图片为空(空框)的情况。
firstImgBrush,firstReflectionBrush:用于当点击左侧导航按钮时,设置为当前分页下最左侧图像,以
避免出现图片为空(空框)的情况。
有了这些静态的UI元素之后,我们还需要让其动起来,所以要用到StoryBoard(故事板)。而有关该内容
介绍可参见如下链接:使用silverlight中的Storyboard实现动画效果
因为本DEMO中用的是PointAnimation(当动画值的变化[FROM ...TO...]类型是 Point型时使用), 所以这
里直接就把相应的Xaml代码放在这里了,代码很简单。
首先是当点击右侧导航按钮时的Storyboard代码:

 Code
Code
<Storyboard x:Name='flowForward' Completed='onForwardFlowCompleted'>
<PointAnimation Storyboard.TargetName='pathFigure_centerImg' Storyboard.TargetProperty='StartPoint' From='250,15' To='330,5' Duration='0:0:0.5'/>
<PointAnimation Storyboard.TargetName='line1_centerImg' Storyboard.TargetProperty='Point' From='370,25' To='470,5' Duration='0:0:0.5'/>
<PointAnimation Storyboard.TargetName='line2_centerImg' Storyboard.TargetProperty='Point' From='370,95' To='470,145' Duration='0:0:0.5'/>
<PointAnimation Storyboard.TargetName='line3_centerImg' Storyboard.TargetProperty='Point' From='250,115' To='330,145' Duration='0:0:0.5'/>
<PointAnimation Storyboard.TargetName='pathFigure_centerReflection' Storyboard.TargetProperty='StartPoint' From='250,120' To='330,155' Duration='0:0:0.5'/>
<PointAnimation Storyboard.TargetName='line1_centerReflection' Storyboard.TargetProperty='Point' From='370,100' To='470,155' Duration='0:0:0.5'/>
<PointAnimation Storyboard.TargetName='line2_centerReflection' Storyboard.TargetProperty='Point' From='370,170' To='490,195' Duration='0:0:0.5'/>
<PointAnimation Storyboard.TargetName='line3_centerReflection' Storyboard.TargetProperty='Point' From='250,190' To='310,195' Duration='0:0:0.5'/>
<PointAnimation Storyboard.TargetName='pathFigure_rightImg1' Storyboard.TargetProperty='StartPoint' From='330,5' To='430,25' Duration='0:0:0.5'/>
<PointAnimation Storyboard.TargetName='line1_rightImg1' Storyboard.TargetProperty='Point' From='470,5' To='550,15' Duration='0:0:0.5'/>
<PointAnimation Storyboard.TargetName='line2_rightImg1' Storyboard.TargetProperty='Point' From='470,145' To='550,115' Duration='0:0:0.5'/>
<PointAnimation Storyboard.TargetName='line3_rightImg1' Storyboard.TargetProperty='Point' From='330,145' To='430,95' Duration='0:0:0.5'/>
<PointAnimation Storyboard.TargetName='pathFigure_right1Reflection' Storyboard.TargetProperty='StartPoint' From='330,155' To='430,100' Duration='0:0:0.5'/>
<PointAnimation Storyboard.TargetName='line1_right1Reflection' Storyboard.TargetProperty='Point' From='470,155' To='550,120' Duration='0:0:0.5'/>
<PointAnimation Storyboard.TargetName='line2_right1Reflection' Storyboard.TargetProperty='Point' From='490,195' To='550,190' Duration='0:0:0.5'/>
<PointAnimation Storyboard.TargetName='line3_right1Reflection' Storyboard.TargetProperty='Point' From='310,195' To='430,170' Duration='0:0:0.5'/>
<PointAnimation Storyboard.TargetName='pathFigure_rightImg2' Storyboard.TargetProperty='StartPoint' From='430,25' To='500,25' Duration='0:0:0.5'/>
<PointAnimation Storyboard.TargetName='line1_rightImg2' Storyboard.TargetProperty='Point' From='550,15' To='620,15' Duration='0:0:0.5'/>
<PointAnimation Storyboard.TargetName='line2_rightImg2' Storyboard.TargetProperty='Point' From='550,115' To='620,115' Duration='0:0:0.5'/>
<PointAnimation Storyboard.TargetName='line3_rightImg2' Storyboard.TargetProperty='Point' From='430,95' To='500,95' Duration='0:0:0.5'/>
<PointAnimation Storyboard.TargetName='pathFigure_right2Reflection' Storyboard.TargetProperty='StartPoint' From='430,100' To='500,100' Duration='0:0:0.5'/>
<PointAnimation Storyboard.TargetName='line1_right2Reflection' Storyboard.TargetProperty='Point' From='550,120' To='620,120' Duration='0:0:0.5'/>
<PointAnimation Storyboard.TargetName='line2_right2Reflection' Storyboard.TargetProperty='Point' From='550,190' To='620,190' Duration='0:0:0.5'/>
<PointAnimation Storyboard.TargetName='line3_right2Reflection' Storyboard.TargetProperty='Point' From='430,170' To='500,170' Duration='0:0:0.5'/>
<PointAnimation Storyboard.TargetName='pathFigure_rightImg3' Storyboard.TargetProperty='StartPoint' From='500,25' To='550,25' Duration='0:0:0.5'/>
<PointAnimation Storyboard.TargetName='line1_rightImg3' Storyboard.TargetProperty='Point' From='620,15' To='670,15' Duration='0:0:0.5'/>
<PointAnimation Storyboard.TargetName='line2_rightImg3' Storyboard.TargetProperty='Point' From='620,115' To='670,115' Duration='0:0:0.5'/>
<PointAnimation Storyboard.TargetName='line3_rightImg3' Storyboard.TargetProperty='Point' From='500,95' To='550,95' Duration='0:0:0.5'/>
<PointAnimation Storyboard.TargetName='pathFigure_right3Reflection' Storyboard.TargetProperty='StartPoint' From='500,100' To='550,100' Duration='0:0:0.5'/>
<PointAnimation Storyboard.TargetName='line1_right3Reflection' Storyboard.TargetProperty='Point' From='620,120' To='670,120' Duration='0:0:0.5'/>
<PointAnimation Storyboard.TargetName='line2_right3Reflection' Storyboard.TargetProperty='Point' From='620,190' To='670,190' Duration='0:0:0.5'/>
<PointAnimation Storyboard.TargetName='line3_right3Reflection' Storyboard.TargetProperty='Point' From='500,170' To='550,170' Duration='0:0:0.5'/>
<PointAnimation Storyboard.TargetName='pathFigure_leftImg1' Storyboard.TargetProperty='StartPoint' From='180,15' To='250,15' Duration='0:0:0.5'/>
<PointAnimation Storyboard.TargetName='line1_leftImg1' Storyboard.TargetProperty='Point' From='300,25' To='370,25' Duration='0:0:0.5'/>
<PointAnimation Storyboard.TargetName='line2_leftImg1' Storyboard.TargetProperty='Point' From='300,95' To='370,95' Duration='0:0:0.5'/>
<PointAnimation Storyboard.TargetName='line3_leftImg1' Storyboard.TargetProperty='Point' From='180,115' To='250,115' Duration='0:0:0.5'/>
<PointAnimation Storyboard.TargetName='pathFigure_left1Reflection' Storyboard.TargetProperty='StartPoint' From='180,120' To='250,120' Duration='0:0:0.5'/>
<PointAnimation Storyboard.TargetName='line1_left1Reflection' Storyboard.TargetProperty='Point' From='300,100' To='370,100' Duration='0:0:0.5'/>
<PointAnimation Storyboard.TargetName='line2_left1Reflection' Storyboard.TargetProperty='Point' From='300,170' To='370,170' Duration='0:0:0.5'/>
<PointAnimation Storyboard.TargetName='line3_left1Reflection' Storyboard.TargetProperty='Point' From='180,190' To='250,190' Duration='0:0:0.5'/>
<PointAnimation Storyboard.TargetName='pathFigure_leftImg2' Storyboard.TargetProperty='StartPoint' From='130,15' To='180,15' Duration='0:0:0.5'/>
<PointAnimation Storyboard.TargetName='line1_leftImg2' Storyboard.TargetProperty='Point' From='250,25' To='300,25' Duration='0:0:0.5'/>
<PointAnimation Storyboard.TargetName='line2_leftImg2' Storyboard.TargetProperty='Point' From='250,95' To='300,95' Duration='0:0:0.5'/>
<PointAnimation Storyboard.TargetName='line3_leftImg2' Storyboard.TargetProperty='Point' From='130,115' To='180,115' Duration='0:0:0.5'/>
<PointAnimation Storyboard.TargetName='pathFigure_left2Reflection' Storyboard.TargetProperty='StartPoint' From='130,120' To='180,120' Duration='0:0:0.5'/>
<PointAnimation Storyboard.TargetName='line1_left2Reflection' Storyboard.TargetProperty='Point' From='250,100' To='300,100' Duration='0:0:0.5'/>
<PointAnimation Storyboard.TargetName='line2_left2Reflection' Storyboard.TargetProperty='Point' From='250,170' To='300,170' Duration='0:0:0.5'/>
<PointAnimation Storyboard.TargetName='line3_left2Reflection' Storyboard.TargetProperty='Point' From='130,190' To='180,190' Duration='0:0:0.5'/>
</Storyboard>
然后是点击左侧导航时的StoryBoard代码:

 Code
Code
<Storyboard x:Name='flowBackward' Completed='onBackwardFlowCompleted'>
<PointAnimation Storyboard.TargetName='pathFigure_centerImg' Storyboard.TargetProperty='StartPoint' From='430,25' To='330,5' Duration='0:0:0.5'/>
<PointAnimation Storyboard.TargetName='line1_centerImg' Storyboard.TargetProperty='Point' From='550,15' To='470,5' Duration='0:0:0.5'/>
<PointAnimation Storyboard.TargetName='line2_centerImg' Storyboard.TargetProperty='Point' From='550,115' To='470,145' Duration='0:0:0.5'/>
<PointAnimation Storyboard.TargetName='line3_centerImg' Storyboard.TargetProperty='Point' From='430,95' To='330,145' Duration='0:0:0.5'/>
<PointAnimation Storyboard.TargetName='pathFigure_centerReflection' Storyboard.TargetProperty='StartPoint' From='430,100' To='330,155' Duration='0:0:0.5'/>
<PointAnimation Storyboard.TargetName='line1_centerReflection' Storyboard.TargetProperty='Point' From='550,120' To='470,155' Duration='0:0:0.5'/>
<PointAnimation Storyboard.TargetName='line2_centerReflection' Storyboard.TargetProperty='Point' From='550,190' To='490,195' Duration='0:0:0.5'/>
<PointAnimation Storyboard.TargetName='line3_centerReflection' Storyboard.TargetProperty='Point' From='430,170' To='310,195' Duration='0:0:0.5'/>
<PointAnimation Storyboard.TargetName='pathFigure_leftImg1' Storyboard.TargetProperty='StartPoint' From='330,5' To='250,15' Duration='0:0:0.5'/>
<PointAnimation Storyboard.TargetName='line1_leftImg1' Storyboard.TargetProperty='Point' From='470,5' To='370,25' Duration='0:0:0.5'/>
<PointAnimation Storyboard.TargetName='line2_leftImg1' Storyboard.TargetProperty='Point' From='470,145' To='370,95' Duration='0:0:0.5'/>
<PointAnimation Storyboard.TargetName='line3_leftImg1' Storyboard.TargetProperty='Point' From='330,145' To='250,115' Duration='0:0:0.5'/>
<PointAnimation Storyboard.TargetName='pathFigure_left1Reflection' Storyboard.TargetProperty='StartPoint' From='330,155' To='250,120' Duration='0:0:0.5'/>
<PointAnimation Storyboard.TargetName='line1_left1Reflection' Storyboard.TargetProperty='Point' From='470,155' To='370,100' Duration='0:0:0.5'/>
<PointAnimation Storyboard.TargetName='line2_left1Reflection' Storyboard.TargetProperty='Point' From='490,195' To='370,170' Duration='0:0:0.5'/>
<PointAnimation Storyboard.TargetName='line3_left1Reflection' Storyboard.TargetProperty='Point' From='310,195' To='250,190' Duration='0:0:0.5'/>
<PointAnimation Storyboard.TargetName='pathFigure_leftImg2' Storyboard.TargetProperty='StartPoint' From='250,15' To='180,15' Duration='0:0:0.5'/>
<PointAnimation Storyboard.TargetName='line1_leftImg2' Storyboard.TargetProperty='Point' From='370,25' To='300,25' Duration='0:0:0.5'/>
<PointAnimation Storyboard.TargetName='line2_leftImg2' Storyboard.TargetProperty='Point' From

