Introduction
I've been using GDI+ for about a week now, and I must say it is a welcome upgrade. I am working on a paint program, and a lot of things I thought I would have to write myself are now built in, meaning I get them "for free". The upside and the downside are,
I guess, the same - things I want my program to do are now a lot easier to accomplish, making it easier both for me, and anyone else wanting to write something similar.
Before I get started, let me thank all the people who helped me get started with GDI+ by letting me know it existed, and where to get it. Parts of the information given here are taken verbatim from the thread where these things were discussed on the CodeProject
lounge. Of course, all the cool things are written by me :0)
First things first. You need to get GDI+ installed before you can use it. It is found in the Feb 2001 Microsoft Platform SDK. If you don't download the SDK (or get it on CD) then shame on you. Every release of the SDK includes cool new stuff, such as updates
to the WTL. Anyhow, I forgive you if you go to
ftp.microsoft.com, and download it NOW. If all you want is GDI+, the files are in
psdk-common.11.cab (at least that's what I was told, I downloaded the whole thing).
The files you need are:
- the dll : gdiplus.dll
- the library : gdiplus.lib
- the header files : gdiplus*.h
- the help files: gdicpp.chm & gdicpp.chi
Don't forget to make sure you set Visual C++ to point to the .h files in the includes, and the .lib file in the directories. Also put
gdiplus.lib in your list of libraries by choosing Project/Settings/Link and entering it into the object/library modules area. To set your include and library directories, go to Tools/Options/Directories
To get your application to work with GDI+, do the following:
- in your application class, add the member:
 Collapse |
Copy CodeULONG_PTR m_gdiplusToken;
ULONG_PTR is a typedef for unsigned __int64. I usually don't like to use typedefs, but in this case I'll make an exception...
- in
InitInstance, add:
Collapse |
Copy Code
Gdiplus::GdiplusStartupInput gdiplusStartupInput;
Gdiplus::GdiplusStartup(&m_gdiplusToken, &gdiplusStartupInput, NULL);
I'd love to tell you how all this works, but I'm afraid Microsoft are not currently shipping the source, just headers and a dll.
- in
ExitInstance, add:
Collapse |
Copy Code
Gdiplus::GdiplusShutdown(m_gdiplusToken);
I'll mention at this point that you have the option of prefacing all your commands with
GdiPlus::, or you can simply put
Collapse |
Copy Code
using namespace GdiPlus;
at the head of your code. The rest of my examples will assume you have included this command first, and will not preface commands as such. So now we have a program that initialises GDI+, this is probably a good place to discuss how GDI+ actually works. As
you may be aware, GDI works with the concept of a device context. Typically you would draw a box using GDI like this:
(in your OnPaint handler)
Collapse |
Copy Code
CPaintDC dc(this);
CPen MyPen, * pOldPen;
CBrush MyBrush, * pOldBrush;<BR>
<BR><BR><BR><BR>MyPen.Create(1, PS_SOLID, RGB(255,0,0));
pOldPen = dc.SelectObject(&MyPen);
MyBrush.CreateSolidBrush(RGB(0, 0, 255));
pOldBrush = dc.SelectObject(&MyBrush);
<BR><BR>dc.Rectangle(0, 0, 200, 200);
dc.SelectObject(pOldPen);
dc.SelectObject(pOldBrush);
The main thing to understand is that I select a pen or brush and it remains there until I select another, and that the opportunities to leak memory are many, and not exactly easy to debug. In contrast the GDI+ model revolves around creating a graphics object,
like so:
Collapse |
Copy Code
CPaintDC dc(this);
Graphics graphics(dc.hdc);
Now this object is holding our DC until we destroy or release it, and we use this object to manipulate our device context. All the functions take the pen or brush they use, meaning no memory leaks, and ease of writing code that draws in more than one colour.
Before presenting an example, let me point out one more exciting thing about GDI+. In GDI we used
COLORREF as a variable that held a colour. It was a typedef for a
DWORDCOLORREF was built using the RGB macro. Colours could be retrieved using
GetRValue, GetGValue and GetBValue. In contrast, GDI+ uses the COLOR class, which takes four values to contruct - the extra being alpha. If you are not familiar with the concept of alpha transparency, imagine you are looking
through a stained glass window. The colours of the glass affect what you see behind the glass, but the degree to which they obscure your vision depends on how thick the glass is. Alpha transparency similarly blends the colour you use to draw with the colour
of the canvas beneath it. Colors in GDI+ are ARGB, the alpha value is specified first. So to draw a line we can do the following:
Collapse |
Copy Code
Pen MyPen(Color(255, 0, 255, )); graphics.DrawLine(&pen, 0, 0, 200, 100);
GDI+ also dispenses with the idea of a current position: in GDI we used
MoveTo(point)LineTo(point). Now we specify both points at once.
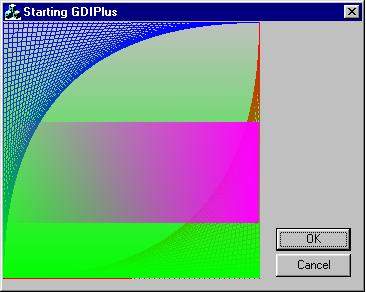
I've provided an example program designed to facilitate experimentation by giving you the necessary framework to play with some code, and also to run and see how alpha works, if you've not seen this before. The drawing code creates a pattern in red and blue,
then draws over with green, then magenta, and the alpha value fades first up and down, then from left to right.
The OnPaint method of the example program looks like this:
Collapse |
Copy Code
using namespace Gdiplus;
CPaintDC dc(this);
Graphics graphics(dc.m_hDC);
Pen blue (Color(255, 0, 0, 255));
Pen red (Color(255, 255, 0, 0));
int y = 256;
for (int x = 0; x < 256; x += 5)
{
graphics.DrawLine(&blue, 0, y, x, 0);
graphics.DrawLine(&red, 256, x, y, 256);
y -= 5;
}
for (y = 0; y < 256; y++)
{
Pen pen(Color(y, 0, 255,0));
graphics.DrawLine(&pen, 0, y, 256, y);
Sleep(20);
}
for (x = 0; x < 256; x++)
{
Pen pen(Color(x, 255, 0, 255));
graphics.DrawLine(&pen, x, 100, x, 200);
Sleep(20);
}
This marks the end of my first GDI+ tutorial. My aim was simply to get you up and running - to show you how to set up a program to use GDI+ and explain some basic concepts about the way it is set up. My next tutorial will be on using brushes - with GDI+
you can make a brush display a gradient, or even be textured with a bitmap. Stay tuned - the real coolness is about to begin...