- #include <QTextStream>
- #include <QFile>
- QFile file("./styles/default.qss");
- file.open(QFile::ReadOnly);
- QString styleSheet = file.readAll();//QLatin1String(file.readAll());
- a.setStyleSheet(styleSheet);
#ifndef DIALOG_H
#define DIALOG_H
#include <QDialog>
#include <QGridLayout>
#include <QLabel>
#include <QPushButton>
#include <QLineEdit>
namespace Ui {
class Dialog;
}
class Dialog : public QDialog
{
Q_OBJECT
public:
explicit Dialog(QWidget *parent = 0);
~Dialog();
private:
Ui::Dialog *ui;
QGridLayout *layout1;
QPushButton *btn1;
QPushButton *btn2;
QPushButton *btn3;
QPushButton *btn4;
QLineEdit *edit1;
};
#endif // DIALOG_H
#include "dialog.h"
#include "ui_dialog.h"
Dialog::Dialog(QWidget *parent) :
QDialog(parent),
ui(new Ui::Dialog)
{
ui->setupUi(this);
this->setWindowFlags(this->windowFlags()&Qt::WindowMaximizeButtonHint&Qt::WindowMinimizeButtonHint); //为对话框添加上最大化和最小化按钮
// layout=new QBoxLayout(this);
layout1=new QGridLayout(this);
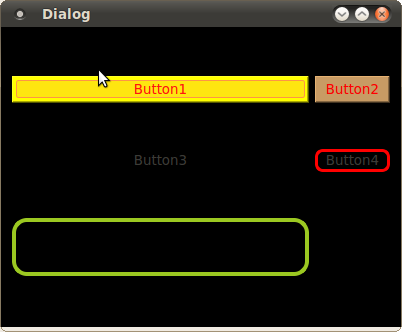
btn1=new QPushButton(this);
btn1->setStyleSheet("QPushButton{color:red;background:yellow}"); //设定前景颜色,就是字体颜色
// btn1->setStyleSheet("QPushButton{background:yellow}");
btn1->setText("Button1");
btn2=new QPushButton(this);
btn2->setStyleSheet("QPushButton{color:red;background-color:rgb(200,155,100)}"); //使用rgb来设定背景颜色
btn2->setText("Button2");
btn3=new QPushButton(this);
btn3->setStyleSheet("QPushButton{background-image:url(image/1.png);background-repeat: repeat-xy;background-position: center;background-attachment: fixed;background-attachment: fixed;background-attachment: fixed;;background-clip: padding}");
//设定按钮的背景图片,background-repeat可以设定背景图片的重复规则,这里设定仅在xy方向都重复,所以图片会被重复一次
//background-position用来设定图片的位置,是左(left)还是右(right),还是在中间(center),是上(top)还是底部(bottom)
//background-attachment用来这定背景图片是否卷动或者和窗口大小相匹配,默认是卷动的
btn3->setText("Button3");
btn4=new QPushButton(this);
btn4->setStyleSheet("QPushButton{border: 3px solid red;border-radius:8px}"); //设定边框宽度以及颜色
//可以使用border-top,border-right,border-bottom,border-left分别设定按钮的上下左右边框,
//同样有border-left-color, border-left-style, border-left-width.等分别来设定他们的颜色,样式和宽度
//border-image用来设定边框的背景图片。
//border-radius用来设定边框的弧度。可以设定圆角的按钮
btn4->setText("Button4");
//字体设定
//font-family来设定字体所属家族,
//font-size来设定字体大小
//font-style来设定字体样式
//font-weight来设定字体深浅
//height用来设定其高低
//selection-color用来设定选中时候的颜色
edit1=new QLineEdit(this);
edit1->setStyleSheet("QLineEdit{font: bold italic large \"Times New Roman\";font-size:25px;color:rgb(55,100,255);height:50px;border:4px solid rgb(155,200,33);border-radius:15px;selection-color:pink}");
//父窗口的设定
//icon-size来设定图片大小
this->setWindowIcon(QIcon("image/1.png"));
this->setStyleSheet("QWidget{background:write url(image/2.png);icon-size:20px 5px}"); //设定整个对话框的背景颜色
// this->setStyleSheet("QWidget{icon-size:20px 5px}");
layout1->addWidget(btn1,0,0);
layout1->addWidget(btn2,0,1);
layout1->addWidget(btn3,1,0);
layout1->addWidget(btn4,1,1);
layout1->addWidget(edit1,2,0);
setLayout(layout1);
}
Dialog::~Dialog()
{
delete ui;
}
QWidget::setStyleSheet(QString);
如:
QCheckBox { color: red }
如:
setStyleSheet("background-color: #FFFFBB;"
"color: #000099;"
"margin: 10px;"
"padding: 5px;"
"padding-left: 15px;"
"padding-right: 15px;"
"border-radius: 5px;" // 圆角边框(只用IE的人就不知道了吧:D)
"border: 3px solid #abc;");
"color: #000099;"
"margin: 10px;"
"padding: 5px;"
"padding-left: 15px;"
"padding-right: 15px;"
"border-radius: 5px;" // 圆角边框(只用IE的人就不知道了吧:D)
"border: 3px solid #abc;"
(原创)QT Creator的style sheet的几种用法(QT Creator)(StyleSheet)(样式)(QT4.7)(用法)
摘要:
QT Create中,对button或者window等部件设置背景、颜色、透明等样式时,需要用到style sheet,可以直接在代码里写,也可以在ui设计师里通过右键change style sheet的方法来设置,本人是使用的后面的方式,下面介绍几种常见的用法。
介绍:
作者使用的开发环境为:qt creator 201005, qt4.7。
1、利用style sheet给窗体设置背景
使用stylesheet设置背景图片还是有一些要注意的,如果是在mainwindow和dialog中,直接右键change style sheet在add resource中选择background-image或者border-image,选择资源文件中的图片就行了(前者是按像素显示图片,后者可根据窗体大小来自动缩放图片),如下图:

但在widget中就不行,你会发现,用同样的方法,背景并没有发生改变,而仅仅是它的子窗体背景图片发生了改变。
那么在widget中要如何做呢,我们在widget中放置一个frame,然后对frame通过stylesheet设置背景,后面窗体里所有的部件都放在这个frame里。
我们知道,子窗体会继承父窗体的属性,也就是说,父窗体的背景,在子窗体中也会有,那如何让子窗体不继承父窗体的背景呢,同样的,还是在Edit Style Sheet里,需下输入如下代码:
border-image: url(:/images/desktop.jpg);
}
#desktop * {
border-image:url();
}
desktop是你的窗体名。
2、menubar设置透明
我想做一个菜单按钮,像ubuntu的应用程序菜单一样,能在点击时弹出一个下拉框,我选择了用mainwindow来实现,但我如现menuba显示在顶层很难看,如何才能不让它显示呢。
设置menuba的stylesheet,
background-color:transparent |
将背景设置为透明。

3、tool button不显示边框
当我们设置button的icon时,发现icon的形状并不与button完全一致,如下图:

设置stylesheet
border-style: |
效果如下:

注意,一定要选择tool button,而不要选择push button,因为push button活动的时候会有一个虚线框。
要达到上图的效果,除了设置border-style:flat,可不可以将style设置为transparent呢?设置成transparent后,显示上看,效果是和上图的一样,但当按下时,button没有被图片覆盖的地方就会显示被按下时的颜色。
4、在父窗体的stylesheet中设置子部件的属性
假设有多个button,且它们的样式是一样的,那是不是需要一个个设置呢?不需要的,我们可以在父窗体中进行设置,那么子部件都会继承它的属性。
如果某个button的样式特殊,再单独修改就行了,下面举个实例,在父窗体的stylesheet中设置如下
QDialog{background:rgb(229, |
QMenuBar{background:url(:/image/header.bmp)} |
QStatusBar{background:url(:/image/header.bmp)} |
QPushButton{background:url(:/image/header.bmp)} |
QLCDNumber{background:url(:/image/lcd.bmp)} |
QLabel{color: |
QDial{background-color: |