Android中Fragment的应用
Fragment 表现 Activity 中用UI的一个行为或者一部分. 可以组合多个fragment放在一个单独的activity中来创建一个多界面区域的UI,并可以在多个activity里重用某一个fragment.把fragment 想象成一个activity的模块化区域, 有它自己的生命周期, 接收属于它的输入事件, 并且可以在activity运行期间添加和删除.
Fragment 必须总是被嵌入到一个activity中, 它们的生命周期直接被其所属的宿主activity的生命周期影响. 例如, 当activity被暂停,那么在其中的所有fragment也被暂停; 当activity被销毁, 所有隶属于它的fragment也被销毁. 然而,当一个activity正在运行时(处于resumed状态), 我们可以独立地操作每一个fragment, 比如添加或删除它们. 当处理这样一个fragment事务时, 也可以将它添加到activity所管理的back stack -- 每一个activity中的back stack实体都是一个发生过的fragment事务的记录. back stack允许用户通过按下 BACK 按键从一个fragment事务后退(往后导航).
将一个fragment作为activity布局的一部分添加进来时, 它处在activity的view hierarchy中的ViewGroup中, 并且定义有它自己的view布局.通过在activity的布局文件中声明fragment来插入一个fragment到你的activity布局中, 或者可以写代码将它添加到一个已存在的ViewGroup.然而, fragment并不一定必须是activity布局的一部分; 也可以将一个fragment作为activity的隐藏的后台工作者.
本文档描述了如何使用fragment创建你的应用程序, 包括:当被添加到activity的back stack后, fragment如何维护他们的状态. 在activity中,与activity和其他fragment共享事件.构建到activity的action bar.以及更多内容.
设计哲学
Android在3.0中引入了fragments的概念,主要目的是用在大屏幕设备上--例如平板电脑上,支持更加动态和灵活的UI设计. 平板电脑的屏幕要比手机的大得多,有更多的空间来放更多的UI组件,并且这些组件之间会产生更多的交互.Fragment允许这样的一种设计,而不需要你亲自来管理view hierarchy的复杂变化. 通过将activity的布局分散到fragment中, 你可以在运行时修改activity的外观, 并在由activity管理的back stack中保存那些变化.
例如, 一个新闻应用可以在屏幕左侧使用一个fragment来展示一个文章的列表, 然后在屏幕右侧使用另一个fragment来展示一篇文章 – 2个fragment并排显示在相同的一个activity中, 并且每一个fragment拥有它自己的一套生命周期回调方法,并且处理它们自己的用户输入事件. 因此, 取代使用一个activity来选择一篇文章,而另一个activity来阅读文章 的方式, 用户可以在相同的activity中选择一篇文章并且阅读, 如图所示:

fragment在你的应用中应当是一个模块化和可重用的组件. 即,因为fragment定义了它自己的布局, 以及通过使用它自己的生命周期回调方法定义了它自己的行为, 你可以将fragment包含到多个activity中. 这点特别重要, 因为这允许你将你的用户体验适配到不同的屏幕尺寸.举个例子, 你可能会仅当在屏幕尺寸足够大时,在一个activity中包含多个fragment, 并且,当不属于这种情况时,会启动另一个单独的,使用不同fragment的activity.
继续之前那个新闻的例子 -- 当运行在一个特别大的屏幕时(例如平板电脑), app可以在Activity A中嵌入2个fragment. 然而,在一个正常尺寸的屏幕(例如手机)上,没有足够的空间同时供2个fragment用, 因此, Activity A 会仅包含文章列表的fragment, 而当用户选择一篇文章时, 它会启动Activity B, 它包含阅读文章的fragment. 因此, 应用可以同时支持图1中的2种设计模式.
创建Fragment
要创建一个fragment, 必须创建一个 Fragment 的子类 (或者继承自一个已存在的它的子类). Fragment 类的代码看起来很像 Activity .它包含了和activity类似的回调方法, 例如 onCreate(), onStart(), onPause, 以及 onStop(). 事实上, 如果你准备将一个现成的Android应用转换到使用fragment, 你可能只需简单的将代码从你的activity的回调函数分别移动到你的fragment的回调方法.
通常, 应当至少实现如下的生命周期方法:
onCreate()
当创建fragment时, 系统调用此方法.
在实现代码中, 应当初始化想要在fragment中保持的必要组件, 当fragment被暂停或者停止后可以恢复.
onCreateView()
fragment第一次绘制它的用户界面的时候, 系统会调用此方法. 为了绘制fragment的UI, 此方法必须返回一个View, 这个view是你的fragment布局的根view. 如果fragment不提供UI, 可以返回null.
onPause()
用户将要离开fragment时,系统调用这个方法作为第一个指示(然而它不总是意味着fragment将被销毁.) 在当前用户会话结束之前,通常应当在这里提交任何应该持久化的变化(因为用户有可能不会返回).
大多数应用应当为每一个fragment实现至少这3个方法, 但是还有一些其他回调方法你也应当用来去处理fragment生命周期的各种阶段.全部的生命周期回调方法将会在后面章节 Handling the Fragment Lifecycle 中讨论.
除了继承基类 Fragment , 还有一些子类你可能会继承:
DialogFragment
显示一个浮动的对话框. 用这个类来创建一个对话框,是使用在Activity类的对话框工具方法之外的一个好的选,因为你可以将一个fragment对话框合并到activity管理的fragment back stack中, 允许用户返回到一个之前曾被摒弃的fragment.
ListFragment
显示一个由一个adapter(例如 SimpleCursorAdapter)管理的项目的列表, 类似于 ListActivity.它提供一些方法来管理一个list view, 例如 onListItemClick() 回调来处理点击事件.
PreferenceFragment
显示一个 Preference对象的层次结构的列表, 类似于 PreferenceActivity. 这在为你的应用创建一个"设置"activity时有用处.

添加一个用户界面
fragment通常用来作为一个activity的用户界面的一部分, 并将它的layout提供给activity.为了给一个fragment提供一个layout,你必须实现 onCreateView() 回调方法, 当到了fragment绘制它自己的layout的时候, Android系统调用它.你的此方法的实现代码必须返回一个你的fragment的layout的根view.
注意: 如果你的fragment是ListFragment的子类, 它的默认实现是返回从onCreateView()返回一个ListView, 所以一般情况下不必实现它.
从onCreateView()返回的View, 也可以从一个xml layout资源文件中读取并生成. 为了帮助你这么做, onCreateView() 提供了一个 LayoutInflater 对象.
举个例子, 这里有一个Fragment的子类, 从文件 example_fragment.xml 加载了一个layout :
public static class ExampleFragment extends Fragment {
@Override
public View onCreateView(LayoutInflater inflater, ViewGroup container,
Bundle savedInstanceState) {
// Inflate the layout for this fragment
return inflater.inflate(R.layout.example_fragment, container, false);
}
}
传入 onCreateView() 的 container 参数是你的fragment layout将被插入的父ViewGroup(来自activity的layout).savedInstanceState 参数是一个 Bundle, 如果fragment是被恢复的,它提供关于fragment的之前的实例的数据,
inflate() 方法有3个参数:
想要加载的layout的resource ID.
加载的layout的父ViewGroup.
传入container是很重要的, 目的是为了让系统接受所要加载的layout的根view的layout参数,由它将挂靠的父view指定.
布尔值指示在加载期间, 展开的layout是否应当附着到ViewGroup (第二个参数).
(在这个例子中, 指定了false, 因为系统已经把展开的layout插入到container – 传入true会在最后的layout中创建一个多余的view group.)
将fragment添加到activity
通常地, fragment为宿主activity提供UI的一部分, 被作为activity的整个view hierarchy的一部分被嵌入. 有2种方法你可以添加一个fragment到activity layout:
在activity的layout文件中声明fragment
你可以像为View一样, 为fragment指定layout属性.
例子是一个有2个fragment的activity:
<?xml version="1.0" encoding="utf-8"?>
<LinearLayout xmlns:android="http://schemas.android.com/apk/res/android"
android:orientation="horizontal"
android:layout_width="match_parent"
android:layout_height="match_parent">
<fragment android:name="com.example.news.ArticleListFragment"
android:id="@+id/list"
android:layout_weight="1"
android:layout_width="0dp"
android:layout_height="match_parent" />
<fragment android:name="com.example.news.ArticleReaderFragment"
android:id="@+id/viewer"
android:layout_weight="2"
android:layout_width="0dp"
android:layout_height="match_parent" />
</LinearLayout>
<fragment> 中的 android:name 属性指定了在layout中实例化的Fragment类.
当系统创建这个activity layout时, 它实例化每一个在layout中指定的fragment,并调用每一个上的onCreateView()方法,来获取每一个fragment的layout. 系统将从fragment返回的 View 直接插入到<fragment>元素所在的地方.
注意: 每一个fragment都需要一个唯一的标识, 如果activity重启,系统可以用来恢复fragment(并且你也可以用来捕获fragment来处理事务,例如移除它.)
有3种方法来为一个fragment提供一个标识:
为 android:id 属性提供一个唯一ID.
为 android:tag 属性提供一个唯一字符串.
如果以上2个你都没有提供, 系统使用容器view的ID.
撰写代码将fragment添加到一个已存在的ViewGroup.
当activity运行的任何时候, 都可以将fragment添加到activity layout.只需简单的指定一个需要放置fragment的ViewGroup.为了在你的activity中操作fragment事务(例如添加,移除,或代替一个fragment),必须使用来自 FragmentTransaction 的API.
可以按如下方法,从你的Activity取得一个 FragmentTransaction 的实例:
FragmentManager fragmentManager = getFragmentManager()
FragmentTransaction fragmentTransaction = fragmentManager.beginTransaction();
然后你可以使用 add() 方法添加一个fragment, 指定要添加的fragment, 和要插入的view.
ExampleFragment fragment = new ExampleFragment();
fragmentTransaction.add(R.id.fragment_container, fragment);
fragmentTransaction.commit();
add()的第一个参数是fragment要放入的ViewGroup, 由resource ID指定, 第二个参数是需要添加的fragment.一旦用FragmentTransaction做了改变,为了使改变生效,必须调用commit().
添加一个无UI的fragment
之前的例子展示了对UI的支持, 如何将一个fragment添加到activity. 然而, 也可以使用fragment来为activity提供后台行为而不用展现额外的UI.
要添加一个无UI的fragment, 需要从activity使用 add(Fragment, String) 来添加 fragment (为fragment提供一个唯一的字符串"tag", 而不是一个view ID).这么做添加了fragment, 但因为它没有关联到一个activity layout中的一个view, 所以不会接收到onCreateView()调用. 因此不必实现此方法.
为fragment提供一个字符串tag并不是专门针对无UI的fragment的 – 也可以提供字符串tag给有UI的fragment – 但是如果fragment没有UI,那么这个tag是仅有的标识它的途径. 如果随后你想从activity获取这个fragment, 需要使用 findFragmentByTag().
管理Fragment
要在activity中管理fragment, 需要使用FragmentManager. 通过调用activity的getFragmentManager()取得它的实例.
可以通过FragmentManager做一些事情, 包括:
使用findFragmentById() (用于在activity layout中提供一个UI的fragment)或findFragmentByTag() (适用于有或没有UI的fragment)获取activity中存在的fragment .
将fragment从后台堆栈中弹出, 使用 popBackStack() (模拟用户按下BACK 命令).
使用addOnBackStackChangeListener()注册一个监听后台堆栈变化的listener.
处理Fragment事务
关于在activity中使用fragment的很强的一个特性是: 根据用户的交互情况,对fragment进行添加,移除,替换,以及执行其他动作.提交给activity的每一套变化被称为一个事务, 可以使用在 FragmentTransaction 中的 API 处理.我们也可以保存每一个事务到一个activity管理的back stack,允许用户经由fragment的变化往回导航(类似于通过activity往后导航).
从 FragmentManager 获得一个FragmentTransaction的实例 :
FragmentManager fragmentManager = getFragmentManager();
FragmentTransaction fragmentTransaction = fragmentManager.beginTransaction();
每一个事务都是同时要执行的一套变化.可以在一个给定的事务中设置你想执行的所有变化,使用诸如 add(), remove(), 和 replace().然后, 要给activity应用事务, 必须调用 commit().
在调用commit()之前, 你可能想调用 addToBackStack(),将事务添加到一个fragment事务的back stack. 这个back stack由activity管理, 并允许用户通过按下 BACK 按键返回到前一个fragment状态.
举个例子, 这里是如何将一个fragment替换为另一个, 并在后台堆栈中保留之前的状态:
// Create new fragment and transaction
Fragment newFragment = new ExampleFragment();
FragmentTransaction transaction = getFragmentManager().beginTransaction();
// Replace whatever is in the fragment_container view with this fragment,
// and add the transaction to the back stack
transaction.replace(R.id.fragment_container, newFragment);
transaction.addToBackStack(null);
// Commit the transaction
transaction.commit();
在这个例子中, newFragment 替换了当前layout容器中的由R.id.fragment_container标识的fragment.通过调用 addToBackStack(), replace事务被保存到back stack, 因此用户可以回退事务,并通过按下BACK按键带回前一个fragment.
如果添加多个变化到事务(例如add()或remove())并调用addToBackStack(), 然后在你调用commit()之前的所有应用的变化会被作为一个单个事务添加到后台堆栈, BACK按键会将它们一起回退.
添加变化到 FragmentTransaction的顺序不重要, 除以下例外:
必须最后调用 commit().
如果添加多个fragment到同一个容器, 那么添加的顺序决定了它们在view hierarchy中显示的顺序.
当执行一个移除fragment的事务时, 如果没有调用 addToBackStack(), 那么当事务提交后, 那个fragment会被销毁,并且用户不能导航回到它. 有鉴于此, 当移除一个fragment时,如果调用了 addToBackStack(), 那么fragment会被停止, 如果用户导航回来,它将会被恢复.
提示: 对于每一个fragment事务, 你可以应用一个事务动画, 通过在提交事务之前调用setTransition()实现.
调用 commit() 并不立即执行事务.恰恰相反, 它将事务安排排期, 一旦准备好, 就在activity的UI线程上运行(主线程).如果有必要, 无论如何, 你可以从你的UI线程调用 executePendingTransactions() 来立即执行由commit()提交的事务. 但这么做通常不必要, 除非事务是其他线程中的job的一个从属.
警告: 你只能在activity保存它的状态(当用户离开activity)之前使用commit()提交事务.
如果你试图在那个点之后提交, 会抛出一个异常.这是因为如果activity需要被恢复, 提交之后的状态可能会丢失.对于你觉得可以丢失提交的状况, 使用 commitAllowingStateLoss().
与Activity通信
尽管Fragment被实现为一个独立于Activity的对象,并且可以在多个activity中使用, 但一个给定的fragment实例是直接绑定到包含它的activity的. 特别的, fragment可以使用 getActivity() 访问Activity实例, 并且容易地执行比如在activity layout中查找一个view的任务.
View listView = getActivity().findViewById(R.id.list);
同样地, activity可以通过从FragmentManager获得一个到Fragment的引用来调用fragment中的方法, 使用 findFragmentById() 或 findFragmentByTag().
ExampleFragmentfragment =(ExampleFragment) getFragmentManager().findFragmentById(R.id.example_fragment);
为Activity创建事件回调方法
在一些情况下, 你可能需要一个fragment与activity分享事件. 一个好的方法是在fragment中定义一个回调的interface, 并要求宿主activity实现它.当activity通过interface接收到一个回调, 必要时它可以和在layout中的其他fragment分享信息.
例如, 如果一个新的应用在activity中有2个fragment – 一个用来显示文章列表(framgent A), 另一个显示文章内容(fragment B) – 然后 framgent A必须告诉activity何时一个list item被选中,然后它可以告诉fragment B去显示文章.
在这个例子中, OnArticleSelectedListener 接口在fragment A中声明:
public static class FragmentA extends ListFragment {
...
// Container Activity must implement this interface
public interface OnArticleSelectedListener {
public void onArticleSelected(Uri articleUri);
}
...
}
然后fragment的宿主activity实现 OnArticleSelectedListener 接口, 并覆写 onArticleSelected() 来通知fragment B,从fragment A到来的事件.为了确保宿主activity实现这个接口, 把Activity作为参数传入fragment A的 onAttach() 回调方法(当添加fragment到activity时由系统调用) ,然后做类型转换来实例化一个OnArticleSelectedListener实例.
public static class FragmentA extends ListFragment {
OnArticleSelectedListener mListener;
...
@Override
public void onAttach(Activity activity) {
super.onAttach(activity);
try {
mListener = (OnArticleSelectedListener) activity;
} catch (ClassCastException e) {
throw new ClassCastException(activity.toString() + " must implement OnArticleSelectedListener");
}
}
...
}
如果activity没有实现接口, fragment会抛出 ClassCastException 异常. 正常情形下, mListener成员会保持一个到activity的OnArticleSelectedListener实现的引用, 因此fragment A可以通过调用在OnArticleSelectedListener接口中定义的方法分享事件给activity.例如, 如果fragment A是一个 ListFragment的子类, 每次用户点击一个列表项, 系统调用在fragment中的onListItemClick(),然后后者调用 onArticleSelected() 来分配事件给activity.
public static class FragmentA extends ListFragment {
OnArticleSelectedListener mListener;
...
@Override
public void onListItemClick(ListView l, View v, int position, long id) {
// Append the clicked item's row ID with the content provider Uri
Uri noteUri = ContentUris.withAppendedId(ArticleColumns.CONTENT_URI, id);
// Send the event and Uri to the host activity
mListener.onArticleSelected(noteUri);
}
...
}
传给 onListItemClick() 的 id 参数是被点击的项的行ID, activity(或其他fragment)用来从应用的 ContentProvider 获取文章.
添加项目到Action Bar
你的fragment可以通过实现 onCreateOptionMenu() 提供菜单项给activity的选项菜单(以此类推, Action Bar也一样).为了使这个方法接收调用,无论如何, 你必须在 onCreate() 期间调用 setHasOptionsMenu() 来指出fragment愿意添加item到选项菜单(否则, fragment将接收不到对 onCreateOptionsMenu()的调用)
随后从fragment添加到Option菜单的任何项,都会被追加到现有菜单项的后面.当一个菜单项被选择, fragment也会接收到 对 onOptionsItemSelected() 的回调.也可以在你的fragment layout中通过调用 registerForContextMenu() 注册一个view来提供一个环境菜单.当用户打开环境菜单, fragment接收到一个对 onCreateContextMenu() 的调用.当用户选择一个项目, fragment接收到一个对onContextItemSelected() 的调用.
注意: 尽管你的fragment会接收到它所添加的每一个菜单项被选择后的回调, 但实际上当用户选择一个菜单项时, activity会首先接收到对应的回调.如果activity的on-item-selected回调函数实现并没有处理被选中的项目, 然后事件才会被传递到fragment的回调.
这个规则适用于选项菜单和环境菜单.
处理Fragment生命周期
管理fragment的生命周期, 大多数地方和管理activity生命周期很像.和activity一样, fragment可以处于3种状态:
Resumed
在运行中的activity中fragment可见.
Paused
另一个activity处于前台并拥有焦点, 但是这个fragment所在的activity仍然可见(前台activity局部透明或者没有覆盖整个屏幕).
Stopped
要么是宿主activity已经被停止, 要么是fragment从activity被移除但被添加到后台堆栈中.
停止状态的fragment仍然活着(所有状态和成员信息被系统保持着). 然而, 它对用户不再可见, 并且如果activity被干掉,他也会被干掉.
仍然和activity一样, 你可以使用Bundle保持fragment的状态, 万一activity的进程被干掉,并且当activity被重新创建的时候, 你需要恢复fragment的状态时就可以用到. 你可以在fragment的 onSaveInstanceState() 期间保存状态, 并可以在 onCreate(), onCreateView() 或 onActivityCreated() 期间恢复它.
生命周期方面activity和fragment之间最重要的区别是各自如何在它的后台堆栈中储存. 默认地, activity在停止后, 它会被放到一个由系统管理的用于保存activity的后台堆栈.(因此用户可以使用BACK按键导航回退到它).
然而, 仅当你在一个事务期间移除fragment时,显式调用addToBackStack()请求保存实例时,才被放到一个由宿主activity管理的后台堆栈.
另外, 管理fragment的生命周期和管理activity生命周期非常类似.因此, "managing the activity lifecycle"中的相同实践也同样适用于fragment. 你需要理解的是, activity的生命如何影响fragment的生命.与activity生命周期的协调工作。
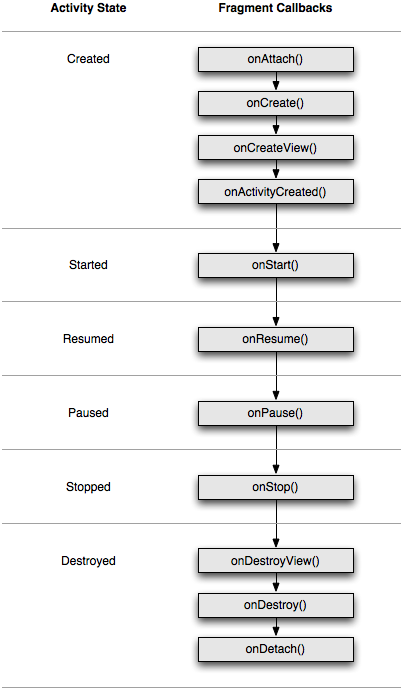
(图3)
fragment所生存的activity的生命周期,直接影响fragment的生命周期, 每一个activity的生命周期的回调行为都会引起每一个fragment中类似的回调.
例如, 当activity接收到onPause()时,activity中的每一个fragment都会接收到onPause().
Fragment 有一些额外的生命周期回调方法, 那些是处理与activity的唯一的交互, 为了执行例如创建和销毁fragment的UI的动作. 这些额外的回调方法是:
onAttach()
当fragment被绑定到activity时被调用(Activity会被传入.).
onCreateView()
创建和fragment关联的view hierarchy时调用.
onActivityCreated()
当activity的onCreate()方法返回时被调用.
onDestroyView()
当和fragment关联的view hierarchy正在被移除时调用.
onDetach()
当fragment从activity解除关联时被调用.
fragment生命周期的流程, 以及宿主activity对它的影响, 在图3中显示.在这个图中, 可以看到activity依次的每个状态是如何决定fragment可能接收到的回调方法.例如, 当activity接收到它的 onCreate(), activity中的fragment接收到最多是onActivityCreated().
一旦activity到达了resumed状态, 你可以自由地在activity添加和移除fragment.因此, 仅当activity处于resumed状态时, fragment的生命周期才可以独立变化.
无论如何, 当activity离开resumed状态, fragment再次被activity的推入它自己的生命周期过程.
Example 例子
To bring everything discussed in this document together, here's an example of an activity using two fragments to create a two-pane layout. The activity below includes one fragment to show a list of Shakespeare play titles and another to show a summary of the play when selected from the list. It also demonstrates how to provide different configurations of the fragments, based on the screen configuration.
Note: The complete source code for this activity is available in FragmentLayout.java.
The main activity applies a layout in the usual way, during onCreate():
@Override
protected void onCreate(Bundle savedInstanceState) {
super.onCreate(savedInstanceState);
setContentView(R.layout.fragment_layout);
}
The layout applied is fragment_layout.xml:
<LinearLayout xmlns:android="http://schemas.android.com/apk/res/android"
android:orientation="horizontal"
android:layout_width="match_parent" android:layout_height="match_parent">
<fragment class="com.example.android.apis.app.FragmentLayout$TitlesFragment"
android:id="@+id/titles" android:layout_weight="1"
android:layout_width="0px" android:layout_height="match_parent" />
<FrameLayout android:id="@+id/details" android:layout_weight="1"
android:layout_width="0px" android:layout_height="match_parent"
android:background="?android:attr/detailsElementBackground" />
</LinearLayout>
Using this layout, the system instantiates the TitlesFragment (which lists the play titles) as soon as the activity loads the layout, while the FrameLayout (where the fragment for showing the play summary will go) consumes space on the right side of the screen, but remains empty at first. As you'll see below, it's not until the user selects an item from the list that a fragment is placed into the FrameLayout.
However, not all screen configurations are wide enough to show both the list of plays and the summary, side by side. So, the layout above is used only for the landscape screen configuration, by saving it at res/layout-land/fragment_layout.xml.
Thus, when the screen is in portrait orientation, the system applies the following layout, which is saved at res/layout/fragment_layout.xml:
<FrameLayout xmlns:android="http://schemas.android.com/apk/res/android"
android:layout_width="match_parent" android:layout_height="match_parent">
<fragment class="com.example.android.apis.app.FragmentLayout$TitlesFragment"
android:id="@+id/titles"
android:layout_width="match_parent" android:layout_height="match_parent" />
</FrameLayout>
This layout includes only TitlesFragment. This means that, when the device is in portrait orientation, only the list of play titles is visible. So, when the user clicks a list item in this configuration, the application will start a new activity to show the summary, instead of loading a second fragment.
Next, you can see how this is accomplished in the fragment classes. First is TitlesFragment, which shows the list of Shakespeare play titles. This fragment extends ListFragmentand relies on it to handle most of the list view work.
As you inspect this code, notice that there are two possible behaviors when the user clicks a list item: depending on which of the two layouts is active, it can either create and display a new fragment to show the details in the same activity (adding the fragment to the FrameLayout), or start a new activity (where the fragment can be shown).
public static class TitlesFragment extends ListFragment {
boolean mDualPane;
int mCurCheckPosition = 0;
@Override
public void onActivityCreated(Bundle savedInstanceState) {
super.onActivityCreated(savedInstanceState);
// Populate list with our static array of titles.
setListAdapter(new ArrayAdapter<String>(getActivity(),
android.R.layout.simple_list_item_activated_1, Shakespeare.TITLES));
// Check to see if we have a frame in which to embed the details
// fragment directly in the containing UI.
View detailsFrame = getActivity().findViewById(R.id.details);
mDualPane = detailsFrame != null && detailsFrame.getVisibility() == View.VISIBLE;
if (savedInstanceState != null) {
// Restore last state for checked position.
mCurCheckPosition = savedInstanceState.getInt("curChoice", 0);
}
if (mDualPane) {
// In dual-pane mode, the list view highlights the selected item.
getListView().setChoiceMode(ListView.CHOICE_MODE_SINGLE);
// Make sure our UI is in the correct state.
showDetails(mCurCheckPosition);
}
}
@Override
public void onSaveInstanceState(Bundle outState) {
super.onSaveInstanceState(outState);
outState.putInt("curChoice", mCurCheckPosition);
}
@Override
public void onListItemClick(ListView l, View v, int position, long id) {
showDetails(position);
}
/**
* Helper function to show the details of a selected item, either by
* displaying a fragment in-place in the current UI, or starting a
* whole new activity in which it is displayed.
*/
void showDetails(int index) {
mCurCheckPosition = index;
if (mDualPane) {
// We can display everything in-place with fragments, so update
// the list to highlight the selected item and show the data.
getListView().setItemChecked(index, true);
// Check what fragment is currently shown, replace if needed.
DetailsFragment details = (DetailsFragment)
getFragmentManager().findFragmentById(R.id.details);
if (details == null || details.getShownIndex() != index) {
// Make new fragment to show this selection.
details = DetailsFragment.newInstance(index);
// Execute a transaction, replacing any existing fragment
// with this one inside the frame.
FragmentTransaction ft = getFragmentManager().beginTransaction();
ft.replace(R.id.details, details);
ft.setTransition(FragmentTransaction.TRANSIT_FRAGMENT_FADE);
ft.commit();
}
} else {
// Otherwise we need to launch a new activity to display
// the dialog fragment with selected text.
Intent intent = new Intent();
intent.setClass(getActivity(), DetailsActivity.class);
intent.putExtra("index", index);
startActivity(intent);
}
}
}
The second fragment, DetailsFragment shows the play summary for the item selected from the list from TitlesFragment:
public static class DetailsFragment extends Fragment {
/**
* Create a new instance of DetailsFragment, initialized to
* show the text at 'index'.
*/
public static DetailsFragment newInstance(int index) {
DetailsFragment f = new DetailsFragment();
// Supply index input as an argument.
Bundle args = new Bundle();
args.putInt("index", index);
f.setArguments(args);
return f;
}
public int getShownIndex() {
return getArguments().getInt("index", 0);
}
@Override
public View onCreateView(LayoutInflater inflater, ViewGroup container,
Bundle savedInstanceState) {
if (container == null) {
// We have different layouts, and in one of them this
// fragment's containing frame doesn't exist. The fragment
// may still be created from its saved state, but there is
// no reason to try to create its view hierarchy because it
// won't be displayed. Note this is not needed -- we could
// just run the code below, where we would create and return
// the view hierarchy; it would just never be used.
return null;
}
ScrollView scroller = new ScrollView(getActivity());
TextView text = new TextView(getActivity());
int padding = (int)TypedValue.applyDimension(TypedValue.COMPLEX_UNIT_DIP,
4, getActivity().getResources().getDisplayMetrics());
text.setPadding(padding, padding, padding, padding);
scroller.addView(text);
text.setText(Shakespeare.DIALOGUE[getShownIndex()]);
return scroller;
}
}
Recall from the TitlesFragment class, that, if the user clicks a list item and the current layout does not include the R.id.details view (which is where the DetailsFragment belongs), then the application starts the DetailsActivity activity to display the content of the item.
Here is the DetailsActivity, which simply embeds the DetailsFragment to display the selected play summary when the screen is in portrait orientation:
public static class DetailsActivity extends Activity {
@Override
protected void onCreate(Bundle savedInstanceState) {
super.onCreate(savedInstanceState);
if (getResources().getConfiguration().orientation
== Configuration.ORIENTATION_LANDSCAPE) {
// If the screen is now in landscape mode, we can show the
// dialog in-line with the list so we don't need this activity.
finish();
return;
}
if (savedInstanceState == null) {
// During initial setup, plug in the details fragment.
DetailsFragment details = new DetailsFragment();
details.setArguments(getIntent().getExtras());
getFragmentManager().beginTransaction().add(android.R.id.content, details).commit();
}
}
}
Notice that this activity finishes itself if the configuration is landscape, so that the main activity can take over and display the DetailsFragment alongside the TitlesFragment. This can happen if the user begins the DetailsActivity while in portrait orientation, but then rotates to landscape (which restarts the current activity).
For more samples using fragments (and complete source files for this example), see the sample code available in ApiDemos (available for download from