作者: Stephen Walther
原文地址:http://msdn.microsoft.com/asp.net/default.aspx?pull=/library/en-us/dnvs05/html/UserProfiles.asp
译者:Tony Qu
原文地址:http://msdn.microsoft.com/asp.net/default.aspx?pull=/library/en-us/dnvs05/html/UserProfiles.asp
译者:Tony Qu
概要:许多ASP.NET应用程序需要跨访问的用户属性跟踪功能,在ASP.NET1.1中,我们只能人工实现这一功能。但如今,使用 ASP.NET 2.0的Profile对象,这个过程变得异常简单。Stephen Walther将验证该对象,并向你展示如何使用Profile来跟踪用户属性、创建一个购物篮,及其他一些例子。
总目录
介绍
User Profile总揽
定义User Profile
使用Profile组
使用复杂的Profile属性
继承一个Profile
迁移匿名Profile设置
配置Profile Provider
管理Profiles并生成Profile报告
总结
相关书籍
介绍
User Profile总揽
定义User Profile
使用Profile组
使用复杂的Profile属性
继承一个Profile
迁移匿名Profile设置
配置Profile Provider
管理Profiles并生成Profile报告
总结
相关书籍
Microsoft ASP.NET 2.0支持被称为Profile的新对象,它可以自动在多个Web应用程序的访问之间存储用户信息。一个User Profile中可以存储各种类型的信息,这些信息既可以是简单的string和integer类型,也可以是复杂的自定义类型。例如,你可以存储用户的姓、购物篮、用户属性或网站使用情况统计。
本文中,你将学习如何在一个应用中定义user profile。我们也会向你演示如何配置使用不同provider的profile。最后,你将学习如何管理和生成user profile的报告。
本文中,你将学习如何在一个应用中定义user profile。我们也会向你演示如何配置使用不同provider的profile。最后,你将学习如何管理和生成user profile的报告。
User Profiles总揽
Profile 对象与Session对象十分相似,但是更好用一些。与Session相似的地方在于,Profile是相对于一个特定的用户的,也就是说,每个Web应用程序的用户都有他们自己的profile对象。与Session不同的是,Profile对象是持久对象。如果你向Session中添加一个项,在你离开网站时,该项就会消失。而Profile则完全不同,当你修改Profile的状态时,修改在多个访问之间均有效。
Profile 对象与Session对象十分相似,但是更好用一些。与Session相似的地方在于,Profile是相对于一个特定的用户的,也就是说,每个Web应用程序的用户都有他们自己的profile对象。与Session不同的是,Profile对象是持久对象。如果你向Session中添加一个项,在你离开网站时,该项就会消失。而Profile则完全不同,当你修改Profile的状态时,修改在多个访问之间均有效。
profile使用provider模式来存储信息,默认情况下,user profile的内容会保存在SQL Server Express数据库中,该数据库位于网站的App_Data目录。然而,在本文的后半部分,你将了解如何使用其他数据提供者(data provider)来存储信息,如完整版的SQL Server中的一个数据库或者一个Oracle数据库。
与Session不同,Profile是强类型的,Session对象仅仅是一个项集合而已,而profile对象则有强类型属性。
使用强类型是有它的道理的。例如,使用强类型,你就可以在Microsoft Visual Web Developer中使用智能感知技术,当你键入Profile和一个点的时候,智能感知会弹出你已经定义过的profile属性列表。
使用强类型是有它的道理的。例如,使用强类型,你就可以在Microsoft Visual Web Developer中使用智能感知技术,当你键入Profile和一个点的时候,智能感知会弹出你已经定义过的profile属性列表。
定义user profile
你既可以在machine.config中,也可以在web.config中定义一个user profile,由于你不能在应用程序的二级目录中创建一个包含文件profile节的web.config文件,这意味着你将无法在一个应用程序中定义两个以上的profile。
在列表1的web.config中,列举了一个简单的profile定义的实例,该profile有三个属性,FirstName, LastName和PageVisits。
你既可以在machine.config中,也可以在web.config中定义一个user profile,由于你不能在应用程序的二级目录中创建一个包含文件profile节的web.config文件,这意味着你将无法在一个应用程序中定义两个以上的profile。
在列表1的web.config中,列举了一个简单的profile定义的实例,该profile有三个属性,FirstName, LastName和PageVisits。
列表1
<configuration>
<system.web>
<authentication mode="Forms" />
<anonymousIdentification enabled="true" />
<profile>
<properties>
<add
name="FirstName"
defaultValue="??"
allowAnonymous="true" />
<add
name="LastName"
defaultValue="??"
allowAnonymous="true" />
<add
name="PageVisits"
type="Int32"
allowAnonymous="true"/>
</properties>
</profile>
</system.web>
</configuration>
由于该profile需要同时被匿名用户和已认证用户使用,因此我们在web.config文件中增加包含一个< anonymousIdentification>元素,有了这个元素,系统就会自动为匿名用户生成唯一的ID。仔细看的话我们会发现,每一个 profile属性都有一个allowAnonymous特性,该特性表明这个profile属性是否允许被匿名用户使用。
默认的profile属性类型是System.String类型。列表1中,由于没有为FirstName和LastName这两个profile属性增加type特性,那么系统默认它们是string类型,而PageVisits属性则指定了type特性为Int32,因此该profile属性可用于表示一个整型值。
最后,注意FirstName和LastName属性都有defaultValue特性。你可以为简单的数据类型设置defaultValue特性,但你不能为复杂类型设置defaultValue特性。
当你定义好一个profile之后,系统会自动在下一次页面被调用时,生成一个与该profile相对应的类。这个类会被保存在"Temporary ASP.NET Files Directory"目录(该目录也用于存放用于动态生成页面的类)。你可以使用HttpContext的Profile属性(Property)调用该类。
当你定义好一个profile后,你可以使用如下方法为profile属性赋值。
当你定义好一个profile之后,系统会自动在下一次页面被调用时,生成一个与该profile相对应的类。这个类会被保存在"Temporary ASP.NET Files Directory"目录(该目录也用于存放用于动态生成页面的类)。你可以使用HttpContext的Profile属性(Property)调用该类。
当你定义好一个profile后,你可以使用如下方法为profile属性赋值。
[Visual Basic .NET]
Profile.FirstName = "Bill"
Profile.FirstName = "Bill"
[C#]
Profile.FirstName
任何在web.config中定义的profile属性都会在Profile对象中呈现。
列表2演示了你该如何使用profile来持久化保存用户信息。这个页显示了FirstName,LastName, PageVisits三个属性的值,同时它包含了一个能够用于修改这三个属性的表单(form)。在Page_Load中更新PageVisits的值,这意味着每一次刷新页面,PageVisits的值都会改变。
列表2演示了你该如何使用profile来持久化保存用户信息。这个页显示了FirstName,LastName, PageVisits三个属性的值,同时它包含了一个能够用于修改这三个属性的表单(form)。在Page_Load中更新PageVisits的值,这意味着每一次刷新页面,PageVisits的值都会改变。
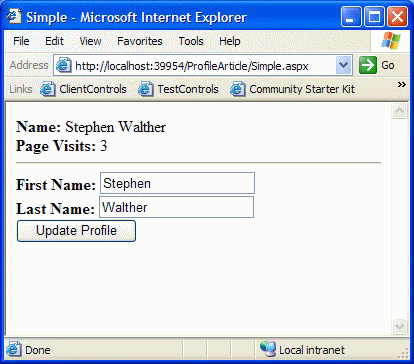
图1 使用简单的profile
列表 2. Simple.aspx (Visual Basic .NET)
<%@ Page Language="VB" %>
<script runat="server">
Profile.PageVisits += 1
End Sub
Sub UpdateProfile(ByVal s As Object, ByVal e As EventArgs)
Profile.FirstName = txtFirstName.Text
Profile.LastName = txtLastName.Text
End Sub
</script> <html>
<head>
<title>Simple</title>
</head>
<body>
<form id="form1" runat="server">
<b>Name:</b> <%= Profile.FirstName %> <%= Profile.LastName %>
<br />
<b>Page Visits:</b> <%= Profile.PageVisits %>
<hr />
<b>First Name:</b>
<asp:TextBox ID="txtFirstName" Runat="Server" />
<br />
<b>Last Name:</b>
<asp:TextBox ID="txtLastName" Runat="Server" />
<br />
<asp:Button
Text="Update Profile"
OnClick="UpdateProfile"
Runat="server" />
</body>
</html>
<%@ Page Language="VB" %>
<script runat="server">
Sub Page_Load()
Profile.PageVisits += 1
End Sub
Sub UpdateProfile(ByVal s As Object, ByVal e As EventArgs)
Profile.FirstName = txtFirstName.Text
Profile.LastName = txtLastName.Text
End Sub
</script> <html>
<head>
<title>Simple</title>
</head>
<body>
<form id="form1" runat="server">
<b>Name:</b> <%= Profile.FirstName %> <%= Profile.LastName %>
<br />
<b>Page Visits:</b> <%= Profile.PageVisits %>
<hr />
<b>First Name:</b>
<asp:TextBox ID="txtFirstName" Runat="Server" />
<br />
<b>Last Name:</b>
<asp:TextBox ID="txtLastName" Runat="Server" />
<br />
<asp:Button
Text="Update Profile"
OnClick="UpdateProfile"
Runat="server" />
</form>
</body>
</html>
列表 2. Simple.aspx (C#)
<%@ Page Language="C#" %>
<script runat="server">
Profile.PageVisits ++;
}
void UpdateProfile(Object s, EventArgs e) {
Profile.FirstName = txtFirstName.Text;
Profile.LastName = txtLastName.Text;
}
</script> <html>
<head>
<title>Simple</title>
</head>
<body>
<form id="form1" runat="server">
<b>Name:</b> <%= Profile.FirstName %> <%= Profile.LastName %>
<br />
<b>Page Visits:</b> <%= Profile.PageVisits %>
<hr />
<b>First Name:</b>
<asp:TextBox ID="txtFirstName" Runat="Server" />
<br />
<b>Last Name:</b>
<asp:TextBox ID="txtLastName" Runat="Server" />
<br />
<asp:Button ID="Button1"
Text="Update Profile"
OnClick="UpdateProfile"
Runat="server" />
</body>
</html>
<%@ Page Language="C#" %>
<script runat="server">
void Page_Load() {
Profile.PageVisits ++;
}
void UpdateProfile(Object s, EventArgs e) {
Profile.FirstName = txtFirstName.Text;
Profile.LastName = txtLastName.Text;
}
</script> <html>
<head>
<title>Simple</title>
</head>
<body>
<form id="form1" runat="server">
<b>Name:</b> <%= Profile.FirstName %> <%= Profile.LastName %>
<br />
<b>Page Visits:</b> <%= Profile.PageVisits %>
<hr />
<b>First Name:</b>
<asp:TextBox ID="txtFirstName" Runat="Server" />
<br />
<b>Last Name:</b>
<asp:TextBox ID="txtLastName" Runat="Server" />
<br />
<asp:Button ID="Button1"
Text="Update Profile"
OnClick="UpdateProfile"
Runat="server" />
</form>
</body>
</html>
如果你多次访问列表2中的页面,你会注意到PageVisits在不断增大。如果你关闭的浏览器,并在一周之后调用该页面,PageVisits属性仍然会保留原值。从这一点可以看出Profile为每个用户自动保存一个副本。
使用Profile组
尽管你仅可以为一个应用程序定义一个profile,但如果你需要让几个profile属性一起工作,把它们放在组中,会让你觉得它们更易管理。
例如,在列表3中,有一个带有两个组的profile,这两个组分别是Address和Preferences
列表3. Web.Config
<configuration>
<system.web>
<anonymousIdentification enabled="true" />
<profile>
<properties>
<group name="Address">
<add
name="Street"
allowAnonymous="true" />
<add
name="City"
allowAnonymous="true" />
</group>
<group name="Preferences">
<add
name="ReceiveNewsletter"
type="Boolean"
defaultValue="false"
allowAnonymous="true" />
</group>
</properties>
</profile>
</system.web>
</configuration>
当你用组来定义profile时,你应该使用组名来设置或读取profile属性。例如,在列表3中,你可以使用以下一些句子来完成三个profile属性的赋值。
一个profile的定义只能包含一层组,换句话说,你不能把其他的组放在一个profile组的下面一层。
使用复杂的profile属性
到目前为止,我们已经介绍了声明包含简单类型(如string或整型)属性的profile,其实你也可以在profile中声明复杂属性。
举个例子,假设你现在需要在profile中存储一个购物篮,如果这样做的话,你就可以在每次访问网站时获得自己的购物篮。
列表4 声明了一个包含profile,这个profile包含一个名为ShoppingCart的属性,而该属性的type特性是一个叫ShoppingCart的类(我们接下来会创建该类),该类名是有效的。
我们还会注意到,该声明中包含一个serializeAs特性,该特性可以帮助ShoppingCart使用二进制序列化器(binary serializer)进行持久化,而不是使用xml序列化器。
举个例子,假设你现在需要在profile中存储一个购物篮,如果这样做的话,你就可以在每次访问网站时获得自己的购物篮。
列表4 声明了一个包含profile,这个profile包含一个名为ShoppingCart的属性,而该属性的type特性是一个叫ShoppingCart的类(我们接下来会创建该类),该类名是有效的。
我们还会注意到,该声明中包含一个serializeAs特性,该特性可以帮助ShoppingCart使用二进制序列化器(binary serializer)进行持久化,而不是使用xml序列化器。
列表4 Web.config
<system.web>
<profile>
<properties>
<add
name="ShoppingCart"
type="ShoppingCart"
serializeAs="Binary"
allowAnonymous="true" />
</properties>
</profile>
</system.web>
</configuration>
<
configuration><system.web>
<anonymousIdentification enabled="true" />
<profile>
<properties>
<add
name="ShoppingCart"
type="ShoppingCart"
serializeAs="Binary"
allowAnonymous="true" />
</properties>
</profile>
</system.web>
</configuration>
列表5 中有一个简单购物篮的实现代码,该购物篮拥有添加和删除项(item)的方法(method),同时它还拥有两个属性(property),一个是用于获得该购物篮中的所有项的,一个是用于表示所有商品的总价的。
列表5 ShoppingCart (Visual Basic.NET)
Public Class ShoppingCart
Public _CartItems As New Hashtable()
Public ReadOnly Property CartItems() As ICollection
Get
Return _CartItems.Values
End Get
End Property
Public ReadOnly Property Total() As Decimal
Get
Dim sum As Decimal
For Each item As CartItem In _CartItems.Values
sum += item.Price * item.Quantity
Next
Return sum
End Get
End Property
Public Sub AddItem(ByVal ID As Integer, _
ByVal Name As String, ByVal Price As Decimal)
Dim item As CartItem = CType(_CartItems(ID), CartItem)
If item Is Nothing Then
_CartItems.Add(ID, New CartItem(ID, Name, Price))
Else
item.Quantity += 1
_CartItems(ID) = item
End If
End Sub
Public Sub RemoveItem(ByVal ID As Integer)
Dim item As CartItem = CType(_CartItems(ID), CartItem)
If item Is Nothing Then
Return
End If
item.Quantity -= 1
If item.Quantity = 0 Then
_CartItems.Remove(ID)
Else
_CartItems(ID) = item
End If
End Sub End Class <Serializable()> _
Public Class CartItem
Private _Name As String
Private _Price As Decimal
Private _Quantity As Integer = 1
Get
Return _ID
End Get
End Property
Get
Return _Name
End Get
End Property
Get
Return _Price
End Get
End Property
Get
Return _Quantity
End Get
Set(ByVal value As Integer)
_Quantity = value
End Set
End Property
ByVal Name As String, ByVal Price As Decimal)
_ID = ID
_Name = Name
_Price = Price
End Sub
End Class
Imports
Microsoft.VisualBasic <Serializable()> _Public Class ShoppingCart
Public _CartItems As New Hashtable()
' Return all the items from the Shopping Cart
Public ReadOnly Property CartItems() As ICollection
Get
Return _CartItems.Values
End Get
End Property
' The sum total of the prices
Public ReadOnly Property Total() As Decimal
Get
Dim sum As Decimal
For Each item As CartItem In _CartItems.Values
sum += item.Price * item.Quantity
Next
Return sum
End Get
End Property
' Add a new item to the shopping cart
Public Sub AddItem(ByVal ID As Integer, _
ByVal Name As String, ByVal Price As Decimal)
Dim item As CartItem = CType(_CartItems(ID), CartItem)
If item Is Nothing Then
_CartItems.Add(ID, New CartItem(ID, Name, Price))
Else
item.Quantity += 1
_CartItems(ID) = item
End If
End Sub
' Remove an item from the shopping cart
Public Sub RemoveItem(ByVal ID As Integer)
Dim item As CartItem = CType(_CartItems(ID), CartItem)
If item Is Nothing Then
Return
End If
item.Quantity -= 1
If item.Quantity = 0 Then
_CartItems.Remove(ID)
Else
_CartItems(ID) = item
End If
End Sub End Class <Serializable()> _
Public Class CartItem
Private _ID As Integer
Private _Name As String
Private _Price As Decimal
Private _Quantity As Integer = 1
Public ReadOnly Property ID() As Integer
Get
Return _ID
End Get
End Property
Public ReadOnly Property Name() As String
Get
Return _Name
End Get
End Property
Public ReadOnly Property Price() As Decimal
Get
Return _Price
End Get
End Property
Public Property Quantity() As Integer
Get
Return _Quantity
End Get
Set(ByVal value As Integer)
_Quantity = value
End Set
End Property
Public Sub New(ByVal ID As Integer, _
ByVal Name As String, ByVal Price As Decimal)
_ID = ID
_Name = Name
_Price = Price
End Sub
End Class
列表5 ShoppingCart (c#)
using System.Collections;
{
public Hashtable _CartItems = new Hashtable();
public ICollection CartItems
{
get { return _CartItems.Values; }
}
public decimal Total
{
get
{
decimal sum = 0;
foreach (CartItem item in _CartItems.Values)
sum += item.Price * item.Quantity;
return sum;
}
}
public void AddItem(int ID, string Name, decimal Price)
{
CartItem item = (CartItem)_CartItems[ID];
if (item == null)
_CartItems.Add(ID, new CartItem(ID, Name, Price));
else
{
item.Quantity++;
_CartItems[ID] = item;
}
}
public void RemoveItem(int ID)
{
CartItem item = (CartItem)_CartItems[ID];
if (item == null)
return;
item.Quantity--;
if (item.Quantity == 0)
_CartItems.Remove(ID);
else
_CartItems[ID] = item;
}
{
private int _ID;
private string _Name;
private decimal _Price;
private int _Quantity = 1;
{
get { return _ID; }
}
{
get { return _Name; }
}
{
get { return _Price; }
}
{
get { return _Quantity; }
set { _Quantity = value; }
}
{
_ID = ID;
_Name = Name;
_Price = Price;
}
}
using
System;using System.Collections;
[Serializable]
{
public Hashtable _CartItems = new Hashtable();
// Return all the items from the Shopping Cart
public ICollection CartItems
{
get { return _CartItems.Values; }
}
// The sum total of the prices
public decimal Total
{
get
{
decimal sum = 0;
foreach (CartItem item in _CartItems.Values)
sum += item.Price * item.Quantity;
return sum;
}
}
// Add a new item to the shopping cart
public void AddItem(int ID, string Name, decimal Price)
{
CartItem item = (CartItem)_CartItems[ID];
if (item == null)
_CartItems.Add(ID, new CartItem(ID, Name, Price));
else
{
item.Quantity++;
_CartItems[ID] = item;
}
}
// Remove an item from the shopping cart
public void RemoveItem(int ID)
{
CartItem item = (CartItem)_CartItems[ID];
if (item == null)
return;
item.Quantity--;
if (item.Quantity == 0)
_CartItems.Remove(ID);
else
_CartItems[ID] = item;
}
}
[Serializable]
{
private int _ID;
private string _Name;
private decimal _Price;
private int _Quantity = 1;
public int ID
{
get { return _ID; }
}
public string Name
{
get { return _Name; }
}
public decimal Price
{
get { return _Price; }
}
public int Quantity
{
get { return _Quantity; }
set { _Quantity = value; }
}
public CartItem(int ID, string Name, decimal Price)
{
_ID = ID;
_Name = Name;
_Price = Price;
}
}
如果你把列表5中的代码添加到应用程序的App_Code目录中,购物篮会自动被编译。
在列表5中有一点值得注意,那就是ShoppingCart和CartItem类都加上了可序列化的特性,这一点对于他们能否被序列化十分重要,只有这样才能保存在Profile对象中。
最后,列表6的页面显示了可以被添加到购物篮中的产品。购物篮是通过BindShoppingCart方法从Profile对象中载入,该方法把购物篮中的对象绑定到一个GridView对象上,这些对象可以通过ShoppingCart类的CartItems属性获得。

图2 在profile中存储购物篮
AddCartItem方法用于在购物篮中添加一个产品,该方法中包含了检测Profile是否存在ShoppingCart的代码。对于Profile中存储的对象,你必须自己实例化这些对象,他们不会自动实例化。
RemoveCartItem方法用于从购物篮中移除一个产品,该方法只是简单地通过调用Profile中的ShoppingCart对象的RemoveItem方法。
列表 6 - Products.aspx (Visual Basic .NET)
<%@ Page Language="VB" %> <script runat="server">
If Not IsPostBack Then
BindShoppingCart()
End
<%@ Page Language="VB" %> <script runat="server">
Sub Page_Load()
If Not IsPostBack Then
BindShoppingCart()
End