Spring Source吭哧哼哧,从2011年2月开始到2011年2月终于把spring-data-mongo-1.0.1给Release出来了。从1.0.0.M1到1.0.0.M3的版本叫做Spring Data Document。1.0.0.M4开始更名为Spring Data MongoDB 1.0.0 M4,不过官网并没有特别说明,乍一看有点莫名其妙,尤其是MongoTemplate从org.springframework.data.document.mongodb移动到org.springframework.data.mongodb.core,官网的HelloWorldExample却还是用org.springframework.data.document.mongodb做例子,实在造成不少误导。
-----垃圾的cnblogs,编辑了半天的东西,一下子乱了格式,要重来!-----
Spring Data Mongo需要依赖Spring Framework,因此,首先需要下载Spring Framework的jar包,新建一个Web工程,将Spring Framework的jar包引入。本文引用了如下组件:
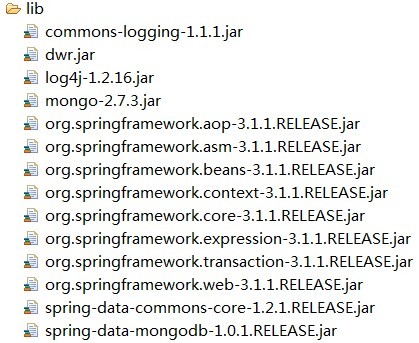
其中,除了Spring的几个组件包以外,还引用了MongoDB的Driver:mongo-2.7.3.jar;DWR3.0的组件dwr.jar;spring-data-mongdb-1.0.1.RELEASE.jar以及Spring Data的公共组件spring-data-commons-core-1.2.1.RELEASE.jar。需要说明的是,本文所使用的Spring Data Mongo的组件版本,需要采用Spring Framework 3.0.7及以上版本,否则程序运行会报错。
引入上述组件后,需要修改Spring的配置文件ApplicationContext.xml文件,引入Spring Data Mongo的命名空间,并定义MongoDB的服务器地址和端口号,初始化MongoTemplate类,代码如下
 View Code

2
3 <beans xmlns="http://www.springframework.org/schema/beans"
4 xmlns:xsi="http://www.w3.org/2001/XMLSchema-instance"
5 xmlns:context="http://www.springframework.org/schema/context"
6 xmlns:mongo="http://www.springframework.org/schema/data/mongo"
7 xmlns:dwr="http://www.directwebremoting.org/schema/spring-dwr"
8 xsi:schemaLocation="http://www.springframework.org/schema/beans http://www.springframework.org/schema/beans/spring-beans-3.0.xsd
9 http://www.springframework.org/schema/context http://www.springframework.org/schema/context/spring-context-3.0.xsd
10 http://www.springframework.org/schema/data/mongo http://www.springframework.org/schema/data/mongo/spring-mongo-1.0.xsd
11 http://www.directwebremoting.org/schema/spring-dwr http://www.directwebremoting.org/schema/spring-dwr-3.0.xsd">
12
13
14
15 <context:annotation-config />
16
17 <!-- Properties files -->
18 <bean id="propertyConfigurer" class="org.springframework.beans.factory.config.PropertyPlaceholderConfigurer">
19 <property name="locations">
20 <list>
21 <value>classpath:server.properties</value>
22 </list>
23 </property>
24 </bean>
25
26 <mongo:mongo host="localhost" port="27017" />
27 <bean id="mongoTemplate" class="org.springframework.data.mongodb.core.MongoTemplate">
28 <constructor-arg ref="mongo" />
29 <constructor-arg name="databaseName" value="testDb" />
30 </bean>
31
32
33 <context:component-scan base-package="com.ics" use-default-filters="false">
34 <context:include-filter type="regex" expression="com.ics.bean.*"/>
35 <context:include-filter type="regex" expression="com.ics.dao.*"/>
36 <context:include-filter type="regex" expression="com.ics.service.*"/>
37 </context:component-scan>
38
39 <dwr:configuration>
40 <dwr:convert type="bean" class="com.ics.bean.HelloKitty" />
41 </dwr:configuration>
42 <dwr:annotation-scan base-package="com.ics.bean" scanDataTransferObject="true" scanRemoteProxy="true"/>
43 <dwr:annotation-scan base-package="com.ics.web.dwr" scanDataTransferObject="false" scanRemoteProxy="true"/>
44 </beans>
下面开始一个简单的样例。首先,定义一个HelloKitty bean
View Code
2 *
3 */
4 package com.ics.bean;
5
6 import org.directwebremoting.annotations.DataTransferObject;
7
8 @DataTransferObject
9 public class HelloKitty
10 {
11 private String id;
12
13 private String name;
14
15 @Override
16 public String toString()
17 {
18 return "HelloKitty[" + "id=" + id + ", name=" + name + "]";
19 }
20
21 public String getId()
22 {
23 return id;
24 }
25
26 public void setId(String id)
27 {
28 this.id = id;
29 }
30
31 public String getName()
32 {
33 return name;
34 }
35
36 public void setName(String name)
37 {
38 this.name = name;
39 }
40 }
定义数据访问类,定义两个方法,一个用于在集合中插入一条记录,另一个根据name属性查询一条记录
View Code
2 *
3 */
4 package com.ics.dao;
5
6 import org.springframework.beans.factory.annotation.Autowired;
7 import org.springframework.data.mongodb.core.MongoTemplate;
8 import org.springframework.data.mongodb.core.query.Criteria;
9 import org.springframework.data.mongodb.core.query.Query;
10
11 import com.ics.bean.HelloKitty;
12
13
14 public class HelloKittyDAO
15 {
16 /**
17 * 定义集合名称
18 */
19 private static String HELLOKITTY = "HelloKitty";
20
21 /**
22 * 操作MongoDB的对象
23 */
24 @Autowired
25 private MongoTemplate mongoTemplate;
26
27
28 public void createHelloKitty(HelloKitty hello)
29 {
30 mongoTemplate.insert(hello, HELLOKITTY);
31 }
32
33 public HelloKitty getHelloKittyByName(String name)
34 {
35 return mongoTemplate.findOne(new Query(Criteria.where("name").is(name)), HelloKitty.class, HELLOKITTY);
36 }
37 }
简单的Service方法
2 *
3 */
4 package com.ics.service;
5
6 import org.springframework.beans.factory.annotation.Autowired;
7
8 import com.ics.bean.HelloKitty;
9 import com.ics.dao.HelloKittyDAO;
10
11 public class HelloKittyService
12 {
13 @Autowired
14 private HelloKittyDAO helloKittyDAO;
15
16 public String createHelloKitty(HelloKitty hello)
17 {
18 helloKittyDAO.createHelloKitty(hello);
19
20 HelloKitty ret = helloKittyDAO.getHelloKittyByName(hello.getName());
21
22 return ret == null ? "" : ret.getId();
23 }
24 }
通过DWR发布出去
2 *
3 */
4 package com.ics.web.dwr;
5
6 import org.directwebremoting.annotations.RemoteMethod;
7 import org.directwebremoting.annotations.RemoteProxy;
8 import org.springframework.beans.factory.annotation.Autowired;
9
10 import com.ics.bean.HelloKitty;
11 import com.ics.service.HelloKittyService;
12
13 @RemoteProxy(name = "HelloKittyManage")
14 public class HelloKittyManage
15 {
16 @Autowired
17 private HelloKittyService helloKittyService;
18
19 @RemoteMethod
20 public String sayHello(HelloKitty hello)
21 {
22 return "hello " + helloKittyService.createHelloKitty(hello);
23 }
24 }
最后,在index.html访问这个DWR方法
2 <head>
3 <title>hello DWR</title>
4 <script type="text/javascript" src="/Mars/dwr/engine.js"></script>
5 <script type="text/javascript" src="/Mars/dwr/util.js"></script>
6 <script type="text/javascript" src="/Mars/dwr/interface/HelloKittyManage.js"></script>
7 <script type="text/javascript">
8 function sayHello()
9 {
10 var helloworld = {"name":"xyzz"};
11 HelloKittyManage.sayHello(helloworld, function(data){alert(data);});
12 }
13 </script>
14 </head>
15 <body>
16 <h3> Spring 3.X with DWR</h3>
17 <a href="javascript:void(0);" onclick="sayHello(); return false;">Retrieve test data</a><br/>
18 </body>
19 </html>
启动MongoDB服务器,运行样例程序。
在页面点击“Retrieve test data”,将会弹出“Hello 4f9fe5112d0182c5bc0a6c39”字样,其中“4f9fe5112d0182c5bc0a6c39”就是刚刚插入MongoDB中自动生成的ID。So easy,:)