最近做的project需要涉及到对扫描图片的文字识别,需要将扫描得到的彩色图片变为1bit的黑白图片。
搜索到很多解决方案,基本的归纳为两个步骤,首先要将彩色图片变为8bit灰度图片(grayscale image),然后再进一步变为1bit的单色图片(1bit monochrome)。
方案一:使用ColorConvert和Dithering操作
1、代码
目前JAVA最新的图片处理包应该是JAI(Java Advanced Imaging),在JAI API的FAQ页面上,找到了下面的方法来完成这两步工作:
| 将彩色图片转换为8bit灰度图片(使用ColorConvert颜色转换操作) |
01.public RenderedImage convertTo8BitGray(RenderedImage colorImage){ 02.ParameterBlock pb = new ParameterBlock(); 03.pb.addSource(colorImage); 04.ColorModel cm = new ComponentColorModel( 05.ColorSpace.getInstance(ColorSpace.CS_GRAY), 06.new int[]{8}, 07.false, 08.false, 09.Transparency.OPAQUE, 10.DataBuffer.TYPE_BYTE); 11.pb.add(cm); 12.RenderedImage grayImage = JAI.create("ColorConvert", pb); 13.return grayImage; 14.} |
| 将8bit灰度图片转换为1bit黑白图片 (使用errordiffusion或ordereddither操作) |
01.public RenderedImage applyDithering(RenderedImage grayImage, boolean isErrorDiffusion){ 02.// Load the ParameterBlock for the dithering operation 03.// and set the operation name. 04.ParameterBlock pb = new ParameterBlock(); 05.pb.addSource(grayImage); 06.String opName = null; 07.if(isErrorDiffusion) { 08.opName = "errordiffusion"; 09.LookupTableJAI lut = new LookupTableJAI(new byte[] {(byte)0x00, (byte)0xff}); 10.pb.add(lut); 11.pb.add(KernelJAI.ERROR_FILTER_FLOYD_STEINBERG); 12.} else { 13.opName = "ordereddither"; 14.ColorCube cube = ColorCube.createColorCube(DataBuffer.TYPE_BYTE, 15.0, new int[] {2}); //尝试改变2为其它值,可以得到不同效果 16.pb.add(cube); 17.pb.add(KernelJAI.DITHER_MASK_441); 18.} 19.// Create a layout containing an IndexColorModel which maps 20.// zero to zero and unity to 255. 21.ImageLayout layout = new ImageLayout(); 22.byte[] map = new byte[] {(byte)0x00, (byte)0xff}; 23.ColorModel cm = new IndexColorModel(1, 2, map, map, map); 24.layout.setColorModel(cm); 25.// Create a hint containing the layout. 26.RenderingHints hints = new RenderingHints(JAI.KEY_IMAGE_LAYOUT, layout); 27.// Dither the image. 28.bwImage = JAI.create(opName, pb, hints); 29.return bwImage; 30.} |
2、问题
这段sample code在很多地方都被提到过,我不知道别人是否能够让它顺利执行,但是在我的机器上是不行的。
问题主要出在第一个convertTo8BitGray()函数里的ColorConvert操作上。在执行完ColorConvert之后,图片的ColorModel的numberOfComponents变为1。我的理解是因为变为灰度图片,只有一个色了。
然而不知为什么,图片的SampleModel的numberOfBands却仍然保持了3,这就造成了SampleModel和ColorModel 不兼容,所以程序总是抛出java.lang.IllegalArgumentException: The specified ColorModel is incompatible with the image SampleModel…的错误。
方案二:使用重画到灰度图片上的方法
后来我在Code Beach看到了这篇文章,试用了里面的第二个方法 — 将彩色图片画到一个灰度图片上的方法,终于可以成功将彩色图片转化为8bit的灰度图片。代码如下:
1.BufferedImage image = new BufferedImage(width, height, BufferedImage.TYPE_BYTE_GRAY); 2.Graphics g = image.getGraphics(); 3.g.drawImage(colorImage, 0, 0, null); 4.g.dispose();转换的效果如下图所示:
转换前:彩色图片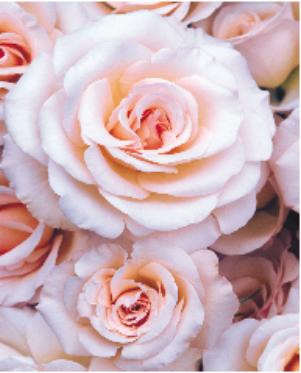 |
转换后:灰度图片 |
使用Binarize将8bit灰度图片转换为1bit黑白图片
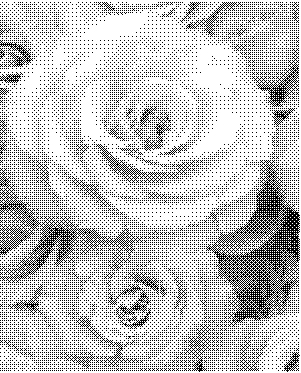
将彩色图片转换为灰度图片后,仍然可以用前面程序例子中的applyDithering()方法来将8bit灰度图片进一步转换为1bit黑白图片,得到的效果比较象报纸上的黑白图片,保留了很多灰度的层次。
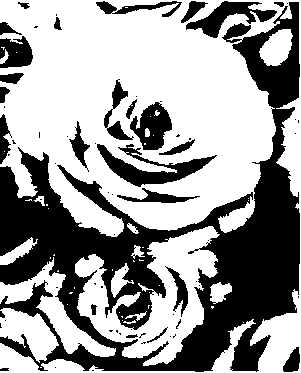
为了能够更进一步得到版画效果的图片,可以使用Binarize操作。改变Binarize操作的域值(threshold)也可以得到不同效果。
代码:
01./*** 02.* Binarize image (convert image to 1 bit black and white) 03.* 输入图片必须为灰度图片,否则会出错。 04.*/05.public RenderedImage applyBinarize(RenderedImage grayImage) { 06.// Generate a histogram. 07.Histogram histogram = 08.(Histogram)JAI.create("histogram", grayImage).getProperty("histogram"); 09.// Get a threshold equal to the median. 10.double[] threshold = histogram.getPTileThreshold(0.4); //改变域值可以得到不同效果 11.// Binarize the image. 12.RenderedImage bwImage = 13.JAI.create("binarize", grayImage, new Double(threshold[0])); 14.return bwImage; 15.}//function applyBinarize效果:
| 使用Dithering的效果 | 使用Binarizing的效果 |
 |
 |