由于项目原因,用了jquery easyui 感觉界面不错,皮肤样式少点,可是官网最近打不开了,资料比较少,给的demo没有想要的效果,今天在用datagrid 做分页显示的时候,折腾了半天,网上的资料也比较少,后自己动手,终于解决,废话不说,开始:
datagrid分页 有一个附加的分页控件,只需后台获取分页控件自动提交的两个参数rows每页显示的记录数和page;//当前第几页
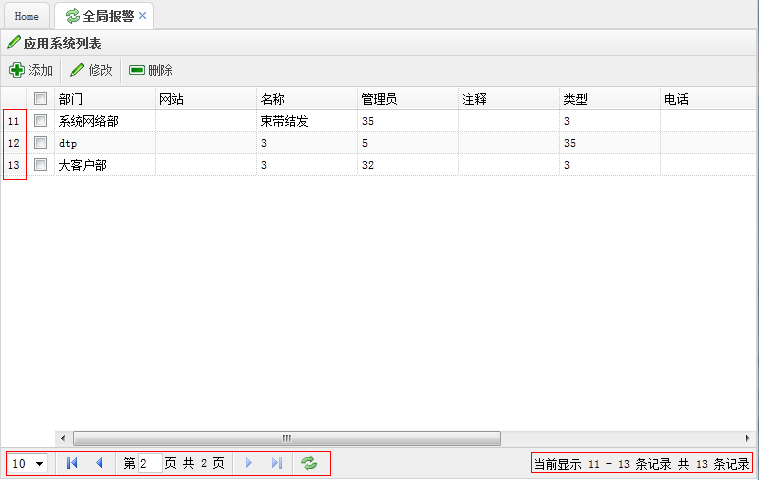
然后读取相应页数的记录,和总记录数total一块返回即可 界面如下:
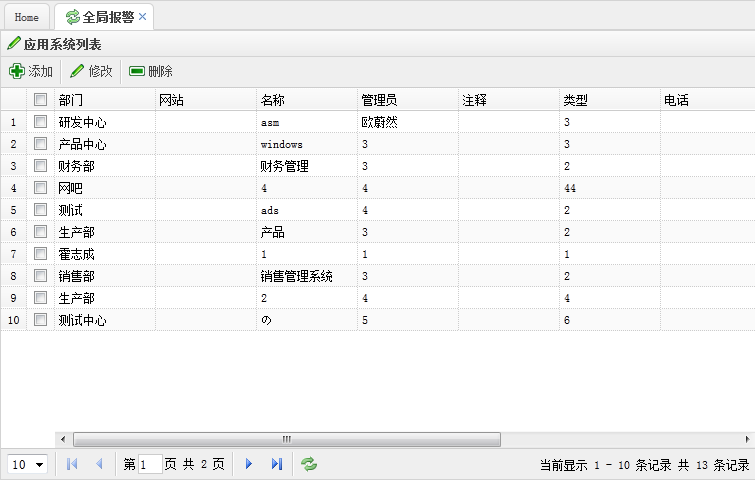
1、下边是datagrid的显示对话框,我直接用table把列头显示出来,感觉比用js写要易于阅读
<table id="list_data" cellspacing="0" cellpadding="0">
	<thead>
		<tr>
			<th field="fldAppDept" width="100">部门</th>
			<th field="fldAppNode" width="100">网站</th>
			<th field="fldAppName" width="100">名称</th>
			<th field="fldAppMgr" width="100">管理员</th>
			<th field="fldAppNote" width="100">注释</th>
			<th field="fldAppType" width="100">类型</th>
			<th field="fldTelphone" width="100">电话</th>
			<th field="fldAppImg" width="100">职务</th>
			<th field="fldAppMonitor" width="100">启用监测</th>
			<th field="fldAppLevel" width="100">要重级别</th>
		</tr>
	</thead>
</table>
2、js代码,用于构建datagrid
注意 要想显示分页控件,pagination属性必须为true
//datagrid初始化
	$('#list_data').datagrid({
		title:'应用系统列表',
		iconCls:'icon-edit',//图标
		width: 700,
		height: 'auto',
		nowrap: false,
		striped: true,
		border: true,
		collapsible:false,//是否可折叠的
		fit: true,//自动大小
		url:'listApp.action',
		//sortName: 'code',
		//sortOrder: 'desc',
		remoteSort:false,
		idField:'fldId',
		singleSelect:false,//是否单选
		pagination:true,//分页控件
		rownumbers:true,//行号
		frozenColumns:[[
	        {field:'ck',checkbox:true}
		]],
		toolbar: [{
	        text: '添加',
	        iconCls: 'icon-add',
	        handler: function() {
				openDialog("add_dialog","add");
	        }
	    }, '-', {
	        text: '修改',
	        iconCls: 'icon-edit',
	        handler: function() {
	    		openDialog("add_dialog","edit");
	        }
	    }, '-',{
			text: '删除',
			iconCls: 'icon-remove',
			handler: function(){
	    		delAppInfo();
	        }
	    }],
	});
	//设置分页控件
	var p = $('#list_data').datagrid('getPager');
	$(p).pagination({
		pageSize: 10,//每页显示的记录条数,默认为10
		pageList: [5,10,15],//可以设置每页记录条数的列表
		beforePageText: '第',//页数文本框前显示的汉字
		afterPageText: '页    共 {pages} 页',
		displayMsg: '当前显示 {from} - {to} 条记录   共 {total} 条记录',
		/*onBeforeRefresh:function(){
			$(this).pagination('loading');
			alert('before refresh');
			$(this).pagination('loaded');
		}*/
	});
3、后台我是通过struts2处理的数据 返回json串
private JSONObject result;//返回的json

	private String rows;//每页显示的记录数

	private String page;//当前第几页

        private AppServiceInter appService;

	public JSONObject getResult() {
		return result;
	}
	public void setResult(JSONObject result) {
		this.result = result;
	}
	public void setAppService(AppServiceInter appService) {
		this.appService = appService;
	}

        public String getRows() {
		return rows;
	}
	public void setRows(String rows) {
		this.rows = rows;
	}
	public String getPage() {
		return page;
	}
	public void setPage(String page) {
		this.page = page;
	}
        /**
	 * 查询应用系统
	 * @return
	 */
	public String listApp() {
		System.out.println("---------------");
		//当前页
		int intPage = Integer.parseInt((page == null || page == "0") ? "1":page);
		//每页显示条数
		int number = Integer.parseInt((rows == null || rows == "0") ? "10":rows);
		//每页的开始记录  第一页为1  第二页为number +1
		int start = (intPage-1)*number;

		List<TblApp> list = appService.findByPageApp(start,number);//每页的数据,放入list
	        Map<String, Object> jsonMap = new HashMap<String, Object>();//定义map
	        jsonMap.put("total", appService.getCountApp());//total键 存放总记录数,必须的
	        jsonMap.put("rows", list);//rows键 存放每页记录 list
	        result = JSONObject.fromObject(jsonMap);//格式化result   一定要是JSONObject

		//result = JSONArray.fromObject(jsonMap);
		return SUCCESS;
	}
4、附上struts.xml配置文件
<package name="app" extends="json-default">
		<action name="listApp" class="appAction" method="listApp">
			<result type="json">
				<param name="root">result</param>
			</result>
		</action>
</package>
特写出这些,方便自己或他人以后参考 ,如果有什么问题大家可以留言......