本文结合AppWidget的应用场景,分析Android中RemoteViews的内部具体实现。
从前文《Android中AppWidget的分析与应用:AppWidgetProvider》和《Android中Launcher对于AppWidget的处理的分析:AppWidgetHost角色》中得知,Android中AppWidget的图形资源是由AppWidgetProvider通过RemoteViews提供的;而显示是由AppWidgetHost通过AppWidgetHostView把RemoteView提供的内容显示在本地View上的。AppWidgetProvider和AppWidgetHostView运行在不同的程序中,而它们沟通的图形元素和点击回馈的桥梁就是RemoteViews。
下面为了行文方便和一致,把RemoteViews的内容提供方AppWidgetProvoder称作Remote端;而显示RemoteViews内容的一方AppWidgetHost称作Local端。
一、给RemoteViews提供内容——SettingsAppWidgetProvider
下图是SettingsAppWidgetProvider(位于Settings中的com.android.settings.widget包中)作为AppWidgetProvider得到update通知之后,创建RemoteViews,并把Remote端的响应Intent以及图形元素放进RemoteViews中的顺序图。
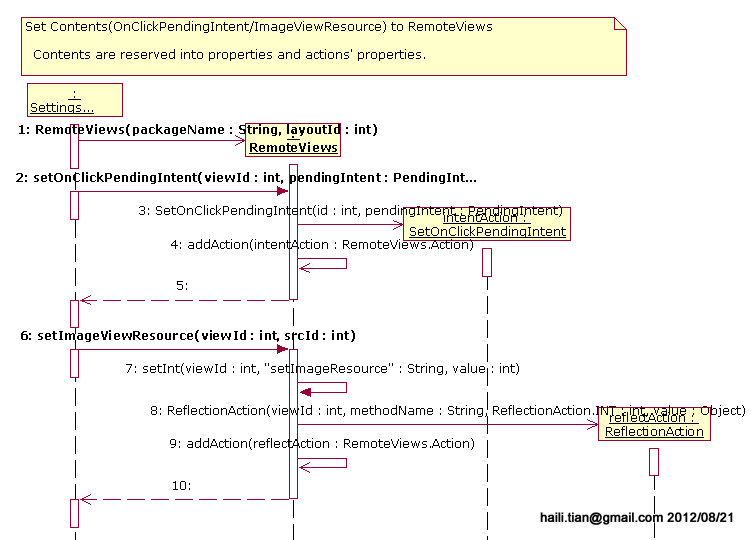
图一、为RemoteViews提供内容和侦听
图中,
1. Settings创建RemoteViews时,把packageName和layoutId传进去并保存起来。packageName相当重要,因为这里的layoutId和各种其他资源都是相对这个程序来说的,只有通过packageName获得相应的Context,才能进而获得资源,否则其他程序是无法获得这些资源的[Seq#1]。
2. Settings把layoutId中的viewId指示的View被点击之后获得响应的PendingIntent设置到RemoteViews中[Seq#2~ #5]。
- RemoteViews创建SetOnClickPendingIntent并把id和intent传入,SetOnClickPendingIntent保存这些值;
- SetOnClickPendingIntent是RemoteViews.Action的子类,通过addAction()把SetOnClickPendingIntent加入到mActions:ArrayList<RemoteViews.Action>保存下来。
3. Settings把layoutId中的viewId指示的View的ImageSourceID设置到RemoteViews中[Seq#6~ #10]。
- RemoteViews中有很多setXYZ()的方法,用来根据不同的要设置值的类型来设置;
- setXYZ()创建ReflectionAction并把viewId和value,以及“setImageResource”作为methodName传入,ReflectionAction保存这些值;
- ReflectionAction是RemoteViews.Action的子类,通过addAction()把ReflectionAction加入到mActions:ArrayList<RemoteViews.Action>保存下来。
这里描述的是一个子过程,后续会通过AppWidgetManager把这个创建好的RemoteViews放进AppWidget系统中,从而使得AppWidget的AppWidgetHost端更新显示RemoteViews里承载的内容。
Remote端设置内容的过程,只是设置这些参数,而RemoteViews也只是用不同的RemoteViews.Action保存了这些参数。下文描述内部结构。
注意:这里的参数都是在Remote端的,在RemoteContext有效。
二、RemoteViews的内部结构
下图是RemoteViews相关的类图。
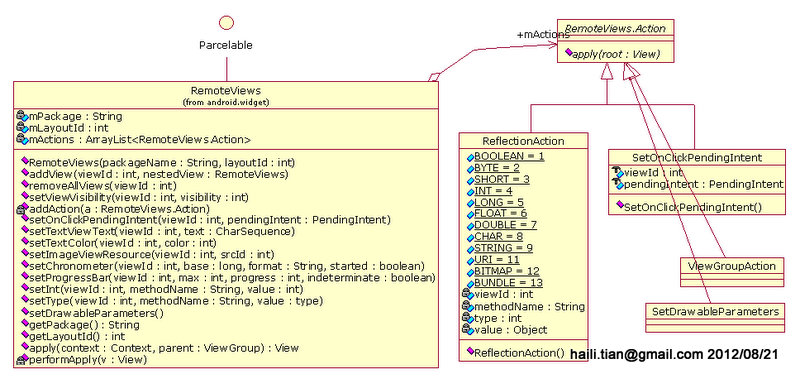
图二、RemoteViews类图
RemoteViews中保存Remote端的mPackage和mLayoutId;并用mActions:ArrayList<RemoteViews.Action>保存各种Action。
mPackage和mLayoutId是在构造RemoteViews时传进去的[上文图中的seq#1];
mActions是设置各种Remote端的响应Intent以及图形元素的时候,保存到相应的Action中,然后把Action加入到这里保存的;
mLayoutId里的各种控件通过setTextViewText()/ setImageViewResource() / setProgressBar(),等函数在remote端设置的。这些方法再调用setType() [Type可为Boolean / Byte / Short / Int/ Long / Char / String / Uri / Bitmap/ Bundle, etc]保存到ReflectionAction中。
SetOnClickPendingIntent是用来在local端用户点击viewId时,发出pendingIntent通知的。在SetOnClickPendingIntent的构造方法中保存viewId和pendingIntent。
ReflectionAction用来在local端显示时,通过Reflect机制执行获得Remote端资源的。在ReflectionAction的构造方法中保存viewId,methodName,type以及value。
ViewGroupAction和SetDrawableParameters也是RemoteViews.Action的子类,在这个场景中并未用到,基本原理相似,读者可自行分析。
三、显示RemoteViews内容——AppWidgetHostView
图一中为RemoteViews提供了内容之后,AppWidgetHost会通过IAppWidgetHost.updateAppWidget()被通知到Remote端有更新,本地端把RemoteViews提供的内容显示在AppWidgetHostView上。下面的顺序图描述这一过程。
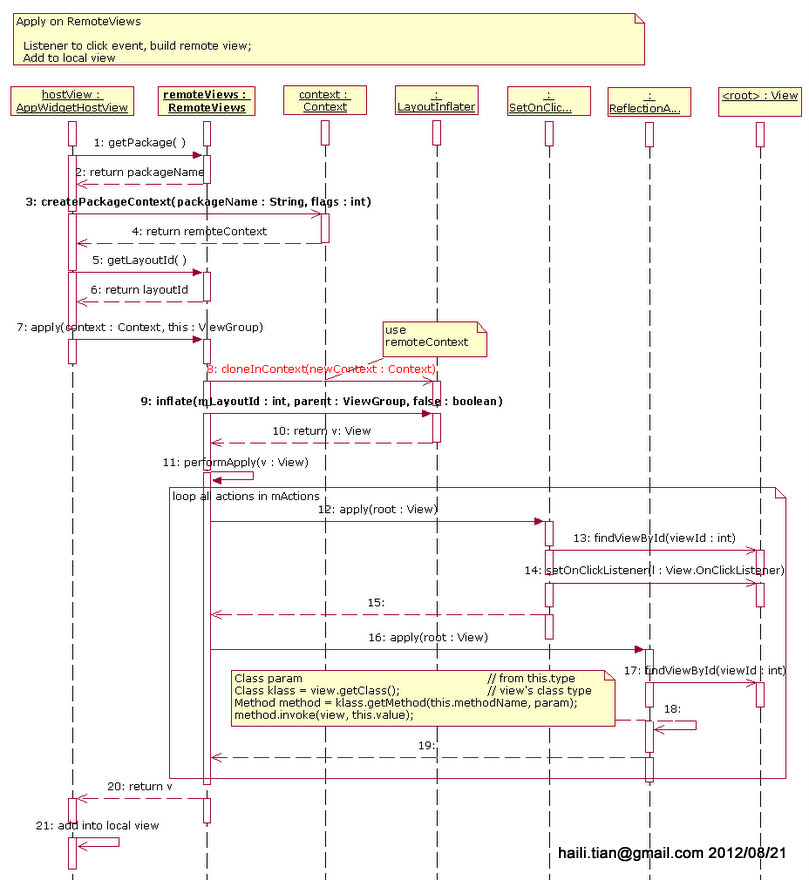
图三、本地显示RemoteViews里的内容
图中:
1. 获取RemoteViews里Remote端(AppWidgetProvider)的packageName和layoutId,通过packageName创建远端的context——remoteContext。[Seq#1~ 6]
2. 通过RemoteViews的apply()方法,真正开始执行侦听Click操作的动作;通过远端Layout获得本地使用的View。[Seq#7~ 20]
2.1. 克隆一个本地的LayoutInflater;[Seq#8]
2.2. 用克隆出的LayoutInflater对remote端的layoutId执行Inflate,获得Layout所描述的View的Hierarchy,亦即后面用到的rootView;[Seq#9~ 10]
2.3. 对2.2中获得的view执行performApply。[Seq#11~ 19]
performApply()对所有mActions中的Action都执行apply()操作。这样,
2.3.1 对于setOnClickPendingIntent来说,[Seq#12~ 15]
- 通过rootView(2.2获得的Remote端的Layout的总的View)的findViewById(viewId),找到要侦听的View;[Seq#13]
- 对找到的要侦听的View设置Click的Listener。[Seq#14]
2.3.2对于ReflectionAction来说,[Seq#16~ 19]
- 通过rootView(2.2获得的Remote端的Layout的总的View)的findViewById(viewId),找到要设置内容的对象View;[Seq#17]
- 然后通过Reflect机制,执行View实现类里的方法(比如这里是setImageResource()),把相应的资源的Id设置给它. [Seq#18]
3. 把获得的View加入到本地的View系统中。[Seq#21]
下面是ReflectionAction.apply()通过Reflect机制设置内容的代码片段(忽略了出错处理和非关键部分):
- @Override
- public void apply(View root) {
- final View view = root.findViewById(viewId);
- Class param = getParameterType(); // 通过this.type得到class:int.class
- Class klass = view.getClass(); // 这个类在Remote的Layout中定义,这里为ImageView
- Method method = klass.getMethod(this.methodName, param); // methodName是实现View类里的方法名:setImageResource(int)
- try {
- // 执行ImageView.setImageResource(value),value为resId
- method.invoke(view, this.value);
- } catch (Exception ex) {
- throw new ActionException(ex);
- }
- }
       @Override
       public void apply(View root) {
           final View view = root.findViewById(viewId);
           Class param = getParameterType();  // 通过this.type得到class:int.class
           Class klass = view.getClass();     // 这个类在Remote的Layout中定义,这里为ImageView
           Method method = klass.getMethod(this.methodName, param); // methodName是实现View类里的方法名:setImageResource(int)

           try {
               // 执行ImageView.setImageResource(value),value为resId
                method.invoke(view, this.value);
           } catch (Exception ex) {
               throw new ActionException(ex);
           }
        }
四、总结
RemoteViews的内容提供方,提供显示的资源和侦听点击事件的Intent;
RemoteViews的本地显示方,通过RemoteViews获得View中的显示资源,并加入到本地的图形系统中,完成Remote资源的本地显示。
可进一步参考的文章
通过这一系列的其他文章,可获得与本文关联的信息:
AppWidget系统框架。
Launcher发起选取过程,此文中描述选取并绑定的过程,可结合本文看完整的选取/绑定/加入显示系统的完整过程。
Android中AppWidget的分析与应用:AppWidgetProvider
是此文所描述的AppWidgetProvider创建RemoteViews,并设置了ImageViewResource和OnClickPendingIntent。
Android中Launcher对于AppWidget处理的分析:AppWidgetHost角色
此文描述的AppWidgetProvider提供的RemoteViews,在Launcher中开始真正应用RemoteViews的时机。
本文。