本文是我个人在学习过程中的笔记,环境:VS2008、SqlServer2005。在学习的过程中遇到一些问题,通过查资料学习得到解决,现在共享出来,希望对对这有所帮助,若有不对之处,请提出宝贵意见。
一、为什么需要代码国际化?
随着社会的进步,人们的交流不在局限于某一个区域。同样,软件的使用也不再面向某一区域的用户,它的用户可能是来自不同国家的、具有很大的文化差异的人们,所以代码的国际化是必要的。这里所说的是Asp.Net的国际化。
二、添加和使用本地资源
资源文件分两种:本地资源文件和全局资源文件,资源文件有它特定存储位置。新建一个名GlobalTest的Web项目,在该项目中默认有一个名称为Default.aspx的页面。.NET提供两个专门存储资源文件的文件夹,本地资源文件夹--App_LocalResources,全局资源文件夹--App_GlobalResources。右击项目选择“添加”-->“添加ASP.NET文件夹”-->选择相应的操作来增加资源文件夹。
资源文件的命名有一定的规则,本地资源文件命名规则为:Aspx文件名称.+语言/特定区域名称+.resx,例如:Default.aspx.zh-cn.resx,其中“zh-cn”为“中文-中国”的名称,这个名称可以从IE中查看,打开IE-->"工具"-->"Internet 选项"-->"语言"-->"添加",即可查看语言和特定区域名称信息。使用资源文件必须要有一个默认的资源文件,这个文件在找不到和客户端浏览器设置的区域对应的资源文件时就会调用。默认资源文件命名规则:Aspx文件名称+.resx。无论全局资源文件或本地资源文件,都必须要有一个默认的资源文件。本地资源文件中没有默认的资源文件会显示空白,全局资源文件中如果没有资源文件将不能通过编译。这样每个aspx文件都会有它对应的资源文件,本例中只做中文和英文,那么就添加资源文件:Default.aspx.resx、Default.aspx.zh-cn.resx、Default.aspx.en-us.resx。如图所示: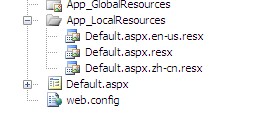
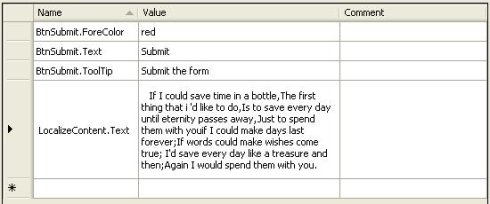
本例默认资源文件为英文的,这样Default.aspx.resx和Default.aspx.en-us.resx中的内容一样,数据如下:
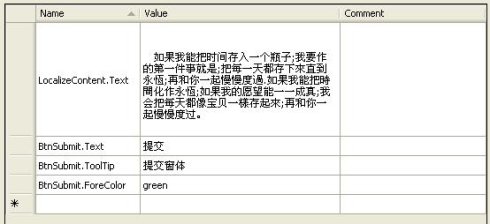
Default.aspx.zh-cn.resx文件内容如下:
同时,必须在Default.aspx文件的page命令中加上属性:Culture="auto" UICulture="auto",Auto表示根据浏览器所设置的区域自动适应。
Default.aspx完整代码如下:
 代码
代码

2
3 <!DOCTYPE html PUBLIC "-//W3C//DTD XHTML 1.0 Transitional//EN" "http://www.w3.org/TR/xhtml1/DTD/xhtml1-transitional.dtd">
4
5 <html xmlns="http://www.w3.org/1999/xhtml">
6 <head runat="server">
7 <title><asp:Localize ID="localizeTitle" runat="server" meta:ResourceKey="LocalizeTitle"></asp:Localize></title>
8 </head>
9 <body>
10 <form id="form1" runat="server">
11 <div>
12 <asp:Localize ID="LocalizeContent" runat="server" meta:ResourceKey="LocalizeContent"></asp:Localize>
13 <br />
14 <asp:Button ID="btnSubmit" runat="server" meta:ResourceKey="btnSubmit"/>
15 </div>
16 </form>
17 </body>
18 </html>
现在可以测试了。打开IE更改语言选项,选择中文并将其升到第一个(第一个为默认选择的区域),可以看到中文的效果。
如果不想每个aspx页面的page都加如上所说的Culture="auto"、UICulture="auto"属性,可在Web.Config文件中配置:<globalizatioin culture="auto" uiCulture="auto" fileEncoding="utf-8">,将此节点放在<system.web>下就可以有同样的效果。
使用资源文件分为隐式使用和显式使用,上面代码即为隐式使用。即添加meta:ResourceKey属性,而值对应资源文件的名称字段。
<asp:Button ID="btnSubmit" runat="server" meta:ResourceKey="btnSubmit"/>
显式使用:即用到资源文件的控件的Text属性修改为Text="<%$ Resources:btnSubmit.Text %>"即可。其中btnSubmit.Text对应资源文件中的名称字段。
三、添加和使用全局资源文件
全局资源文件的添加和本地资源文件添加类似,但全局资源文件的命名规则不同:自定义命名字符串+.resx(默认资源名称)、自定义命名字符串+.语言/特定区域名称+.resx。全局资源文件数量可能会大大少于本地资源文件,如果做两种语言的话3个资源文件就足够了。
全局资源文件是不和页面相关的,整个网站都能访问到的资源文件。比如完整的站点地图、网站通用性文字,对这些内容的本地化只能用全局资源文件来实现了。绑定全局资源文件的代码示例:
其中Resource表示全局资源文件夹中的资源文件名称,Name即资源文件中的字段名。
PS:在App_GlobalResources文件夹中有三个资源文件:Resource.en-us.resx、Resource.resx、Resource.zh-cn.resx。
四:保存区域信息
每次在IE里设置一次区域信息很麻烦,或者客户不知道怎样设置区域信息,这就要求我们在首页做一个功能方便客户选择。完成此功能前请将web.config中的Culture="auto" UICulture="auto"删除。同时在web.config中的system.web节点下面加入<anonymousIdentification enabled="true">。下面设置profile节点。profile是非常重要的,profile对象与session十分相似,不同之处是:profile是相对一个特定用户的,也就是说web应用程序用户都有自己的profile对象,并且该对象是持久存在的,不像session一样离开网站就消失。web.config配置如下:
<properties>
<add name="MyCultrue" defaultValue="zh-cn" allowAnonymous="true"/>
</properties>
</profile>
在Default.aspx中添加一个RadioButtonList控件,将其命名为rbtnlistLanguage,并将其AutoPostBack属性设置为"True"。代码为:
后台代码如下:
代码
{
if (!Page.IsPostBack)
{
ListItem liEnglish = new ListItem("English 英语", "en-us");
ListItem liChinese = new ListItem("Chinese 中文", "zh-cn");
this.rbtnlistLanguage.Items.Add(liEnglish);
this.rbtnlistLanguage.Items.Add(liChinese);
this.rbtnlistLanguage.Items.FindByValue(Profile.MyCultrue).Selected = true;
}
}
protected void rbtnlistLanguage_SelectedIndexChanged(object sender, EventArgs e)
{
if (Profile.MyCultrue.ToLower() != this.rbtnlistLanguage.SelectedItem.Value.ToLower())
{
Profile.SetPropertyValue("MyCultrue", this.rbtnlistLanguage.SelectedItem.Value.ToLower());
Response.Redirect(Request.Url.LocalPath);
}
}
protected override void InitializeCulture()
{
base.InitializeCulture();
System.Threading.Thread.CurrentThread.CurrentCulture = CultureInfo.CreateSpecificCulture(Profile.MyCultrue);
System.Threading.Thread.CurrentThread.CurrentUICulture = CultureInfo.CreateSpecificCulture(Profile.MyCultrue);
}
OK,暂时告一段落!
五、如何在web application中正确使用Profile
上面介绍的方法在website中适用,但到web application中没有profile。解决方法有两种:
1、读取Profile值的代码更改为:
HttpContext.Current.Profile.SetPropertyValue("MyCultrue", rblLanguage.SelectedItem.Value.ToLower());//设置
2、利用WebProfileBuilder生成强类型的Profile。(推荐使用)
首先到http://code.msdn.microsoft.com/WebProfileBuilder/Release/ProjectReleases.aspx?ReleaseId=980下载免费开源的插件并安装。在web.config中增加一个节点
代码
<section name="webProfileSettings" type="WebProfileBuilder.WebProfileConfigurationSection, WebProfileBuilder, Version=1.3.0.0, Culture=neutral, PublicKeyToken=01d50f1f82943b0c" allowLocation="true" allowDefinition="Everywhere"/>
</sectionGroup>
添加到<configSections>这一行后面。然后把
<webProfileSettings className="CntvsWebProfile" directory="App_Code" fileName="CntvsWebProfile"/>
</robo.webProfile>
放到</configSections>的下面。这一段告诉编译器,将在App_Code目录下生成一个CntvsWebProfile.cs的文件,类名为CntvsWebProfile(当然还可以指定namespace,具体可以参看WebProfileBuilder的sample),注意App_Code如果不存在将生成失败,另外最好在App_Code目录下,事先新建一个空的CntvsWebProfile.cs,否则也容易造成失败。
然后修改项目文件XXX.csproj。退出vs.net,用记事本打开远吗文件,找到
<Import Project="$(MSBuildExtensionsPath)\Microsoft\VisualStudio\v9.0\WebApplications\Microsoft.WebApplication.targets" />
加一行
这里告诉编译器,每次Build时,如果遇到web.config中的profile配置有变化,将自动重新生成CntvsWebProfile.cs文件。完成上述操作后,再次打开该项目,会提示该项目文件已经被修改,可能不安全之类的警告,不要理它,继续正常加载项目,Build一下,检查一下App_Code/CntvsWebProfile.cs的内容是否正确,如果正确的话,还要检查一下该cs文件的Property中的Build Action是否为Compile,如果不是,调整为Compile,否则别的地方没办法引用这个类。
然后在使用到Profile的文件中添加Profile属性。
代码
{
get { return new CntvsWebProfile(HttpContext.Current.Profile); }
}
void SetProfile()
{
Profile.AdminSystem.Name = User.Identity.Name;
Profile.Save();
}
六:如何将一个匿名用户的Profile迁移到认证用户?
这种情况特别是在购物系统中很常见,比如浏览者在未登录的情况下,可以先把喜欢的商品加入基于Profile的购物车,要结算的时候再登录去付帐,默认情况下,匿名用户一旦登录成为认证用户,匿名状态下购物车中的东东将“丢失”,这里如果能把匿名用户的Profile迁移到认证用户就能避免该问题,解决办法:在Global.asax全局文件中处理,在全局文件中增加一个事件:Profile_MigrateAnonymous,代码参考下面:
代码
2 protected void Profile_MigrateAnonymous(Object sender, ProfileMigrateEventArgs e)
3 {
4 //得到匿名用户的Profile
5 CntvsWebProfile anonProfile = new CntvsWebProfile(System.Web.Profile.ProfileBase.Create(e.AnonymousID));
6
7 //得到当前通过验证的用户的Profile
8 CntvsWebProfile Profile = new CntvsWebProfile(HttpContext.Current.Profile);
9
10 //将匿名用户的Profile赋值给认证用户
11 Profile.AdminSystem.Age = anonProfile.AdminSystem.Age;
12 Profile.AdminSystem.Name = anonProfile.AdminSystem.Name;
13 Profile.AdminSystem.Sex = anonProfile.AdminSystem.Sex;
14
15 //删除匿名Profile
16 ProfileManager.DeleteProfile(e.AnonymousID);
17 AnonymousIdentificationModule.ClearAnonymousIdentifier();
18
19 //保存Profile
20 Profile.Save();
21 }
OK,大功告成!