iOS学习之UINavigationController详解与使用(一)添加UIBarButtonItem是上篇,我们接着讲UINavigationController的重要作用,页面的管理和切换。
1、RootView 跳到SecondView
首先我们需要新一个View。新建SecondView,按住Command键然后按N,弹出新建页面,我们新建SecondView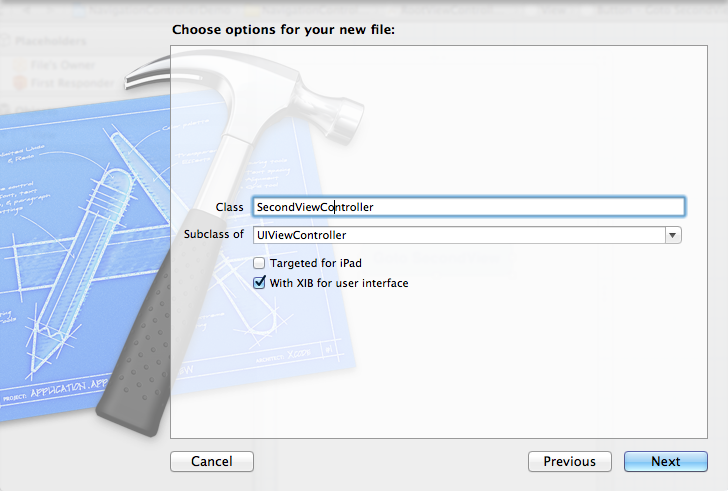
2、为Button 添加点击事件,实现跳转
在RootViewController.xib中和RootViewController.h文件建立连接

在RootViewController.m中实现代码,alloc一个SecondViewController,用pushViewController到navigationController中去,并为
SecondViewController这是title为 secondView.title =@"Second View"; 默认情况下,titie为下个页面返回按钮的名字。
- (IBAction)gotoSecondView:(id)sender {
    SecondViewController *secondView = [[SecondViewController alloc] init];
    [self.navigationController pushViewController:secondView animated:YES];
    secondView.title = @"Second View";
}
这是点击GotoSecondView 按钮,出现
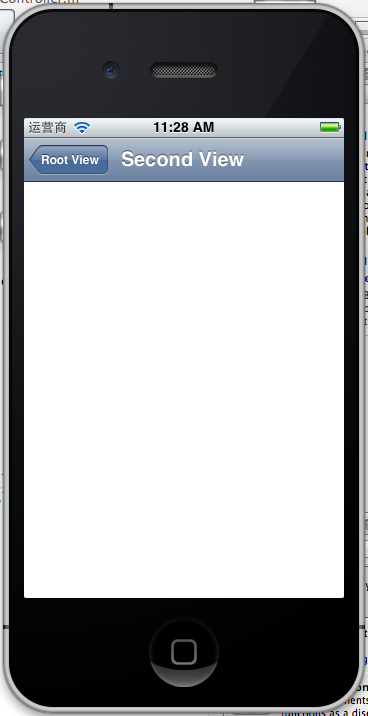
这就是SecondView了。
3、添加segmentedController
在nav bar这样的效果是如何实现的呢?
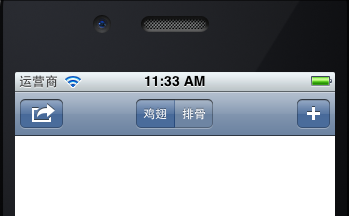
这就是segmentedController。
3.1在RootViewController.m的viewDidLoad添加如下代码:
 NSArray *array = [NSArray arrayWithObjects:@"鸡翅",@"排骨", nil];
    UISegmentedControl *segmentedController = [[UISegmentedControl alloc] initWithItems:array];
    segmentedController.segmentedControlStyle = UISegmentedControlSegmentCenter;

    [segmentedController addTarget:self action:@selector(segmentAction:) forControlEvents:UIControlEventValueChanged];
    self.navigationItem.titleView = segmentedController;
3.2[segmentedController addTarget:selfaction:的实现
-(void)segmentAction:(id)sender
{
    switch ([sender selectedSegmentIndex]) {
        case 0:
        {
            UIAlertView *alter = [[UIAlertView alloc] initWithTitle:@"提示" message:@"你点击了鸡翅" delegate:self  cancelButtonTitle:@"确定" otherButtonTitles:nil, nil];
            [alter show];

        }
        break;
    case 1:
        {
            UIAlertView *alter = [[UIAlertView alloc] initWithTitle:@"提示" message:@"你点击了排骨" delegate:self  cancelButtonTitle:@"确定" otherButtonTitles:nil, nil];
            [alter show];
        }
        break;

        default:
            break;
    }
}
这样就能响应鸡翅和排骨按钮了
4、自定义backBarButtonItem
左上角的返回上级View的barButtonitem的名字是上级目录的Title,如果title或者适合做button的名字,怎么办呢?我们可以自己定义
代码如下:
 UIBarButtonItem *backButton = [[UIBarButtonItem alloc] initWithTitle:@"根视图" style:UIBarButtonItemStyleDone target:nil action:nil];
    self.navigationItem.backBarBu
效果:

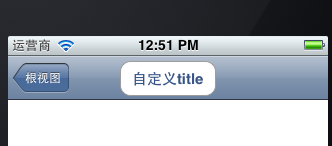
6、自定义title
UINavigationController的title可以用别view替代,比如用UIButton UILable等,下面我用UIButton.
在SecondViewController.m中添加下面如下。
- (void)viewDidLoad
{
    [super viewDidLoad];
    UIButton *button = [UIButton buttonWithType: UIButtonTypeRoundedRect];
    [button setTitle: @"自定义title" forState: UIControlStateNormal];
    [button sizeToFit];
    self.navigationItem.titleView = button;}
运行程序,goto secondView,运行效果
下篇文件讲下Navigation 的Toobar如何显示和如何自己定义。
下篇:
iOS学习之UINavigationController详解与使用(三)ToolBar