Updating Applications for On-screen Input Methods
One of the major new features we are introducing in Android 1.5 is our Input Method Framework (IMF), which allows developers on-screen input methods such as software keyboards. This article will provide an overview of what Android input method editors (IMEs) are, and what an application developer needs to do to work well with them. The IMF allows for a new class of Android devices, such as those without a hardware keyboard, so it is important that your application work well with it to provide the users of such devices a great experience.
What is an input method?
The Android IMF is designed to support a variety of IMEs, including soft keyboard, hand-writing recognizers, and hard keyboard translators. Our focus, however, will be on soft keyboards, since this is the kind of input method that is currently part of the platform.
A user will usually access the current IME by tapping on a text view to edit, as shown here in the home screen:
The soft keyboard is positioned at the bottom of the screen over the application's window. To organize the available space between the application and IME, we use a few approaches; the one shown here is called pan and scan, and simply involves scrolling the application window around so that the currently focused view is visible. This is the default mode, since it is the safest for existing applications.
Most often the preferred screen layout is a resize, where the application's window is resized to be entirely visible. An example is shown here, when composing an e-mail message:
The size of the application window is changed so that none of it is hidden by the IME, allowing full access to both the application and IME. This of course only works for applications that have a resizeable area that can be reduced to make enough space, but the vertical space in this mode is actually no less than what is available in landscape orientation, so very often an application can already accommodate it.
The final major mode is fullscreen or extract mode. This is used when the IME is too large to reasonably share space with the underlying application. With the standard IMEs, you will only encounter this situation when the screen is in a landscape orientation, although other IMEs are free to use it whenever they desire. In this case the application window is left as-is, and the IME simply displays fullscreen on top of it, as shown here:
Because the IME is covering the application, it has its own editing area, which shows the text actually contained in the application. There are also some limited opportunities the application has to customize parts of the IME (the "done" button at the top and enter key label at the bottom) to improve the user experience.
Basic XML attributes for controlling IMEs
There are a number of things the system does to try to help existing applications work with IMEs as well as possible, such as:
- Use pan and scan mode by default, unless it can reasonably guess that resize mode will work by the existence of lists, scroll views, etc.
- Analyze the various existing TextView attributes to guess at the kind of content (numbers, plain text, etc) to help the soft keyboard display an appropriate key layout.
- Assign a few default actions to the fullscreen IME, such as "next field" and "done".
There are also some simple things you can do in your application that will often greatly improve its user experience. Note that, except where explicitly mentioned, all of the things suggested here will not tie your application to Android 1.5 -- it will still work on older releases, which will simply ignore these new options.
Specifying each EditText control's input type
The most important thing for an application to do is use the new android:inputType attribute on each EditText, which provides much richer information about the text content. This attribute actually replaces many existing attributes (android:password, android:singleLine, android:numeric, android:phoneNumber, android:capitalize, android:autoText, android:editable); if you specify both, Cupcake devices will use the new android:inputType attribute and ignore the others.
The input type attribute has three pieces:
- The class is the overall interpretation of characters. The currently supported classes are
text(plain text),number(decimal number),phone(phone number), anddatetime(a date or time). - The variation is a further refinement on the class. In the attribute you will normally specify the class and variant together, with the class as a prefix. For example,
textEmailAddressis a text field where the user will enter something that is an e-mail address (foo@bar.com) so the key layout will have an '@' character in easy access, andnumberSignedis a numeric field with a sign. If only the class is specified, then you get the default/generic variant. - Additional flags can be specified that supply further refinement. These flags are specific to a class. For example, some flags for the
textclass aretextCapSentences,textAutoCorrect, andtextMultiline.
As an example, here is the new EditText for the IM application's message text view:
    <EditText android:id="@+id/edtInput"
        android:layout_width="0dip"
        android:layout_height="wrap_content"
        android:layout_weight="1"
        android:inputType="textShortMessage|textAutoCorrect|textCapSentences|textMultiLine"
        android:imeOptions="actionSend|flagNoEnterAction"
        android:maxLines="4"
        android:maxLength="2000"
        android:hint="@string/compose_hint"/>
A full description of all of the input types can be found in the documentation. It is important to make use of the correct input types that are available, so that the soft keyboard can use the optimal keyboard layout for the text the user will be entering.
Enabling resize mode and other window features
The next most important thing for you to do is specify the overall behavior of your window in relation to the input method. The most visible aspect of this is controlling resize vs. pan and scan mode, but there are other things you can do as well to improve your user experience.
You will usually control this behavior through the android:windowSoftInputMode attribute on each <activity> definition in your AndroidManifest.xml. Like the input type, there are a couple different pieces of data that can be specified here by combining them together:
- The window adjustment mode is specified with either
adjustResizeoradjustPan. It is highly recommended that you always specify one or the other. - You can further control whether the IME will be shown automatically when your activity is displayed and other situations where the user moves to it. The system won't automatically show an IME by default, but in some cases it can be convenient for the user if an application enables this behavior. You can request this with
stateVisible. There are also a number of other state options for finer-grained control that you can find in the documentation.
A typical example of this field can be see in the edit contact activity, which ensures it is resized and automatically displays the IME for the user:
    <activity name="EditContactActivity"
        android:windowSoftInputMode="stateVisible|adjustResize">
        ...
    </activity>
For non-activity windows, there is a new Window.setSoftInputMode() method that can be used to control their behavior. Note that calling this API will make your application incompatible with previous Android platforms.
Controlling the action buttons
The final customization we will look at is the "action" buttons in the IME. There are currently two types of actions:
- The enter key on a soft keyboard is typically bound to an action when not operating on a mult-line edit text. For example, on the G1 pressing the hard enter key will typically move to the next field or the application will intercept it to execute an action; with a soft keyboard, this overloading of the enter key remains, since the enter button just sends an enter key event.
- When in fullscreen mode, an IME may also put an additional action button to the right of the text being edited, giving the user quick access to a common application operation.
These options are controlled with the android:imeOptions attribute on TextView. The value you supply here can be any combination of:
- One of the pre-defined action constants (
actionGo,actionSearch,actionSend,actionNext,actionDone). If none of these are specified, the system will infer eitheractionNextoractionDonedepending on whether there is a focusable field after this one; you can explicitly force no action withactionNone. - The
flagNoEnterActionoption tells the IME that the action should not be available on the enter key, even if the text itself is not multi-line. This avoids having unrecoverable actions like (send) that can be accidentally touched by the user while typing. - The
flagNoAccessoryActionremoves the action button from the text area, leaving more room for text. - The
flagNoExtractUicompletely removes the text area, allowing the application to be seen behind it.
The previous IM application message view also provides an example of an interesting use of imeOptions, to specify the send action but not let it be shown on the enter key:
android:imeOptions="actionSend|flagNoEnterAction"
APIs for controlling IMEs
For more advanced control over the IME, there are a variety of new APIs you can use. Unless special care is taken (such as by using reflection), using these APIs will cause your application to be incompatible with previous versions of Android, and you should make sure you specify android:minSdkVersion="3" in your manifest.
The primary API is the new android.view.inputmethod.InputMethodManager class, which you can retrieve with Context.getSystemService(). It allows you to interact with the global input method state, such as explicitly hiding or showing the current IME's input area.
There are also new window flags controlling input method interaction, which you can control through the existing Window.addFlags() method and new Window.setSoftInputMode() method. The PopupWindow class has grown corresponding methods to control these options on its window. One thing in particular to be aware of is the new WindowManager.LayoutParams.FLAG_ALT_FOCUSABLE_IM constant, which is used to control whether a window is on top of or behind the current IME.
Most of the interaction between an active IME and application is done through the android.view.inputmethod.InputConnection class. This is the API an application implement, which an IME calls to perform the appropriate edit operations on the application. You won't normally need to worry about this, since TextView provides its own implementation for itself.
There are also a handful of new View APIs, the most important of these being onCreateInputConnection() which creates a new InputConnection for an IME (and fills in an android.view.inputmethod.EditorInfo structure with your input type, IME options, and other data); again, most developers won't need to worry about this, since TextView takes care of it for you.
Learn about Android 1.5 and more at Google I/O. Members of the Android team will be there to give a series of in-depth technical sessions and to field your toughest questions.
==================================================================================================================
Creating an Input Method
An input method editor (IME) is a user control that enables users to enter text. Android provides an extensible input method framework that allows applications to provide users alternative input methods, such as on-screen keyboards or even speech input. Once installed, users can select which IME they want to use from the system settings and use it across the entire system; only one IME may be enabled at a time.
To add an IME to the Android system, you create an Android application containing a class that extends InputMethodService. In addition, you usually create a "settings" activity that passes options to the IME service. You can also define a settings UI that's displayed as part of the system settings.
This article covers the following:
- The IME lifecycle.
- Declaring IME components in the application manifest.
- The IME API.
- Designing an IME UI.
- Sending text from an IME to an application.
- Working with IME subtypes.
If you haven't worked with IMEs before, you should read the introductory article Onscreen Input Methods first. Also, the Soft Keyboard sample app included in the SDK contains sample code that you can modify to start building your own IME.
The IME Lifecycle
The following diagram describes the life cycle of an IME:
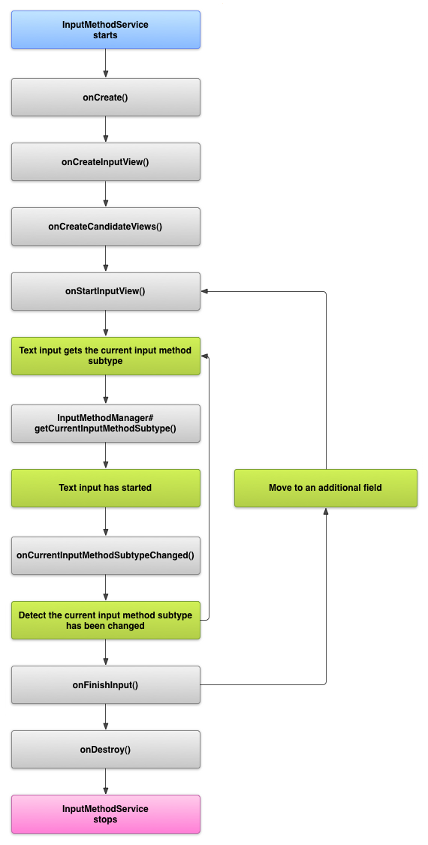
Figure 1. The life cycle of an IME.
The following sections describe how to implement the UI and code associated with an IME that follows this lifecycle.
Declaring IME Components in the Manifest
In the Android system, an IME is an Android application that contains a special IME service. The application's manifest file must declare the service, request the necessary permissions, provide an intent filter that matches the action action.view.InputMethod, and provide metadata that defines characteristics of the IME. In addition, to provide a settings interface that allows the user to modify the behavior of the IME, you can define a "settings" activity that can be launched from System Settings.
The following snippet declares IME service. It requests the permission BIND_INPUT_METHOD to allow the service to connect the IME to the system, sets up an intent filter that matches the action android.view.InputMethod, and defines metadata for the IME:
<!-- Declares the input method service --><serviceandroid:name="FastInputIME"android:label="@string/fast_input_label"android:permission="android.permission.BIND_INPUT_METHOD"><intent-filter><actionandroid:name="android.view.InputMethod"/></intent-filter><meta-dataandroid:name="android.view.im"android:resource="@xml/method"/></service>
This next snippet declares the settings activity for the IME. It has an intent filter for ACTION_MAIN that indicates this activity is the main entry point for the IME application:
<!-- Optional: an activity for controlling the IME settings --><activityandroid:name="FastInputIMESettings"android:label="@string/fast_input_settings"><intent-filter><actionandroid:name="android.intent.action.MAIN"/></intent-filter></activity>
You can also provide access to the IME's settings directly from its UI.
The Input Method API
Classes specific to IMEs are found in the android.inputmethodservice and android.view.inputmethod packages. The KeyEvent class is important for handling keyboard characters.
The central part of an IME is a service component, a class that extends InputMethodService. In addition to implementing the normal service lifecycle, this class has callbacks for providing your IME's UI, handling user input, and delivering text to the field that currently has focus. By default, the InputMethodService class provides most of the implementation for managing the state and visibility of the IME and communicating with the current input field.
The following classes are also important:
BaseInputConnection- Defines the communication channel from an
InputMethodback to the application that is receiving its input. You use it to read text around the cursor, commit text to the text box, and send raw key events to the application. Applications should extend this class rather than implementing the base interfaceInputConnection. KeyboardView- An extension of
Viewthat renders a keyboard and responds to user input events. The keyboard layout is specified by an instance ofKeyboard, which you can define in an XML file.
Designing the Input Method UI
There are two main visual elements for an IME: the input view and the candidates view. You only have to implement the elements that are relevant to the input method you're designing.
Input view
The input view is the UI where the user inputs text, in the form of keyclicks, handwriting or gestures. When the iIME is displayed for the first time, the system calls the onCreateInputView() callback. In your implementation of this method, you create the layout you want to display in the IME window and return the layout to the system. This snippet is an example of implementing the onCreateInputView() method:
@OverridepublicView onCreateInputView(){MyKeyboardView inputView =(MyKeyboardView) getLayoutInflater().inflate( R.layout.input,null);

        inputView.setOnKeyboardActionListener(this); inputView.setKeyboard(mLatinKeyboard);return mInputView;}
In this example, MyKeyboardView is an instance of a custom implementation of KeyboardView that renders a Keyboard. If you’re building a traditional QWERTY keyboard, see the Soft Keyboard sample app for an example of how to extend the KeyboardView class.
Candidates view
The candidates view is the UI where the IME displays potential word corrections or suggestions for the user to select. In the IME lifecycle, the system calls onCreateCandidatesView() when it's ready to display the candidate view. In your implementation of this method, return a layout that shows word suggestions, or return null if you don’t want to show anything (a null response is the default behavior, so you don’t have to implement this if you don’t provide suggestions).
For an example implementation that provides user suggestions, see the Soft Keyboard sample app.
UI design considerations
This section describes some specific UI design considerations for IMEs.
Handling multiple screen sizes
The UI for your IME must be able to scale for different screen sizes, and it also must handle both landscape and portrait orientations. In non-fullscreen IME mode, leave sufficient space for the application to show the text field and any associated context, so that no more than half the screen is occupied by the IME. In fullscreen IME mode this is not an issue.
Handling different input types
Android text fields allow you to set a specific input type, such as free form text, numbers, URLs, email addresses, and search strings. When you implement a new IME, you need to detect the input type of each field and provide the appropriate interface for it. However, you don't have to set up your IME to check that the user entered text that's valid for the input type; that's the responsibility of the application that owns the text field.
For example, here are screenshots of the interfaces that the Latin IME provided with the Android platform provides for text and phone number inputs:
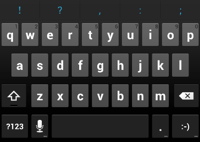
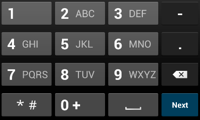
Figure 2. Latin IME input types.
When an input field receives focus and your IME starts, the system calls onStartInputView(), passing in an EditorInfo object that contains details about the input type and other attributes of the text field. In this object, the inputType field contains the text field's input type.
The inputType field is an int that contains bit patterns for various input type settings. To test it for the text field's input type, mask it with the constant TYPE_MASK_CLASS, like this:
inputType &InputType.TYPE_MASK_CLASS
The input type bit pattern can have one of several values, including:
TYPE_CLASS_NUMBER- A text field for entering numbers. As illustrated in the previous screen shot, the Latin IME displays a number pad for fields of this type.
TYPE_CLASS_DATETIME- A text field for entering a date and time.
TYPE_CLASS_PHONE- A text field for entering telephone numbers.
TYPE_CLASS_TEXT- A text field for entering all supported characters.
These constants are described in more detail in the reference documentation for InputType.
The inputType field can contain other bits that indicate a variant of the text field type, such as:
TYPE_TEXT_VARIATION_PASSWORD- A variant of
TYPE_CLASS_TEXTfor entering passwords. The input method will display dingbats instead of the actual text. TYPE_TEXT_VARIATION_URI- A variant of
TYPE_CLASS_TEXTfor entering web URLs and other Uniform Resource Identifiers (URIs). TYPE_TEXT_FLAG_AUTO_COMPLETE- A variant of
TYPE_CLASS_TEXTfor entering text that the application "auto-completes" from a dictionary, search, or other facility.
Remember to mask inputType with the appropriate constant when you test for these variants. The available mask constants are listed in the reference documentation for InputType.
Caution: In your own IME, make sure you handle text correctly when you send it to a password field. Hide the password in your UI both in the input view and in the candidates view. Also remember that you shouldn't store passwords on a device. To learn more, see the Designing for Security guide.
Sending Text to the Application
As the user inputs text with your IME, you can send text to the application by sending individual key events or by editing the text around the cursor in the application's text field. In either case, you use an instance of InputConnection to deliver the text. To get this instance, call InputMethodService.getCurrentInputConnection().
Editing the text around the cursor
When you're handling the editing of existing text in a text field, some of the more useful methods in BaseInputConnection are:
getTextBeforeCursor()- Returns a
CharSequencecontaining the number of requested characters before the current cursor position. getTextAfterCursor()- Returns a
CharSequencecontaining the number of requested characters following the current cursor position. deleteSurroundingText()- Deletes the specified number of characters before and following the current cursor position.
commitText()- Commit a
CharSequenceto the text field and set a new cursor position.
For example, the following snippet shows how to replace the text "Fell" to the left of the with the text "Hello!":
InputConnection ic = getCurrentInputConnection();

    ic.deleteSurroundingText(4,0);

    ic.commitText("Hello",1);

    ic.commitText("!",1);
Composing text before committing
If your IME does text prediction or requires multiple steps to compose a glyph or word, you can show the progress in the text field until the user commits the word, and then you can replace the partial composition with the completed text. You may give special treatment to the text by adding a "span" to it when you pass it to InputConnection#setComposingText().
The following snippet shows how to show progress in a text field:
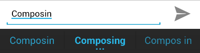
InputConnection ic = getCurrentInputConnection();

    ic.setComposingText("Composi",1);...

    ic.setComposingText("Composin",1);...

    ic.commitText("Composing ",1);
The following screenshots show how this appears to the user:

![]()
Figure 3. Composing text before committing.
Intercepting hardware key events
Even though the input method window doesn't have explicit focus, it receives hardware key events first and can choose to consume them or forward them along to the application. For example, you may want to consume the directional keys to navigate within your UI for candidate selection during composition. You may also want to trap the back key to dismiss any popups originating from the input method window.
To intercept hardware keys, override onKeyDown() and onKeyUp(). See the Soft Keyboard sample app for an example.
Remember to call the super() method for keys you don't want to handle yourself.
Creating an IME Subtype
Subtypes allow the IME to expose multiple input modes and languages supported by an IME. A subtype can represent:
- A locale such as en_US or fr_FR
- An input mode such as voice, keyboard, or handwriting
- Other input styles, forms, or properties specific to the IME, such as 10-key or qwerty keyboard layouts.
Basically, the mode can be any text such as "keyboard", "voice", and so forth.
A subtype can also expose a combination of these.
Subtype information is used for an IME switcher dialog that's available from the notification bar and also for IME settings. The information also allows the framework to bring up a specific subtype of an IME directly. When you build an IME, use the subtype facility, because it helps the user identify and switch between different IME languages and modes.
You define subtypes in one of the input method's XML resource files, using the <subtype> element. The following snippet defines an IME with two subtypes: a keyboard subtype for the US English locale, and another keyboard subtype for the French language locale for France:
<input-method xmlns:android="http://schemas.android.com/apk/res/android"
        android:settingsActivity="com.example.softkeyboard.Settings"
        android:icon="@drawable/ime_icon"
    <subtypeandroid:name="@string/display_name_english_keyboard_ime"android:icon="@drawable/subtype_icon_english_keyboard_ime"android:imeSubtypeLanguage="en_US"android:imeSubtypeMode="keyboard"android:imeSubtypeExtraValue="somePrivateOption=true"/><subtypeandroid:name="@string/display_name_french_keyboard_ime"android:icon="@drawable/subtype_icon_french_keyboard_ime"android:imeSubtypeLanguage="fr_FR"android:imeSubtypeMode="keyboard"android:imeSubtypeExtraValue="foobar=30,someInternalOption=false"/><subtypeandroid:name="@string/display_name_german_keyboard_ime"
            ...
    />
/>
To ensure that your subtypes are labeled correctly in the UI, use %s to get a subtype label that is the same as the subtype’s locale label. This is demonstrated in the next two snippets. The first snippet shows part of the input method's XML file:
<subtypeandroid:label="@string/label_subtype_generic"android:imeSubtypeLocale="en_US"android:icon="@drawable/icon_en_us"android:imeSubtypeMode="keyboard"/>
The next snippet is part of the IME's strings.xml file. The string resource label_subtype_generic, which is used by the input method UI definition to set the subtype's label, is defined as:
<stringname="label_subtype_generic">%s</string>
This sets the subtype’s display name to “English (United States)” in any English language locale, or to the appropriate localization in other locales.
Choosing IME subtypes from the notification bar
The Android system manages all subtypes exposed by all IMEs. IME subtypes are treated as modes of the IME they belong to. In the notification bar, a user can select an available subtype for the currently-set IME, as shown in the following screenshot:
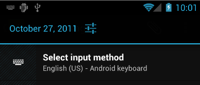
Figure 4. Choosing an IME subtype from the notification bar.
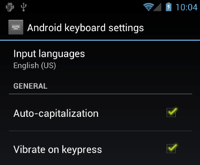
Figure 5. Setting subtype preferences in System Settings.
Choosing IME subtypes from System Settings
A user can control how subtypes are used in the “Language & input” settings panel in the System Settings area. In the Soft Keyboard sample, the file InputMethodSettingsFragment.java contains an implementation that facilitates a subtype enabler in the IME settings. Please refer to the SoftKeyboard sample in the Android SDK for more information about how to support Input Method Subtypes in your IME.
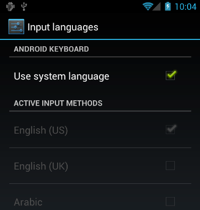
Figure 6. Choosing a language for the IME.
General IME Considerations
Here are some other things to consider as you're implementing your IME:
- Provide a way for users to set options directly from the IME's UI.
- Because multiple IMEs may be installed on the device, provide a way for the user to switch to a different IME directly from the input method UI.
- Bring up the IME's UI quickly. Preload or load on demand any large resources so that users see the IME as soon as they tap on a text field. Cache resources and views for subsequent invocations of the input method.
- Conversely, you should release large memory allocations soon after the input method window is hidden, so that applications can have sufficient memory to run. Consider using a delayed message to release resources if the IME is in a hidden state for a few seconds.
- Make sure that users can enter as many characters as possible for the language or locale associated with the IME. Remember that users may use punctuation in passwords or user names, so your IME has to provide many different characters to allow users to enter a password and get access to the device.