EditText需要注意的地方很多,所以做个小结。
该篇博客会持续更新。
下面的内容来自:http://www.learningandroid.net/blog/,自己稍加修改。

下面的LAYOUT定义文件举了一些例子说明inputType和imeOptions的使用。
<EditText android:id="@+id/textNormal"
			android:layout_width="fill_parent" android:layout_height="wrap_content"
			android:hint="Normal text"
			android:inputType="text"
			android:imeOptions="actionNext"
		/>
		<EditText android:id="@+id/textInteger"
			android:layout_width="fill_parent" android:layout_height="wrap_content"
			android:hint="Integer only"
			android:inputType="number"
			android:imeOptions="actionNext"
		/>
		<EditText android:id="@+id/textDecimal"
			android:layout_width="fill_parent" android:layout_height="wrap_content"
			android:hint="Decimal only"
			android:inputType="numberDecimal"
			android:imeOptions="actionNext"
		/>
		<EditText android:id="@+id/textPhone"
			android:layout_width="fill_parent" android:layout_height="wrap_content"
			android:hint="Phone number"
			android:inputType="phone"
			android:imeOptions="actionNext"
		/>
		<EditText android:id="@+id/textEmail"
			android:layout_width="fill_parent" android:layout_height="wrap_content"
			android:hint="Email"
			android:imeOptions="actionSend"
			android:inputType="textEmailAddress"
		/>
		<EditText android:id="@+id/textSite"
			android:layout_width="fill_parent" android:layout_height="wrap_content"
			android:hint="Web Site"
			android:imeOptions="actionDone"
			android:inputType="textUri"
		/>
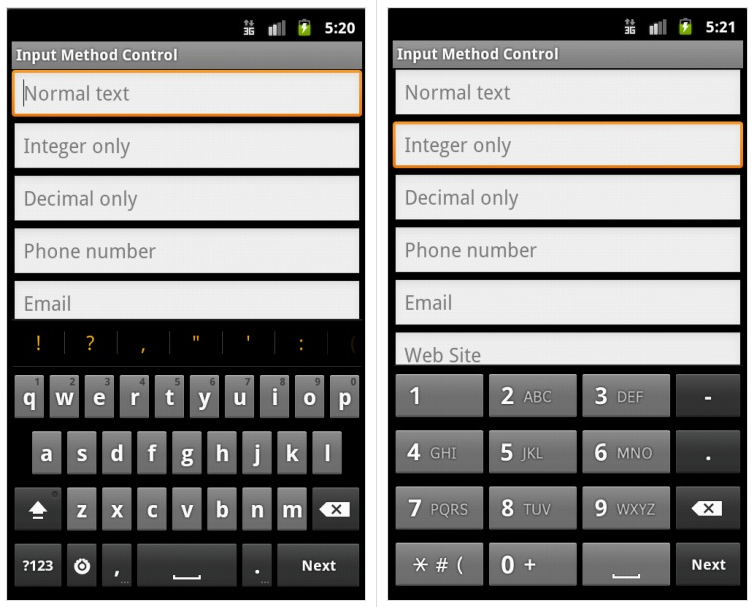
可看到,随着inputType的不同,输入法的键盘也自动跟着发生变化,并且在inputType=number时,是不允许输入英文字符的。
另外,在inputType属性中,textCapCharacters是大写字符 textCapWord是单词首字母大写。
注意:android:phoneNumber,android:numeric,这几个属性均已被废弃,不少输入法已经不再支持。直接使用inputType比较好。
另外,在做这种调试时,最好使用Google拼音,或Android键盘来进行,否则imeOptions可能不能正常显示,比如百度输入法在我删除它之前就一直不支持imeOptions。
我们经常会碰到在输入的时候,输入法窗口盖住需要点击的按钮,只有用Back键关闭输入法才能按到这个按钮。我们可以通过修改窗口的输入法模式来解决。
另一个可能会有用的模式选项是在窗口刚打开时,是否立刻弹出输入法窗口还是等用户点击文本框后再弹出。后者通常适用于登录画面。
文件名:input_method_test.xml
<?xml version="1.0" encoding="utf-8"?>
<ScrollView
	xmlns:android="http://schemas.android.com/apk/res/android"
		android:layout_width="fill_parent"
		android:layout_height="fill_parent"
	android:fillViewport="true"
>
	<LinearLayout
		android:layout_width="fill_parent"
		android:layout_height="fill_parent"
		android:orientation="vertical"
		>
		<EditText android:id="@+id/textNormal"
			android:layout_width="fill_parent" android:layout_height="wrap_content"
			android:hint="Normal text"
			android:inputType="text"
			android:imeOptions="actionNext"
		/>
		<EditText android:id="@+id/textInteger"
			android:layout_width="fill_parent" android:layout_height="wrap_content"
			android:hint="Integer only"
			android:inputType="number"
			android:imeOptions="actionNext"
		/>
		<EditText android:id="@+id/textDecimal"
			android:layout_width="fill_parent" android:layout_height="wrap_content"
			android:hint="Decimal only"
			android:inputType="numberDecimal"
			android:imeOptions="actionNext"
		/>
		<EditText android:id="@+id/textPhone"
			android:layout_width="fill_parent" android:layout_height="wrap_content"
			android:hint="Phone number"
			android:inputType="phone"
			android:imeOptions="actionNext"
		/>
		<EditText android:id="@+id/textEmail"
			android:layout_width="fill_parent" android:layout_height="wrap_content"
			android:hint="Email"
			android:imeOptions="actionSend"
			android:inputType="textEmailAddress"
		/>
		<EditText android:id="@+id/textSite"
			android:layout_width="fill_parent" android:layout_height="wrap_content"
			android:hint="Web Site"
			android:imeOptions="actionDone"
			android:inputType="textUri"
		/>
		<LinearLayout
			android:orientation="horizontal"
			android:layout_width="fill_parent" android:layout_height="wrap_content"
		>
			<ToggleButton android:id="@+id/btnResize"
				android:layout_width="wrap_content" android:layout_height="wrap_content"
				android:textOff="Pan" android:textOn="Resize"
			/>
			<ToggleButton android:id="@+id/btnHidden"
				android:layout_width="wrap_content" android:layout_height="wrap_content"
				android:textOff="Visible" android:textOn="Hidden"
			/>
		</LinearLayout>
	</LinearLayout>
</ScrollView>
最后的2个ToogleButton,这就是我们用来控制软键盘的2个开关。再贴出代码:
文件名:InputMethodTestActivity.java
package mark.zhang;

import android.app.Activity;
import android.content.SharedPreferences;
import android.os.Bundle;
import android.view.WindowManager;
import android.widget.CompoundButton;
import android.widget.ToggleButton;

/**
 * 输入框的输入法控制和输入法窗口自身的控制
 */
public class InputMethodTestActivity extends Activity implements
		CompoundButton.OnCheckedChangeListener {
	SharedPreferences prefs;
	private static final String PREF_ADJUST = "ADJUST";
	private static final String PREF_HIDDEN = "HIDDEN";
	private static final String PREF_PACKAGE = "INPUT_METHOD_TEST";

	// ToggleButton实例及其对应的参数
	ToggleButton btnResize;
	ToggleButton btnHidden;
	private boolean resize;
	private boolean hidden;

	@Override
	protected void onCreate(Bundle savedInstanceState) {
		super.onCreate(savedInstanceState);
		setContentView(R.layout.input_method_test);

		// 取得保存的参数值,并且以此设置本窗口的输入法显示模式
		prefs = getSharedPreferences(PREF_PACKAGE, MODE_PRIVATE);
		resize = prefs.getBoolean(PREF_ADJUST, false);
		hidden = prefs.getBoolean(PREF_HIDDEN, false);
		setupInputWindow();

		// 设置2个Toggle Button
		btnResize = (ToggleButton) findViewById(R.id.btnResize);
		btnResize.setChecked(resize);
		btnResize.setOnCheckedChangeListener(this);

		btnHidden = (ToggleButton) findViewById(R.id.btnHidden);
		btnHidden.setChecked(hidden);
		btnHidden.setOnCheckedChangeListener(this);
	}

	@Override
	public void onCheckedChanged(CompoundButton buttonView, boolean isChecked) {
		// 任何时候toggle button变化时,均会保存属性,并且重设input属性
		resize = btnResize.isChecked();
		hidden = btnHidden.isChecked();
		SharedPreferences.Editor editor = prefs.edit();
		editor.putBoolean(PREF_ADJUST, resize);
		editor.putBoolean(PREF_HIDDEN, hidden);
		editor.commit();

		setupInputWindow();
	}

	/**
	 * 根据resize和hidden参数来设置输入法窗口的属性
	 */
	private void setupInputWindow() {
		int inputMode = resize ? WindowManager.LayoutParams.SOFT_INPUT_ADJUST_RESIZE
				: WindowManager.LayoutParams.SOFT_INPUT_ADJUST_PAN;
		inputMode = inputMode
				| (hidden ? WindowManager.LayoutParams.SOFT_INPUT_STATE_HIDDEN
						: WindowManager.LayoutParams.SOFT_INPUT_STATE_VISIBLE);
		getWindow().setSoftInputMode(inputMode);
	}
}
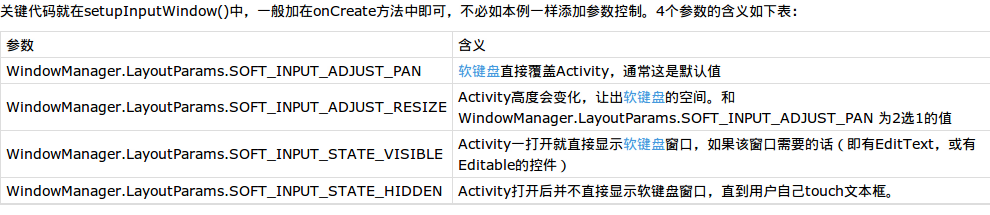
另外还有几个参数,API中相关说明如下:
- visibility states: SOFT_INPUT_STATE_UNSPECIFIED, SOFT_INPUT_STATE_UNCHANGED, SOFT_INPUT_STATE_HIDDEN, SOFT_INPUT_STATE_ALWAYS_VISIBLE, or SOFT_INPUT_STATE_VISIBLE.
- adjustment options: SOFT_INPUT_ADJUST_UNSPECIFIED, SOFT_INPUT_ADJUST_RESIZE, or SOFT_INPUT_ADJUST_PAN.
2个开关均为开的情况下的截图:
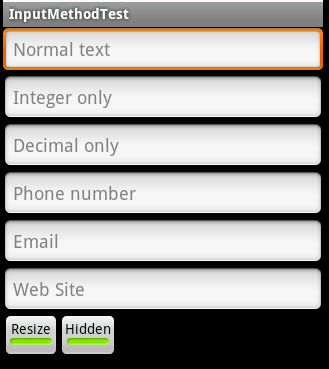

可以看到由于使用了Resize模式,整个Activity的大小被缩小了,让出了输入法窗体的空间,并且由Activity本身使用了ScrollView,所以Activity可以被滚动到最下方。
文章链接:
http://www.learningandroid.net/blog/foundation/input-method-control-in-edittext/
http://www.learningandroid.net/blog/foundation/input-method-soft-mode/