前两篇介绍了如何通过XMPP来发送消息和接收消息,这一篇我们主要介绍如何来美化我们的聊天程序,看一下最终效果呢,当然源程序也会在最后放出
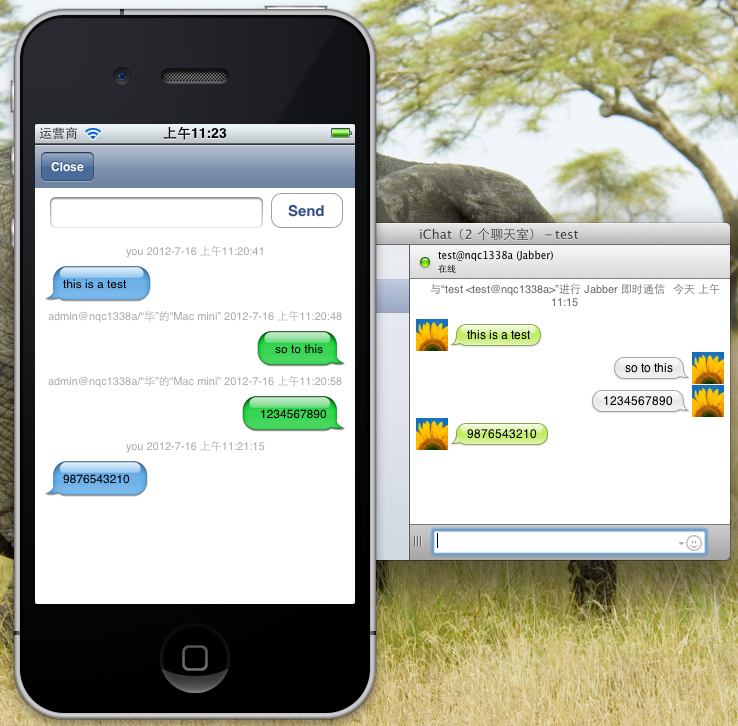
好了,我们来看一下我们写的程序
这里我们自定义了TableViewCell
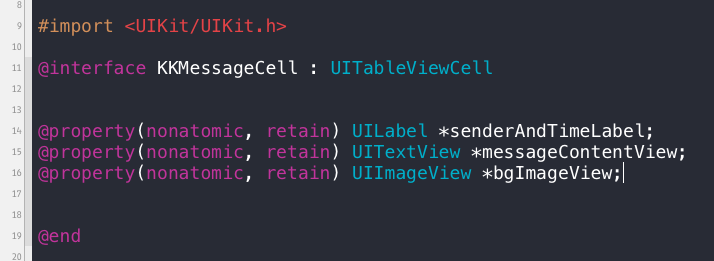
一行是显示发布日期,一行是显示发送的消息,还有一个是背景
-(id)initWithStyle:(UITableViewCellStyle)style reuseIdentifier:(NSString *)reuseIdentifier{

    self = [super initWithStyle:style reuseIdentifier:reuseIdentifier];
    if (self) {
        //日期标签
        senderAndTimeLabel = [[UILabel alloc] initWithFrame:CGRectMake(10, 5, 300, 20)];
        //居中显示
        senderAndTimeLabel.textAlignment = UITextAlignmentCenter;
        senderAndTimeLabel.font = [UIFont systemFontOfSize:11.0];
        //文字颜色
        senderAndTimeLabel.textColor = [UIColor lightGrayColor];
        [self.contentView addSubview:senderAndTimeLabel];

        //背景图
        bgImageView = [[UIImageView alloc] initWithFrame:CGRectZero];
        [self.contentView addSubview:bgImageView];

        //聊天信息
        messageContentView = [[UITextView alloc] init];
        messageContentView.backgroundColor = [UIColor clearColor];
        //不可编辑
        messageContentView.editable = NO;
        messageContentView.scrollEnabled = NO;
        [messageContentView sizeToFit];
        [self.contentView addSubview:messageContentView];

    }

    return self;

}
定义好,在UITableViewCell中将Cell改成我们自己定义的Cell
-(UITableViewCell *)tableView:(UITableView *)tableView cellForRowAtIndexPath:(NSIndexPath *)indexPath{

    static NSString *identifier = @"msgCell";

    KKMessageCell *cell =(KKMessageCell *)[tableView dequeueReusableCellWithIdentifier:identifier];

    if (cell == nil) {
        cell = [[KKMessageCell alloc] initWithStyle:UITableViewCellStyleValue1 reuseIdentifier:identifier];
    }

    NSMutableDictionary *dict = [messages objectAtIndex:indexPath.row];

    //发送者
    NSString *sender = [dict objectForKey:@"sender"];
    //消息
    NSString *message = [dict objectForKey:@"msg"];
    //时间
    NSString *time = [dict objectForKey:@"time"];

    CGSize textSize = {260.0 ,10000.0};
    CGSize size = [message sizeWithFont:[UIFont boldSystemFontOfSize:13] constrainedToSize:textSize lineBreakMode:UILineBreakModeWordWrap];

    size.width +=(padding/2);

    cell.messageContentView.text = message;
    cell.accessoryType = UITableViewCellAccessoryNone;
    cell.userInteractionEnabled = NO;

    UIImage *bgImage = nil;

    //发送消息
    if ([sender isEqualToString:@"you"]) {
        //背景图
        bgImage = [[UIImage imageNamed:@"BlueBubble2.png"] stretchableImageWithLeftCapWidth:20 topCapHeight:15];
        [cell.messageContentView setFrame:CGRectMake(padding, padding*2, size.width, size.height)];

        [cell.bgImageView setFrame:CGRectMake(cell.messageContentView.frame.origin.x - padding/2, cell.messageContentView.frame.origin.y - padding/2, size.width + padding, size.height + padding)];
    }else {

        bgImage = [[UIImage imageNamed:@"GreenBubble2.png"] stretchableImageWithLeftCapWidth:14 topCapHeight:15];

        [cell.messageContentView setFrame:CGRectMake(320-size.width - padding, padding*2, size.width, size.height)];
        [cell.bgImageView setFrame:CGRectMake(cell.messageContentView.frame.origin.x - padding/2, cell.messageContentView.frame.origin.y - padding/2, size.width + padding, size.height + padding)];
    }

    cell.bgImageView.image = bgImage;
    cell.senderAndTimeLabel.text = [NSString stringWithFormat:@"%@ %@", sender, time];

    return cell;

}
在这个Cell里设置了发送的消息的背景图和接收消息的背景图
这里在字典里有一个"time"
这是我们接收和发送消息的时间
+(NSString *)getCurrentTime{

    NSDate *nowUTC = [NSDate date];

    NSDateFormatter *dateFormatter = [[NSDateFormatter alloc] init];
    [dateFormatter setTimeZone:[NSTimeZone localTimeZone]];
    [dateFormatter setDateStyle:NSDateFormatterMediumStyle];
    [dateFormatter setTimeStyle:NSDateFormatterMediumStyle];

    return [dateFormatter stringFromDate:nowUTC];

}
在AppDelegate.m中
将我们收到消息的内容也做一下调整
- (void)xmppStream:(XMPPStream *)sender didReceiveMessage:(XMPPMessage *)message{

//   ......

    NSMutableDictionary *dict = [NSMutableDictionary dictionary];
    [dict setObject:msg forKey:@"msg"];
    [dict setObject:from forKey:@"sender"];
    //消息接收到的时间
    [dict setObject:[Statics getCurrentTime] forKey:@"time"];

   ......

}
最后我们再设置一下每一行显示的高度
//每一行的高度
-(CGFloat)tableView:(UITableView *)tableView heightForRowAtIndexPath:(NSIndexPath *)indexPath{

    NSMutableDictionary *dict  = [messages objectAtIndex:indexPath.row];
    NSString *msg = [dict objectForKey:@"msg"];

    CGSize textSize = {260.0 , 10000.0};
    CGSize size = [msg sizeWithFont:[UIFont boldSystemFontOfSize:13] constrainedToSize:textSize lineBreakMode:UILineBreakModeWordWrap];

    size.height += padding*2;

    CGFloat height = size.height < 65 ? 65 : size.height;

    return height;

}
,对了,在发送消息的时候,别忘了也加上
- (IBAction)sendButton:(id)sender {

    //本地输入框中的信息
    ......

    if (message.length > 0) {

        .....

        NSMutableDictionary *dictionary = [NSMutableDictionary dictionary];

        [dictionary setObject:message forKey:@"msg"];
        [dictionary setObject:@"you" forKey:@"sender"];
        [dictionary setObject:[Statics getCurrentTime] forKey:@"time"];

        [messages addObject:dictionary];

        //重新刷新tableView
        [self.tView reloadData];

    }


}
好了,这里关于XMPP发送消息的教程就结束了,以后我们会详细介绍其他关于XMPP的内容