创建一个组件
第一步:在hot-deploy 下创建子目录命名为“computer“。这个目录名要匹配我们要创建的组件名。
第二步:在hot-deploy/computer 路径下创建ofbiz-component.xml 文件,填入下面的内容。
<?xml version="1.0" encoding="UTF-8"?>
<ofbiz-component name="computer"
	xmlns:xsi="http://www.w3.org/2001/XMLSchema-instance"
	xsi:noNamespaceSchemaLocation="http://ofbiz.apache.org/dtds/ofbiz-component.xsd">
	<resource-loader name="main" type="component" />

	<webapp name="computer" title="Computer" server="default-server"
		base-permission="OFBTOOLS" location="webapp/computer" mount-point="/computer"
		app-bar-display="false" />
</ofbiz-component>
1. 这个ofbiz-component.xml 文件是负责让OFBiz 知道资源的位置,同时让你加入到classpath 中.
2. 这个'resource-loader name' 可以是任意字符串。这儿我们设为"main". 这个 'type' 告诉OFBiz 我们将开始装载一个组件。
a) name :- 定义我们web 应用的名字。
b) title :- 这个将是应用的标识,会显示在顶端导航栏上。
c) server :- 这个让OFBiz 知道使用哪个server
d) base-permission :- 这行要求用户要有OFBTOOLS 权限才能使用这个应用。因为'admin'用户有这个权限,所以我们不必创建其它新用户。
e) location :- 在这个服务器上缺省基准路径的位置。
f) mount-point :- 这是访问资源的URL,应该是localhost:8080/computer
g) app-bar-display :- 这个是让OFBiz 知道是否显示在主应用导航条上,这个是公用OFBiz 修饰的一部分。
创建 web 应用
第一步:在 computer 组件中创建一个"webapp"目录(hot-deploy/computer/webapp).,这个目录包含所有这组件相关的webapp 目录。
第二步:在 webapp 目录下创建一个子目录命名为"computer",这个就是我们要开发的webapp 名称(hot-deploy/computer/webapp/computer).
第三步:在你 webapp 下创建WEB-INF 目录(hot-deploy/computer/webapp/computer/WEB-INF)。一个OFBiz 的web 应用要有两个配置文件:controller.xml 和web.xml。这controller.xml 告诉OFBiz 从访问者来的不同请求做不同的事:做什么动作和渲染什么页面。web.xml 告诉OFBiz 什么资源 (database and business logic access) 对这个web 应用是有效的和如何处理web 相关的事,比如welcome pages, redirects, and error pages。.
第三步:创建一个命名为"web.xml"(web.xml 遵守 j2ee web 应用规范). 这个文件的内容如下
<?xml version="1.0" encoding="UTF-8"?>
<!DOCTYPE web-app PUBLIC "-//Sun Microsystems, Inc.//DTD Web Application 2.3//EN" "http://java.sun.com/dtd/web-app_2_3.dtd">
<!--
Licensed to the Apache Software Foundation (ASF) under one
or more contributor license agreements.  See the NOTICE file
distributed with this work for additional information
regarding copyright ownership.  The ASF licenses this file
to you under the Apache License, Version 2.0 (the
"License"); you may not use this file except in compliance
with the License.  You may obtain a copy of the License at

http://www.apache.org/licenses/LICENSE-2.0

Unless required by applicable law or agreed to in writing,
software distributed under the License is distributed on an
"AS IS" BASIS, WITHOUT WARRANTIES OR CONDITIONS OF ANY
KIND, either express or implied.  See the License for the
specific language governing permissions and limitations
under the License.
-->

<web-app>
    <display-name>Open For Business - Computer Application</display-name>
    <description>Computer Application of the Open For Business Project</description>

    <context-param>
        <param-name>webSiteId</param-name>
        <param-value>COMPUTER</param-value>
        <description>A unique ID used to look up the WebSite entity</description>
    </context-param>
    <context-param>
        <param-name>localDispatcherName</param-name><param-value>computer</param-value>
        <description>A unique name used to identify/recognize the local dispatcher for the Service Engine</description>
    </context-param>
    <context-param>
        <param-name>entityDelegatorName</param-name><param-value>default</param-value>
        <description>The Name of the Entity Delegator to use, defined in entityengine.xml</description>
    </context-param>
    <context-param>
        <param-name>mainDecoratorLocation</param-name>
        <param-value>component://computer/widget/CommonScreens.xml</param-value>
        <description>The location of the main-decorator screen to use for this webapp; referred to as a context variable in screen def XML files.</description>
    </context-param>
    <!-- context-param>
        <param-name>widgetVerbose</param-name>
        <param-value>false</param-value>
        <description>Enable/disable widget boundary comments. will override widget.properties See org.ofbiz.widget.ModelWidget.widgetBoundaryCommentsEnabled().</description>
    </context-param-->
    <context-param>
        <param-name>compressHTML</param-name>
        <param-value>false</param-value>
        <description>Remove unnecessary whitespace from HTML output.</description>
    </context-param>

    <filter>
        <filter-name>ContextFilter</filter-name>
        <display-name>ContextFilter</display-name>
        <filter-class>org.ofbiz.webapp.control.ContextFilter</filter-class>
        <init-param><param-name>disableContextSecurity</param-name><param-value>N</param-value></init-param>
        <init-param>
            <param-name>allowedPaths</param-name>
            <param-value>/error:/control:/select:/index.html:/index.jsp:/default.html:/default.jsp:/images:/includes/maincss.css</param-value>
        </init-param>
        <init-param><param-name>errorCode</param-name><param-value>403</param-value></init-param>
        <init-param><param-name>redirectPath</param-name><param-value>/control/main</param-value></init-param>
    </filter>
    <filter-mapping><filter-name>ContextFilter</filter-name><url-pattern>/*</url-pattern></filter-mapping>

    <listener><listener-class>org.ofbiz.webapp.control.ControlEventListener</listener-class></listener>
    <listener><listener-class>org.ofbiz.webapp.control.LoginEventListener</listener-class></listener>
    <!-- NOTE: not all app servers support mounting implementations of the HttpSessionActivationListener interface -->
    <!-- <listener><listener-class>org.ofbiz.webapp.control.ControlActivationEventListener</listener-class></listener> -->

    <servlet>
        <servlet-name>ControlServlet</servlet-name>
        <display-name>ControlServlet</display-name>
        <description>Main Control Servlet</description>
        <servlet-class>org.ofbiz.webapp.control.ControlServlet</servlet-class>
        <load-on-startup>1</load-on-startup>
    </servlet>
    <servlet-mapping><servlet-name>ControlServlet</servlet-name><url-pattern>/control/*</url-pattern></servlet-mapping>

    <session-config><session-timeout>60</session-timeout><!-- in minutes --></session-config>

    <welcome-file-list>
        <welcome-file>index.jsp</welcome-file>
        <welcome-file>index.html</welcome-file>
        <welcome-file>index.htm</welcome-file>
    </welcome-file-list>
</web-app>
第五步:创建一个命名"controller.xml" (被ofbiz webapp 控制器使用)的文件。这个文件开始是小而简单,但随后我们增加功能而快速增长。代码如下
<?xml version="1.0" encoding="UTF-8"?>
<site-conf xmlns:xsi="http://www.w3.org/2001/XMLSchema-instance"
	xsi:noNamespaceSchemaLocation="http://ofbiz.apache.org/dtds/site-conf.xsd">
	<include location="component://common/webcommon/WEB-INF/common-controller.xml" />
	<description>Computer Component Site Configuration File</description>
	<owner>Copyright 2001-2009 The Apache Software Foundation</owner>
	<handler name="screen" type="view"
		class="org.ofbiz.widget.screen.ScreenWidgetViewHandler" /> <!-- Request Mappings -->
	<request-map uri="main">
		<security https="false" auth="false" />
		<response name="success" type="view" value="main" />
	</request-map>
	<!-- end of request mappings -->

	<!-- View Mappings -->
	<view-map name="main" type="screen"
		page="component://computer/widget/ComputerScreens.xml#main" />
	<!-- end of view mappings -->
</site-conf>
第六步:在目录hot-deploy/computer/webapp/computer下建一个index.jsp.代码如下
<%response.sendRedirect("control/main");%>
第七步:在你的组件目录practice 中创建一个"widget"(hot-deploy/practice/widget). 这个目录就包含forms,menus, and screens,用来处理用户界面的。
第八步:在"widget"中创建文件"ComputerScreens.xml".代码如下
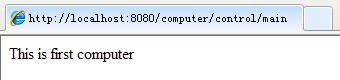
<?xml version="1.0" encoding="UTF-8"?>
<screens xmlns:xsi="http://www.w3.org/2001/XMLSchema-instance"
	xsi:noNamespaceSchemaLocation="http://ofbiz.apache.org/dtds/widget-screen.xsd">
	<screen name="main">
		<section>
			<widgets>
				<label text="This is first computer" />
			</widgets>
		</section>
	</screen>
</screens>
第九步:重新启动ofbiz。启动完成后输入http://localhost:8080/computer/control/main既可以看到如下界面