使用WCF我们也可以对Sharepoint的列表数据进行操作。
主要有两种类型的WCF应用可以用来和Sharepoint的列表进行交互:
一、标准的WCF服务应用
二、REST-base Service,REST(Representational State Transfer).
我们使用标准的WCF服务应用来和Sharepoint的列表进行交互。
首先,我们需要创建一个WCF,使用VS2010的项目模板,WCF Service Application,不要忘记选择的是.NET Framework3.5。我们需要创建一个服务契约和一个服务来和Sharepont的列表进行交互,其中,契约的代码如下:
 代码
代码

{
[ServiceContract]
public interface IService1
{
[OperationContract]
}
}
如果我们想在我们的这个WCF中使用Sharepoint 对象模型,我们必须为项目添加引用Microsoft.SharePoint.dll,以下是Service代码:
代码
using System.Collections.Generic;
using System.Linq;
using System.Runtime.Serialization;
using System.ServiceModel;
using System.ServiceModel.Web;
using System.Text; using Microsoft.SharePoint; namespace UpdateSPList
{
// NOTE: You can use the "Rename" command on the "Refactor" menu to change the class name "Service1" in code, svc and config file together.
public class Service1 : IService1
{
public void updateBlog(string SPSite, string blogTitle, string blogContent, string blogAuthor)
{
string strDashListRoot = SPSite;
using (SPSite site = new SPSite(strDashListRoot))
{
using (SPWeb web = site.OpenWeb())
{
web.AllowUnsafeUpdates = true;
SPList list = web.Lists["Blog"];
SPListItem Item = list.Items.Add();
Item["Title"] = blogTitle;
Item["Content"] = blogContent;
Item["Writer"] = blogAuthor;
Item.Update();
web.AllowUnsafeUpdates = false;
}
}
}
}
}
发布WCF 服务。
下面创建一个客户端的WPF应用来调用这个WCF服务,创建WPF应用的过程略。
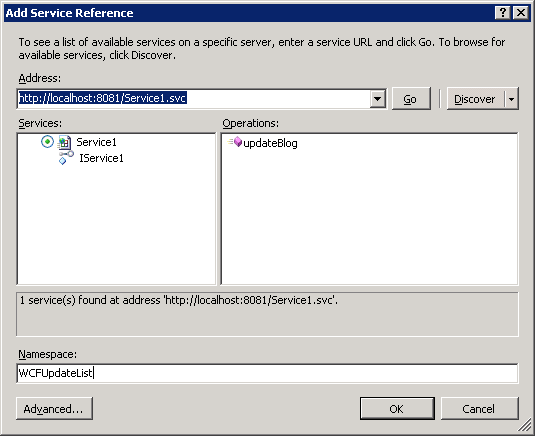
创建好WPF项目后,我们添加Service Reference,把刚创建的WCF服务地址填上
在添加按钮的方法内添加如下代码:
代码
{
strSPURL = txtbxURL.Text;
strBlogTitle = txtbxBlogTitle.Text;
strBlogContent = txtbxBlogContent.Text;
strBlogAuthor = txtbxBlogAuthor.Text;
WCFUpdateList.Service1Client myWCFProxy = new WCFUpdateList.Service1Client();
myWCFProxy.updateBlog(strSPURL, strBlogTitle, strBlogContent, strBlogAuthor);
myWCFProxy.Close();
}
当然,不要忘记给类添加如下的变量:
string strSPURL = "";
string strBlogTitle = "";
string strBlogContent = "";
string strBlogAuthor = "";
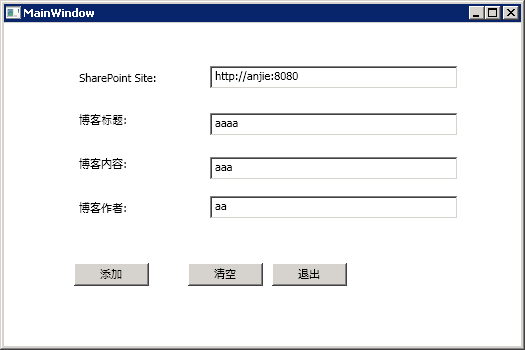
运行项目,填写一些数据,提交后你会发现你提交的数据被记录到列表中了。
异常:
如果在调用WCF的过程中发生异常,想要查看异常信息时,你需要在WCF的web.config中添加如下黑体的代码:
代码
<serviceBehaviors>
<behavior name="UpdateSPList.SPListServiceBehavior">
<serviceMetadata httpGetEnabled="true" />
<serviceDebug includeExceptionDetailInFaults="true" />
</behavior>
</serviceBehaviors>
</behaviors>
在调用WCF的过程中,如果抛出如下异常信息
或者:
代码
解决方法:
1) 打开IIS,定位到Application Pools,找到你部署的WCF站点对应的Application Pool,右键单击选择“高级”,弹出如下对话框
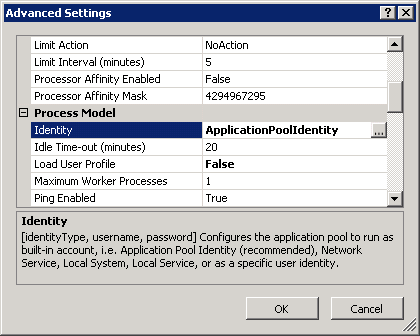
2) 点击Identity右边的按钮,在弹出的对话框中

选择Custom account,点击Set按钮,弹出对话框
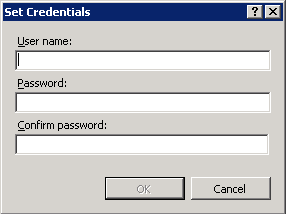
填写一个有权限访问你的MOSS站点的账户和密码,一路OK下去。
再次运行调用WCF的WPF项目,异常不再显示。
项目文件:http://files.cnblogs.com/Jayan/WCFList.zip