动机和目标
OSGi技术发展至今也有好几年了,然而除了在富客户端应用(以Eclipse为代表)和服务器应用(如大多数的应用服务器)方面大放光芒之外,在
Web
Application方面的应用和资料却少之又少。一方面,在OSGi规范中,对于Web应用方面的规划尚不成熟,即使在最新的4.2版中,也仅仅只有
一个HttpService,这个简陋的service甚至不能覆盖任何一个现有的Servlet规范;另一方面,各个OSGi实现厂商对
HttpService的实现也是不完全的,在开发实现一个常规的Web
Application时,这些实现也是完全不够用的。本文章的目的,也就是为了探索OSGi在Web
Application上的开发之路该如何走,从我的视角提出一些看法,做一些尝试,希望对大家有所帮助。
现在OSGi与Web Application的结合,大致有两个方向:
- OSGi包含Web Container:目前能完美嵌入OSGi的Web
Container似乎只有jetty一个,tomcat的catalina似乎有希望能成为第二个。我们完全不能指望Websphere和
Weblogic能在短期内具有能嵌入OSGi的能力,所以这个方向理所当然的被我放弃了。 - Web Container包含OSGi:这个方面目前只有equinox的Servlet
Bridge这么一个著名的实现,equinox通过Servlet
Bridge的方式来实现一个OSGi的HttpService服务,这个服务目前能做的事情还非常有限,还不足以覆盖Servlet规范。
我的目标是构建一个OSGi与Web Application结合的方式,它要能满足一下几点需求:
- 基于OSGi的bundle和service。
- 适合绝大对数支持Servlet 2.4和Jsp 2.0规范的Web服务器。
- 适合现有的实现OSGi 4.2规范的OSGi Framework实现:equinox、felix和knopflerfish。
- 支持大部分Servlet 2.4和Jsp 2.0规范中声明的功能。
- 提供一个基于HttpService的服务实现,以此来兼容其他使用HttpService的service。
毫无疑问,我将采用Web Container中包含OSGi的方式来实现,具体的内容将在以后陆续提供。
搭建开发环境
工欲善其事必先利其器,在正式开发之前,花一点时间来构建开发环境还是有必要的。本章介绍一下我的开发环境。
我使用的开发环境如下:
- Eclipse:当然了,最新版3.52,其中包含了最新版的WTP(Eclipse Web Tools
Platform),个人感觉,不比MyEclipse差,而且最重要的是,它是free的。 - equinox-SDK:版本为3.6M5,实现了OSGi R4 core framework specification 4.2。
- Tomcat:作为第一个实现的Web
Container,我采用了Tomcat,从中抽取几个特定版本作为测试对象:5.5.28和6.0.26这两个版本,因为他们支持Java5和
Servlet2.4/Jsp2.0。 - JDK:当然Java5以上的,谁叫Equinox只支持Java5以上的呢,我采用的是jdk1.5.0.22。基于Websphere和
Weblogic的缓慢的JDK升级历程,我还是决定不采用Java6或者是7了。
以下是我的目录结构: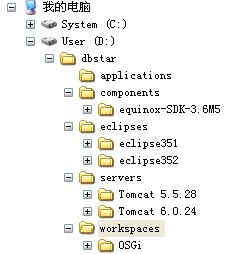
环境整合:
1.运行Eclipse,指定Workspace路径为:D:/dbstar/workspaces/OSGi
2.设置Plug-in Development的Target
Platform,增加equinox-SDK-3.6M5并设为默认,这样我们就可以使用equinox-SDK-3.6M5来作为我们开发
bundle的基准库,而不是使用Eclipse自带的plugin开发环境。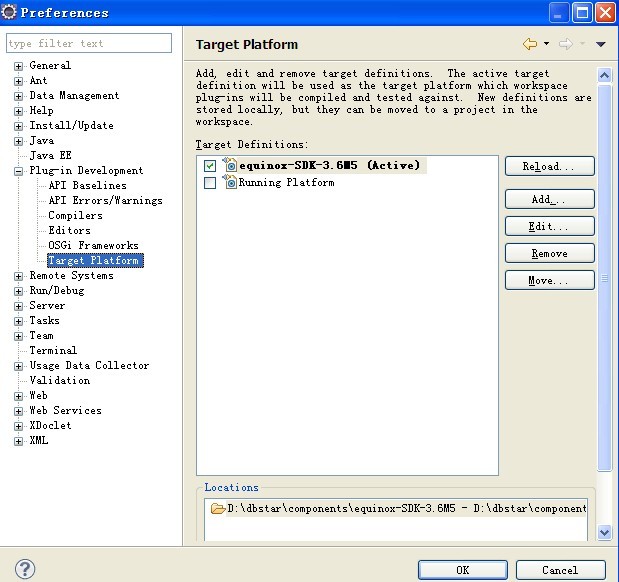
3.在Server配置中增加Tomcat两个版本的服务器。
自此,我的开发环境就已经设置好了,当然了,还有一些其他的个人习惯设置,比如说字体,默认编码设为UTF-8,Code
Template和Formatter等等,就不一一赘述了。
在下面一篇中,将介绍如何在Web Application中启动OSGi。
在WebApplication中启动
OSGi
本章将创建一个Web Application项目,并描述如何在此应用中启动OSGi。
首先,在Eclipse中创建一个Dynamic Web Project,名字为OSGi-Web,Context root为osgi。
这个项目只作为部署Web Application使用,相关java代码放在另外一个Java Project中,因此我们再创建一个新的Java
Project,名字为OSGi-Web-Launcher。然后在OSGi-Web项目的Java EE Module
Dependencies中设置OSGi-Web-Launcher为关联,这样在部署的时候,OSGi-Web-Launcher项目中的java代码
将为打包为jar存放到Web的WEB-INF/lib目录之中。
为了启动OSGi,我们在web中增加一个ServletContextListener监听器实现,并且通过这个监听器来控制OSGi容器的启动和终
止。
在OSGi-Web-Launcher项目中增加一个java类,类名为FrameworkConfigListener,实现接口
ServletContextListener,package为org.dbstar.osgi.web.launcher。在
contextInitialized方法中,增加启动OSGi的代码,在contextDestroyed方法中,增加停止OSGi的代码,这样我们就
可以使OSGi容器的生命周期与ServletContext的生命周期保持一致了。
启动OSGi容器:
感谢OSGi规范4.2给了我们一个简单统一的启动OSGi容器的方式,所有实现OSGi4.2规范的容器实力都应该实现这种启动方式,那就是通过
org.osgi.framework.launch.FrameworkFactory,同时,还必须在其实现jar中放置一个文件:META-
INF/services/org.osgi.framework.launch.FrameworkFactory,这个文件中设置了实际的
FrameworkFactory实现类的类名。在equinox-SDK-3.6M5的
org.eclipse.osgi_3.6.0.v20100128-1430.jar中,这个文件的内容
是:org.eclipse.osgi.launch.EquinoxFactory。
我们先写一个工具类来载入这个配置文件中的内容:
<br />
Code highlighting produced by Actipro CodeHighlighter (freeware)<br
/>
http://www.CodeHighlighter.com/<br />
<br />
--> 1
package
org.dbstar.osgi.web.launcher;
2
3
import
java.io.BufferedReader;
4
import
java.io.IOException;
5
import
java.io.InputStream;
6
import
java.io.InputStreamReader;
7
8
public
abstract
class
ServiceLoader {
9
public
final
static
<
E
>
Class
<
E
>
load(Class
<
E
>
clazz)
throws
IOException, ClassNotFoundException {
10
return
load(clazz, Thread.currentThread().getContextClassLoader());
11
}
12
13
@SuppressWarnings(
"
unchecked
"
)
14
public
final
static
<
E
>
Class
<
E
>
load(Class
<
E
>
clazz, ClassLoader classLoader)
throws
IOException,
15
ClassNotFoundException {
16
String resource
=
"
META-INF/services/
"
+
clazz.getName();
17
InputStream in
=
classLoader.getResourceAsStream(resource);
18
if
(in
==
null
)
return
null
;
19
20
try
{
21
BufferedReader reader
=
new
BufferedReader(
new
InputStreamReader(in));
22
String serviceClassName
=
reader.readLine();
23
return
(Class
<
E
>
) classLoader.loadClass(serviceClassName);
24
}
finally
{
25
in.close();
26
}
27
}
28
}
然后获取到FrameworkFactory的实例类:
<br />
Code highlighting produced by Actipro CodeHighlighter (freeware)<br
/>
http://www.CodeHighlighter.com/<br />
<br />
-->1
try
{
2
frameworkFactoryClass
=
ServiceLoader.load(FrameworkFactory.
class
);
3
}
catch
(Exception e) {
4
throw
new
IllegalArgumentException(
"
FrameworkFactory service load error.
"
, e);
5
}
6
if
(frameworkFactoryClass
==
null
) {
7
throw
new
IllegalArgumentException(
"
FrameworkFactory service not found.
"
);
8
}
实例化FrameworkFactory:
<br />
Code highlighting produced by Actipro CodeHighlighter (freeware)<br
/>
http://www.CodeHighlighter.com/<br />
<br />
-->1
FrameworkFactory frameworkFactory;
2
try
{
3
frameworkFactory
=
frameworkFactoryClass.newInstance();
4
}
catch
(Exception e) {
5
throw
new
IllegalArgumentException(
"
FrameworkFactory instantiation error.
"
, e);
6
}
获取Framework的启动配置:
<br />
Code highlighting produced by Actipro CodeHighlighter (freeware)<br
/>
http://www.CodeHighlighter.com/<br />
<br />
--> 1
Map
<
Object, Object
>
configuration;
2
try
{
3
//
载入Framework启动配置
4
configuration
=
loadFrameworkConfig(event.getServletContext());
5
if
(logger.isInfoEnabled()) {
6
logger.info(
"
Load Framework configuration: [
"
);
7
for
(Object key : configuration.keySet()) {
8
logger.info(
"
/t
"
+
key
+
"
=
"
+
configuration.get(key));
9
}
10
logger.info(
"
]
"
);
11
}
12
}
catch
(Exception e) {
13
throw
new
IllegalArgumentException(
"
Load Framework configuration error.
"
, e);
14
}
启动配置读取外部配置文件,可以在此配置文件中增加OSGi容器实现类相关的配置项,例如Equinox的osgi.console:
<br />
Code highlighting produced by Actipro CodeHighlighter (freeware)<br
/>
http://www.CodeHighlighter.com/<br />
<br />
--> 1
//
载入Framework启动配置
2
private
static
Map
<
Object, Object
>
loadFrameworkConfig(ServletContext context)
throws
MalformedURLException {
3
String configLocation
=
context.getInitParameter(CONTEXT_PARAM_OSGI_CONFIG_LOCATION);
4
if
(configLocation
==
null
) configLocation
=
DEFAULT_OSGI_CONFIG_LOCATION;
5
else
if
(
!
configLocation.startsWith(
"
/
"
)) configLocation
=
"
/
"
.concat(configLocation);
6
7
Properties config
=
new
Properties();
8
try
{
9
//
载入配置项
10
config.load(context.getResourceAsStream(configLocation));
11
if
(logger.isInfoEnabled()) logger.info(
"
Load Framework configuration from:
"
+
configLocation);
12
}
catch
(IOException e) {
13
if
(logger.isWarnEnabled()) logger.warn(
"
Load Framework configuration error from:
"
+
configLocation, e);
14
}
15
16
String storageDirectory
=
config.getProperty(PROPERTY_FRAMEWORK_STORAGE, DEFAULT_OSGI_STORAGE_DIRECTORY);
17
//
检查storageDirectory合法性
18
if
(storageDirectory.startsWith(WEB_ROOT)) {
19
//
如果以WEB_ROOT常量字符串开头,那么相对于WEB_ROOT来定
位
20
storageDirectory
=
storageDirectory.substring(WEB_ROOT.length());
21
storageDirectory
=
context.getRealPath(storageDirectory);
22
}
else
{
23
//
如果是相对路径,那么相对于WEB_ROOT来定位
24
if
(
!
new
File(storageDirectory).isAbsolute()) {
25
storageDirectory
=
context.getRealPath(storageDirectory);
26
}
27
}
28
storageDirectory
=
new
File(storageDirectory).toURL().toExternalForm();
29
config.setProperty(PROPERTY_FRAMEWORK_STORAGE, storageDirectory);
30
if
(logger.isInfoEnabled()) logger.info(
"
Use Framework Storage:
"
+
storageDirectory);
31
32
return
config;
33
}
然后,就可以获取framework实例了,通过framework来初始化,启动和停止OSGi容器:
<br />
Code highlighting produced by Actipro CodeHighlighter (freeware)<br
/>
http://www.CodeHighlighter.com/<br />
<br />
--> 1
try
{
2
framework
=
frameworkFactory.newFramework(configuration);
3
framework.init();
4
5
//
初始化Framework环境
6
initFramework(framework, event);
7
8
//
启动Framework
9
framework.start();
10
11
succeed
=
true
;
12
}
catch
(BundleException e) {
13
throw
new
OSGiStartException(
"
Start OSGi Framework error!
"
, e);
14
}
catch
(IOException e) {
15
throw
new
OSGiStartException(
"
Init OSGi Framework error
"
, e);
16
}
在initFramework方法中,主要做两件事情,一是将当前的ServletContext作为一个service注册到OSGi容器中去:
<br />
Code highlighting produced by Actipro CodeHighlighter (freeware)<br
/>
http://www.CodeHighlighter.com/<br />
<br />
-->1
private
static
void
registerContext(BundleContext bundleContext, ServletContext servletContext) {
2
Properties properties
=
new
Properties();
3
properties.setProperty(
"
ServerInfo
"
, servletContext.getServerInfo());
4
properties.setProperty(
"
ServletContextName
"
, servletContext.getServletContextName());
5
properties.setProperty(
"
MajorVersion
"
, String.valueOf(servletContext.getMajorVersion()));
6
properties.setProperty(
"
MinorVersion
"
, String.valueOf(servletContext.getMinorVersion()));
7
bundleContext.registerService(ServletContext.
class
.getName(), servletContext, properties);
8
}
第二件事就是:在第一次初始化容器时,加载并启动指定目录中的bundle:
<br />
Code highlighting produced by Actipro CodeHighlighter (freeware)<br
/>
http://www.CodeHighlighter.com/<br />
<br />
--> 1
//
初始化Framework环境
2
private
static
void
initFramework(Framework framework, ServletContextEvent event)
throws
IOException {
3
BundleContext bundleContext
=
framework.getBundleContext();
4
ServletContext servletContext
=
event.getServletContext();
5
6
//
将ServletContext注册为服务
7
registerContext(bundleContext, servletContext);
8
9
File file
=
bundleContext.getDataFile(
"
.init
"
);
10
if
(
!
file.isFile()) {
//
第一次初始化
11
if
(logger.isInfoEnabled()) logger.info(
"
Init Framework

"
);
12
13
String pluginLocation
=
servletContext.getInitParameter(CONTEXT_PARAM_OSGI_PLUGINS_LOCATION);
14
if
(pluginLocation
==
null
) pluginLocation
=
DEFAULT_OSGI_PLUGINS_LOCATION;
15
else
if
(
!
pluginLocation.startsWith(
"
/
"
)) pluginLocation
=
"
/
"
.concat(pluginLocation);
16
17
//
安装bundle
18
File bundleRoot
=
new
File(servletContext.getRealPath(pluginLocation));
19
if
(bundleRoot.isDirectory()) {
20
if
(logger.isInfoEnabled()) logger.info(
"
Load Framework bundles from:
"
+
pluginLocation);
21
22
File bundleFiles[]
=
bundleRoot.listFiles(
new
FilenameFilter() {
23
public
boolean
accept(File dir, String name) {
24
return
name.endsWith(
"
.jar
"
);
25
}
26
});
27
28
if
(bundleFiles
!=
null
&&
bundleFiles.length
>
0
) {
29
for
(File bundleFile : bundleFiles) {
30
try
{
31
bundleContext.installBundle(bundleFile.toURL().toExternalForm());
32
if
(logger.isInfoEnabled()) logger.info(
"
Install bundle success:
"
+
bundleFile.getName());
33
}
catch
(Throwable e) {
34
if
(logger.isWarnEnabled()) logger.warn(
"
Install bundle error:
"
+
bundleFile, e);
35
}
36
}
37
}
38
39
for
(Bundle bundle : bundleContext.getBundles()) {
40
if
(bundle.getState()
==
Bundle.INSTALLED
||
bundle.getState()
==
Bundle.RESOLVED) {
41
if
(bundle.getHeaders().get(Constants.BUNDLE_ACTIVATOR)
!=
null
) {
42
try
{
43
bundle.start(Bundle.START_ACTIVATION_POLICY);
44
if
(logger.isInfoEnabled()) logger.info(
"
Start bundle:
"
+
bundle);
45
}
catch
(Throwable e) {
46
if
(logger.isWarnEnabled()) logger.warn(
"
Start bundle error:
"
+
bundle, e);
47
}
48
}
49
}
50
}
51
}
52
53
new
FileWriter(file).close();
54
if
(logger.isInfoEnabled()) logger.info(
"
Framework inited.
"
);
55
}
56
}
以上就是启动OSGi容器的过程,相比较而言,停止容器就简单多了:
<br />
Code highlighting produced by Actipro CodeHighlighter (freeware)<br
/>
http://www.CodeHighlighter.com/<br />
<br />
--> 1
public
void
contextDestroyed(ServletContextEvent event) {
2
if
(framework
!=
null
) {
3
if
(logger.isInfoEnabled()) logger.info(
"
Stopping OSGi Framework
"
);
4
5
boolean
succeed
=
false
;
6
try
{
7
if
(framework.getState()
==
Framework.ACTIVE) framework.stop();
8
framework.waitForStop(
0
);
9
framework
=
null
;
10
11
succeed
=
true
;
12
}
catch
(BundleException e) {
13
throw
new
OSGiStopException(
"
Stop OSGi Framework error!
"
, e);
14
}
catch
(InterruptedException e) {
15
throw
new
OSGiStopException(
"
Stop OSGi Framework error!
"
, e);
16
}
finally
{
17
if
(logger.isInfoEnabled()) {
18
if
(succeed) logger.info(
"
OSGi Framework Stopped!
"
);
19
else
logger.info(
"
OSGi Framework not stop!
"
);
20
}
21
}
22
}
23
}
最后,还有一件事情,就是将FrameworkConfigListener配置到web.xml中:
<br />
Code highlighting produced by Actipro CodeHighlighter (freeware)<br
/>
http://www.CodeHighlighter.com/<br />
<br />
-->1
<!--
Init OSGi framework
-->
2
<
listener
>
3
<
listener-class
>
org.dbstar.osgi.web.launcher.FrameworkConfigListener
</
listener-class
>
4
</
listener
>
让我们来测试一下吧,在Eclipse中新建一个Server: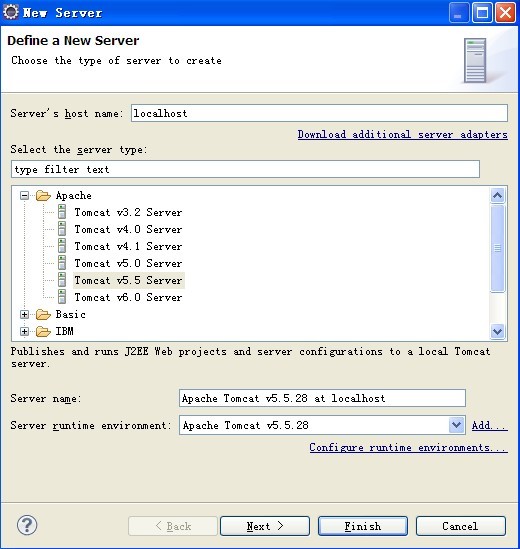
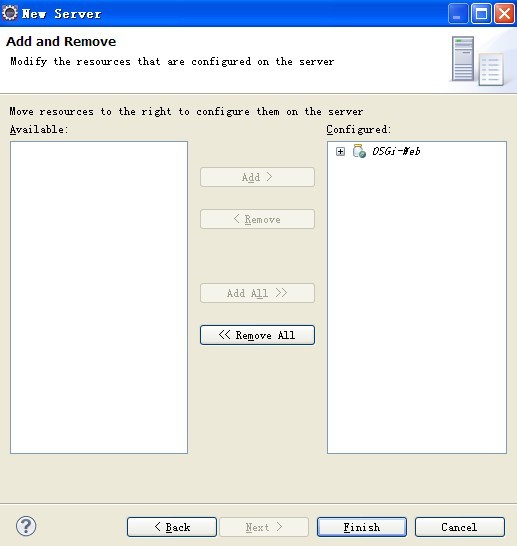
另外,在OSGi-Web-Launcher项目的classpath中增加
org.eclipse.osgi_3.6.0.v20100128-1430.jar,并且在Java EE Module
Dependencies中勾选这个jar,这样可以保证这个jar最终部署到Web
Application的WEB-INF/lib目录下去。同样,还需要增加commons-logging.jar。
然后就可以启动这个Server查看效果了。
附上本文中提到的源
代码
。
为OSGi容器提供Web
Application环境
本章叙述如何在OSGi容器中提供必要的Web Application环境,其中包括Servlet 2.4、Jsp
2.0和Commons-Logging相关的package,使得其他在OSGi容器中的bundle可以import。
为了在OSGi容器中提供export的package,一般有三种方式:
- 一个常规的bundle,自身包含必要的class,同时在Export-Package中声明。
- 一个Host为System Bundle的Fragment
Bundle,同样也可以在Export-Package中声明导出的package,只要这个package中的class在System
Bundle的ClassLoader中能load到。 - 通过启动Framework的配置项:org.osgi.framework.system.packages和
org.osgi.framework.system.packages.extra。OSGi
4.2规范中描述了这两个标准的配置项。在这两个配置项中描述的package都等同于在System Bundle中声明了export。
对于在Web Application中运行的OSGi容器,一些必要的环境是通过Web
Container提供的,我们最好不要,也不应该用自己的类来替换,这包括了j2ee相关的j