
version="1.0"
encoding="UTF-8"?>
<web-app
xmlns="http://java.sun.com/xml/ns/javaee"
xmlns:xsi="http://www.w3.org/2001/XMLSchema-instance"
version="2.5"
xsi:schemaLocation="http://java.sun.com/xml/ns/javaee [url]http://java.sun.com/xml/ns/javaee/web-app_2_5.xsd[/url]">
<servlet>
<servlet-name>XFireServlet</servlet-name>
<servlet-class>org.codehaus.xfire.transport.http.XFireConfigurableServlet</servlet-class>
<load-on-startup>0</load-on-startup>
</servlet>
<servlet-mapping>
<servlet-name>XFireServlet</servlet-name>
<url-pattern>/services/*</url-pattern>
</servlet-mapping>
<welcome-file-list>
<welcome-file>index.jsp</welcome-file>
</welcome-file-list>
</web-app>

version="1.0"
encoding="UTF-8"?>
<beans
xmlns="http://xfire.codehaus.org/config/1.0">
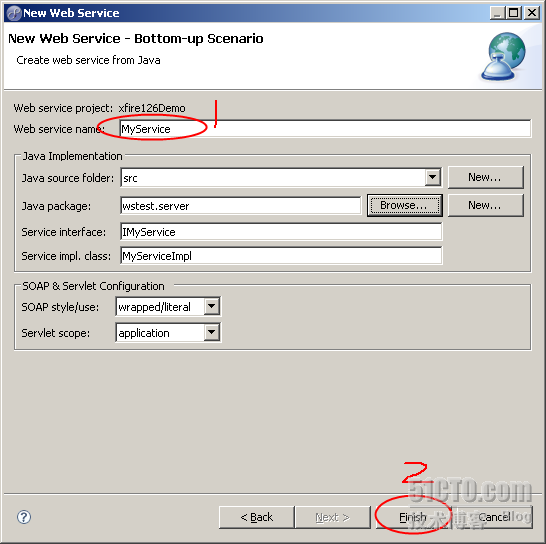
<service>
<name>MyService</name>
<serviceClass>wstest.server.IMyService</serviceClass>
<implementationClass>
wstest.server.MyServiceImpl
</implementationClass>
<style>wrapped</style>
<use>literal</use>
<scope>application</scope>
</service>
</beans>
//Generated by MyEclipse
public interface IMyService {
public String sayHello(String user);
}
//Generated by MyEclipse
public class MyServiceImpl
implements IMyService {
public String sayHello(String user) {
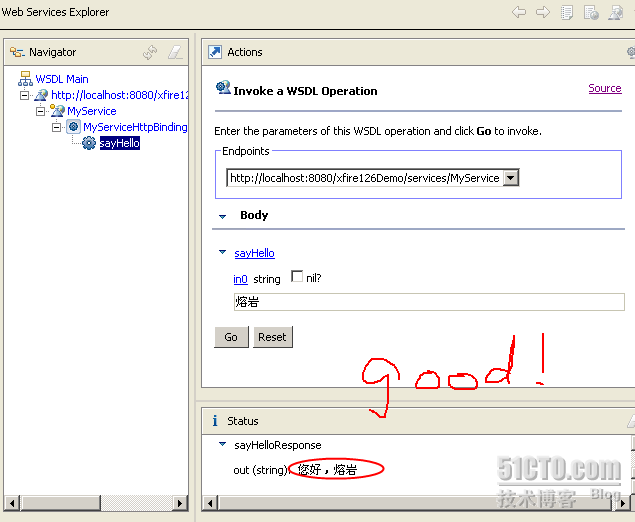
return "您好,"+user;
}
}

package wstest.client;
import java.net.MalformedURLException;
import java.util.Collection;
import java.util.HashMap;
import javax.xml.namespace.QName;
import org.codehaus.xfire.XFireRuntimeException;
import org.codehaus.xfire.aegis.AegisBindingProvider;
import org.codehaus.xfire.annotations.AnnotationServiceFactory;
import org.codehaus.xfire.annotations.jsr181.Jsr181WebAnnotations;
import org.codehaus.xfire.client.XFireProxyFactory;
import org.codehaus.xfire.jaxb2.JaxbTypeRegistry;
import org.codehaus.xfire.service.Endpoint;
import org.codehaus.xfire.service.Service;
import org.codehaus.xfire.soap.AbstractSoapBinding;
import org.codehaus.xfire.transport.TransportManager;
public class MyServiceClient {
private static XFireProxyFactory proxyFactory =
new XFireProxyFactory();
private HashMap endpoints =
new HashMap();
private Service service0;
public MyServiceClient() {
create0();
Endpoint MyServicePortTypeLocalEndpointEP = service0 .addEndpoint(new QName("http://server.wstest","MyServicePortTypeLocalEndpoint"), new QName("http://server.wstest","MyServicePortTypeLocalBinding"),
"xfire.local://MyService");
endpoints.put(new QName("http://server.wstest", "MyServicePortTypeLocalEndpoint"), MyServicePortTypeLocalEndpointEP);
Endpoint MyServiceHttpPortEP = service0 .addEndpoint(new QName("http://server.wstest","MyServiceHttpPort"), new QName("http://server.wstest","MyServiceHttpBinding"),"http://localhost:8080/xfire126Demo/services/MyService");
endpoints.put(new QName("http://server.wstest", "MyServiceHttpPort"), MyServiceHttpPortEP);
}
public Object getEndpoint(Endpoint endpoint) {
try {
return proxyFactory.create((endpoint).getBinding(), (endpoint).getUrl());
} catch (MalformedURLException e) {
throw
new XFireRuntimeException("Invalid URL", e);
}
}
public Object getEndpoint(QName name) {
Endpoint endpoint = ((Endpoint) endpoints.get((name)));
if ((endpoint) ==
null) {
throw
new IllegalStateException("No such endpoint!");
}
return getEndpoint((endpoint));
}
public Collection getEndpoints() {
return endpoints.values();
}
private void create0() {
TransportManager tm = (org.codehaus.xfire.XFireFactory.newInstance().getXFire().getTransportManager());
HashMap props = new HashMap();
props.put("annotations.allow.interface",
true);
AnnotationServiceFactory asf = new AnnotationServiceFactory(new Jsr181WebAnnotations(), tm,
new AegisBindingProvider(new JaxbTypeRegistry()));
asf.setBindingCreationEnabled(false);
service0 = asf.create((wstest.client.MyServicePortType.class), props);
{
AbstractSoapBinding soapBinding = asf.createSoap11Binding(service0,
new QName("http://server.wstest", "MyServiceHttpBinding"), "http://schemas.xmlsoap.org/soap/http");
}
{
AbstractSoapBinding soapBinding = asf.createSoap11Binding(service0,
new QName("http://server.wstest", "MyServicePortTypeLocalBinding"), "urn:xfire:transport:local");
}
}
public MyServicePortType getMyServicePortTypeLocalEndpoint() {
return ((MyServicePortType)(this).getEndpoint(new QName("http://server.wstest",
"MyServicePortTypeLocalEndpoint")));
}
public MyServicePortType getMyServicePortTypeLocalEndpoint(String url) {
MyServicePortType var = getMyServicePortTypeLocalEndpoint();
org.codehaus.xfire.client.Client.getInstance(var).setUrl(url);
return var;
}
public MyServicePortType getMyServiceHttpPort() {
return ((MyServicePortType)(this).getEndpoint(new QName("http://server.wstest",
"MyServiceHttpPort")));
}
public MyServicePortType getMyServiceHttpPort(String url) {
MyServicePortType var = getMyServiceHttpPort();
org.codehaus.xfire.client.Client.getInstance(var).setUrl(url);
return var;
}
public static
void main(String[] args) {
MyServiceClient client = new MyServiceClient();
//create a default service endpoint
MyServicePortType service = client.getMyServiceHttpPort();
//TODO: Add custom client code here
//
//service.yourServiceOperationHere();
System.out.println("test client completed");
System.exit(0);
}
}
//
//service.yourServiceOperationHere();
//
//service.yourServiceOperationHere();
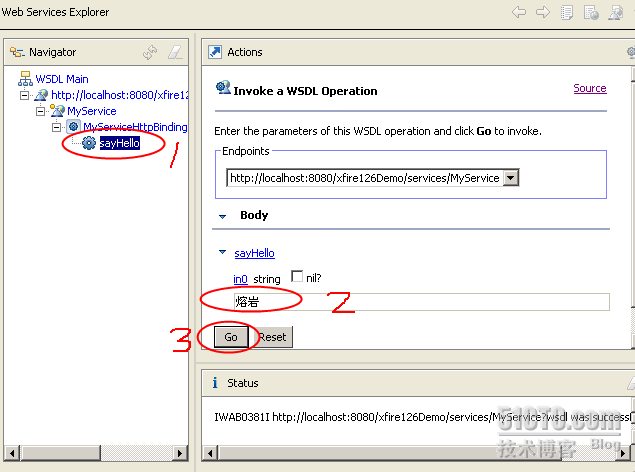
String helloString = service.sayHello("熔岩");
System.out.println(helloString);
test client completed
from:http://lavasoft.blog.51cto.com/62575/105956
XFire是与Axis 2并列的新一代Web Service框架,通过提供简单的API支持Web Service各项标准协议,帮助你方便快速地开发Web Service应用。
相对于Axis来说,目前XFire相对受欢迎,加上其提供了和Spring集成的支持,在目前的WebService开源社区拥有众多的追随者。并且因为XFire为Spring提供的支持,使得我们可以很容易在Spring中使用XFire构建WebService应用。
XFire与Axis2相比具有如下特征:
l
支持一系列Web Service的新标准--JSR181、WSDL2.0 、JAXB2、WS-Security等;
l
使用Stax解释XML,性能有了质的提高。XFire采用Woodstox 作Stax实现;
l
容易上手,可以方便快速地从pojo发布服务;
l
支持Spring、Pico、Plexus、Loom等容器;
l
灵活的Binding机制,包括默认的Aegis,xmlbeans,jaxb2,castor;
l
高性能的SOAP 栈设计;
l
支持Spring、Pico、Plexus、Loom等容器。
XFire与Axis1性能的比较如下:
l
XFire比Axis1.3快2-6倍;
l
XFire的响应时间是Axis1.3的1/2到1/5。
XFire在WebService框架中开始较晚,它从现有的框架中借鉴了许多优秀的理念,力争将Web Service的应用开发难度降到最低。此外,还提供了各种绑定技术、支持多种传输协议,对WebService体系中许多新的规范提供了支持。
下面让我们来看一个XFire于Spring集成的helloWorld的简单例子。
一.实现的功能和特点
本例具有如下功能和特点:
1) 基于J2EE平台的Web Service服务;
2) 开发方便,配置简单;
3) 与spring无缝集成。
XFire是完全基于流数据处理进行工作的系统,这意味着XFire不是将整个SOAP文档缓存在内存中,而是以管道的方式接收SOAP流数据。这种工作方式的转变带来了可观的性能回报,同时节省了内存的占用。
XFire从管道中接收一个SOAP请求到返回一个SOAP响应,会经历一系列的阶段。在管道调用的任何一个阶段,XFire都可以添加一些额外的Handler,在对消息进行加工处理后再传入到下一个阶段中。在SOAP请求消息对WebService发起真正调用之前,分别会经过传输、预转发、转发、策略实施、用户信息处理、预调用、服务调用等阶段。
二.开发环境
笔者的开发环境描述如下:
1) jdk: 1.5版本;
2) Tomcat:5.5.20;
3) MyEclipse:5.1.1 GA。
三.开发步骤
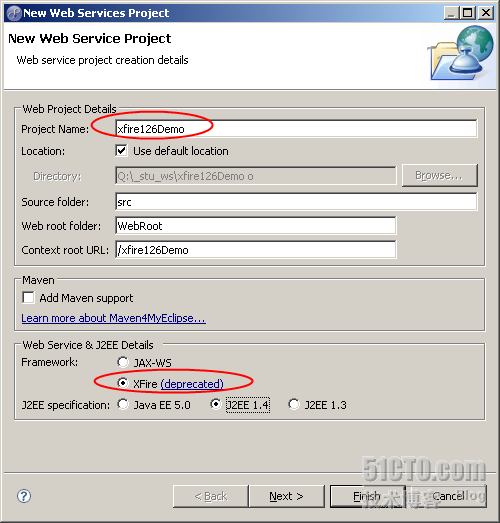
1. 工程与环境的建立
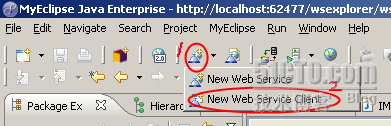
在MyEclipse中新建Web工程,名为webservice_helloworld。选择该工程后,点击右键选择MyEclipse->AddWeb Service Capabilities,弹出Add Web ServiceCapabilities对话框,点击“Next”,弹出Project Library Configuration对话框,默认选择CoreLibraries,点击“Finish”按钮,完成XFire核心包的添加。为了后续的客户端的测试,还需读者加入commons-httpclient.jar包到WEB-INF/lib下。
部署后可看到此时WEB-INF/lib的jar包列表如下:
activation-1.1.jar、commons-beanutils-1.7.0.jar、commons-codec-1.3.jar、commons-httpclient.jar、commons-logging-1.0.4.jar、jaxen-1.1-beta-9.jar、jaxws-api-2.0.jar、jdom-1.0.jar、jsr173_api-1.0.jar、mail-1.4.jar、saaj-api-1.3.jar、saaj-impl-1.3.jar、spring-1.2.6.jar、stax-api-1.0.1.jar、wsdl4j-1.5.2.jar、wstx-asl-3.0.1.jar、xbean-2.1.0.jar、xbean-spring-2.5.jar、xfire-aegis-1.2.2.jar、xfire-annotations-1.2.2.jar、xfire-core-1.2.2.jar、xfire-java5-1.2.2.jar、xfire-jaxws-1.2.2.jar、xfire-jsr181-api-1.0-M1.jar、xfire-spring-1.2.2.jar、XmlSchema-1.1.jar
为了后续的开发和测试,在src目录下分别建立test和webservice目录,分别用于存放测试文件和webservice的相关类。
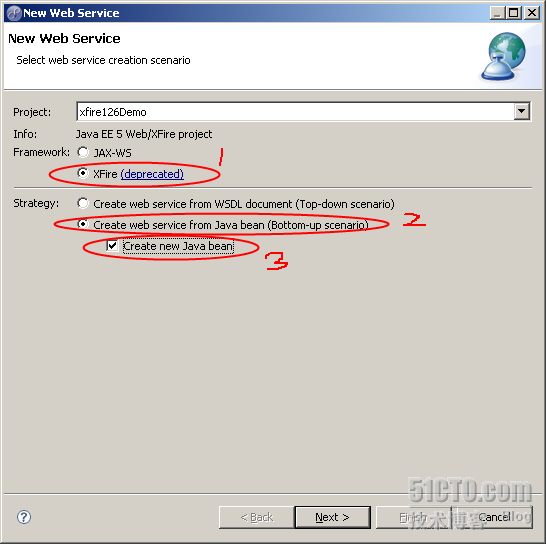
2.Web Service实现的编写
在本例中,我们只是做一个helloWorld的简单例子。Web Service服务端提供一个根据输入的名字信息回复相应的helloWorld信息的。例如,当名字为“阿蜜果”时,恢复信息为“hello,阿蜜果”。下面让我们一步一步来开始进行编码。
1)web.xml的配置
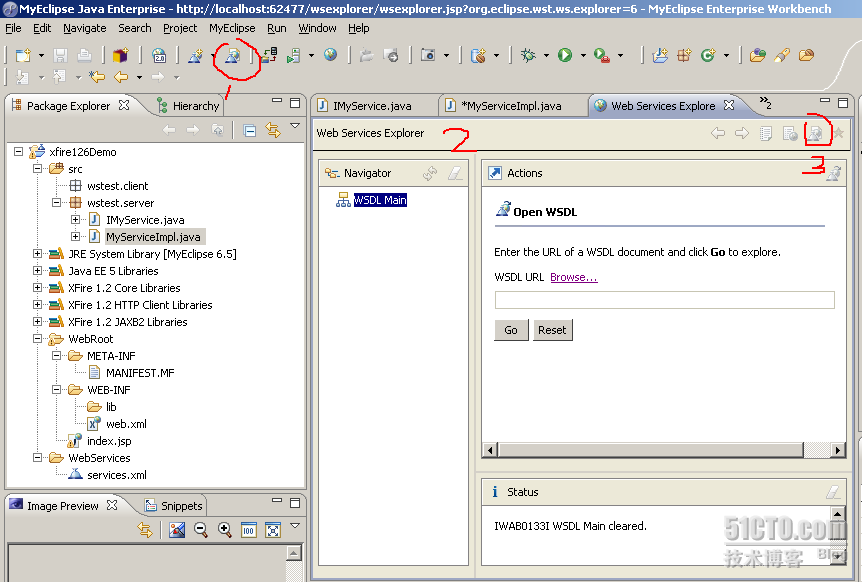
一般情况下,我们通过HTTP作为WebService的传输协议,这样我们只需启动一个Web服务器(如Tomcat,在本例中使用的是Tomcat5.5.20),这样客户端就可以通过HTTP访问到WebService服务。为了集成Spring容器,XFire专门提供一个XFireSpringServlet,我们可以在web.xml中配置该Servlet,将Spring容器中定义的Web Service在某个URI下发布。
为了能正确使用XFire,需在web.xml中进行相应配置,在该文件中配置XFire的servlet和servlet-mapping。同时因为本实例需要将XFire集成到Spring中,因而需要在web.xml文件中加载Spring的相应配置文件。在本实例中,我们首先在WEB-INF下建立两个配置Spring配置文件,一个为applicationContext.xml,该文件用来定义本工程的bean,一个为xfire-servlet.xml,用来配置XFire的相关bean。修改后的web.xml的内容如下所示:
 <?xml version="1.0" encoding="UTF-8"?><web-app xmlns="http://java.sun.com/xml/ns/j2ee" xmlns:xsi="http://www.w3.org/2001/XMLSchema-instance" version="2.4" xsi:schemaLocation="http://java.sun.com/xml/ns/j2ee http://java.sun.com/xml/ns/j2ee/web-app_2_4.xsd"> <display-name>XFireService</display-name> <!-- begin Spring配置 --> <context-param> <param-name>contextConfigLocation</param-name> <param-value>/WEB-INF/applicationContext.xml,/WEB-INF/xfire-servlet.xml</param-value> </context-param> <listener> <listener-class> org.springframework.web.context.ContextLoaderListener </listener-class> </listener> <listener> <listener-class> org.springframework.web.util.IntrospectorCleanupListener </listener-class> </listener> <!-- end Spring配置 --> <!-- begin XFire 配置 --> <servlet> <servlet-name>xfire</servlet-name> <servlet-class>org.springframework.web.servlet.DispatcherServlet</servlet-class> </servlet> <servlet-mapping> <servlet-name>xfire</servlet-name> <url-pattern>*.ws</url-pattern> </servlet-mapping> <servlet> <!-- 配合Spring容器中XFire一起工作的Servlet--> <servlet-name>xfireServlet</servlet-name> <servlet-class>org.codehaus.xfire.spring.XFireSpringServlet</servlet-class> </servlet> <servlet-mapping> <servlet-name>xfireServlet</servlet-name> <!-- 在这个URI下开放Web Service服务 --> <url-pattern>/service/*</url-pattern> </servlet-mapping> <!-- end XFire 配置 --></web-app>
2)Web Service的接口类HelloWorld.java和对应实现类HelloWorldImpl.java
为了用Web Service完成HelloWorld功能,我们首先在src/webservice目录下建立接口类HelloWold.java。它仅包含一个sayHelloWorld(String
name)的方法,其详细内容如下:
package webservice;
 /** *//**
 *HelloWorld的接口类.
 */public
interface HelloWorld
 {
{
 /** *//** *对名字为name的人打招呼. *@paramname名字 *@return返回打招呼的字符串
 */ String sayHelloWorld(String name);}我们还需要建立一个对应的实现类,来实现sayHelloWorld的功能,该实现类即为HelloWorldImpl.java。该类的详细内容如下:package webservice;/** *//** *HelloWorld的实现类. */public
class HelloWorldImpl implements HelloWorld
{ public String sayHelloWorld(String name) { String helloWorld = "hello," + name; return helloWorld; }}3)Spring配置文件applicationContext.xml和xfire-servlet.xml的配置
首先我们在applicationCon