原文:http://docs.sencha.com/ext-js/4-0/#!/guide/drag_and_drop
翻译:frank/sp42 转载请保留本页信息
拖放 Drag and Drop
在那么多的交互设计模式之中,“拖放(Drag andDrop)”模式可以说是开发者感觉比较不错的。用户日常在进行拖放操作的时候,真的是连“想都不用想”地就可以进行拖放操作了,非常直观而且易学易用。下文中的教程中,请跟随我们。不是我们“大厥其词”,而是真的——只要将下面五个步骤的要义领会在心,拖放的话将不再是一件难事。
One of the most powerful interaction design patterns available to developers is "Drag and Drop." We utilize Drag and Drop without really giving it much thought - especially when its done right. Here are 5 easy steps to ensure an elegant implementation.
拖放的定义 Defining drag and drop
拖动(drag)动作的发生,就是鼠标在某些 UI 元素身上点击了,然后按着不放鼠标,进行鼠标移动的动作;放下(drop,或者称“置下”)动作的发生,就是拖动开始后,鼠标按钮松开了——也就是放下的动作。宏观而言,拖放两者的操作可用下面的流程图来描述。
A drag operation, essentially, is a click gesture on some UI element while the mouse button is held down and the mouse is moved. A drop operation occurs when the mouse button is released after a drag operation. From a high level, drag and drop decisions
can be summed up by the following flow chart.
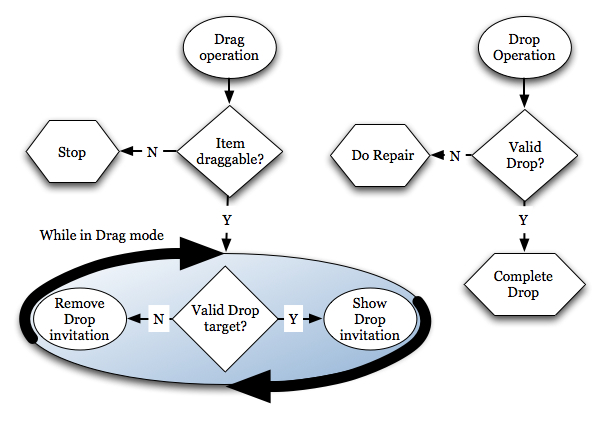
ExtJS 本身就提供了 Ext.dd 以实现拖放的支持。在本指南中,我们将围绕拖放行动的相关命题,包括“触发、无效置下和成功置下”的这几个方面问题,以及内在的事件消息编程,还有涉及的外观修改等的问题,进行有益探讨。
To speed up our development, Ext JS provides us with the Ext.dd classes to manage the basic decisions for us. In this guide, we will cover coding for the appearance and removal of the drop invitation, invalid drop repair and what happens when a successful
drop occurs.
拖放类的组织构成 Organizing the drag and drop classes
不容分说,初涉 Ext.dd 的时候,哪怕文档齐备好,大家还是会觉得怕怕的,可是,如果我们能稍加一点耐心,能够去观察其中的源码,那么其实这些东西一点都不可怕的。我们会发现许多类都继承于 DragDrop 类,并由此分为“Drag 表示拖动的”和“Drop 表示置下的”这两大类别。从类的组织来看可以看到,之所以如此分类,目的在于搞清楚单个或多个节点拖放时它们之间的关系,最后归纳为特定的“行为模式”。
A first glance of the classes in the Ext.dd documentation might seem a bit intimidating. But, if we take a quick moment to look at the classes, we see that they all stem from the DragDrop class and most can be categorized into Drag or Drop groups. With a
bit more time and digging, we can see that the classes can be further categorized into single node and multiple node drag or drop interactions.

我们想更好地降低的学习曲线,照顾初学朋友,为此我们打算从单个节点 DOM 来由浅入深,分别通过扩展 DD 及 DDTarget 类来实现最基本拖放行为。然而,我们必须先介绍一下例程以及例程的目标是怎样子的。
In order to learn about the basics of drag and drop we'll focus on applying single drag and drop interactions to DOM nodes. To do this, we'll utilize the DD and DDTarget classes, which provide the base implementations for their respective drag and drop behaviors.
However, we need to discuss what our objectives are before we can start implementing drag and drop.
话说这个例子……The task at hand
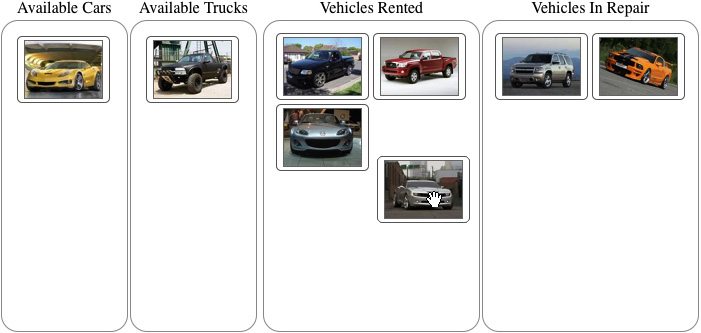
假设有这样的一个需求,客户为一个间汽车出租公司,业务主要是出租 cars 小汽车和 trucks 卡车。他希望汽车有三种状态可选择:available 可用的、rented 已出租的、in repaire 处于维修中的。作为类别划分,cars 和 trucks 分别只能在其所属的“available”容器中。
Lets say we've been asked to develop an application that will provide a rental car company the ability to place their cars and trucks in one of three states: available, rented or in repair status. The cars and trucks are only allowed to be placed in their
respective "available" container.
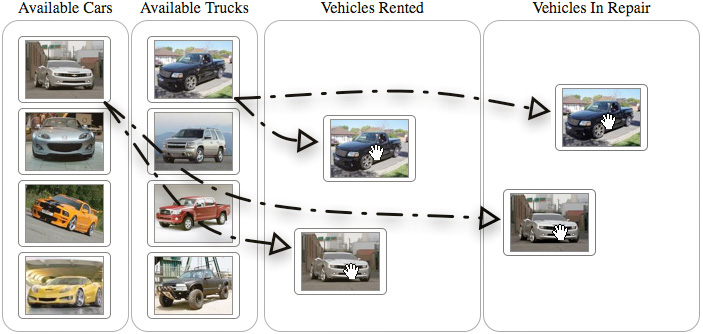
正式开始了。第一个目标是要使得 cars 和 trucks 处于“可拖动”的状态,对此我们将使用 DD 类;第二目标是要使得 rented 、repair 、vehicle 设置为“可投放(可置下)”的目标地方,对此我们将会使用 DDTarget 。最后,我们将安排两个拖放组(drag drop groups),目的是把小车和卡车区分开来,让它们各自属于不同的“available”投放容器于是就不会相互搞错。这个例程的 HTML 和 CSS 已经准备好,可以在这儿下载。下载后,就可在例程中拖动那些小车和卡车了。
To get started, we must make the cars and trucks "dragable". For this, we'll use DD. We'll need to make the rented, repair and vehicle containers "drop targets". For this we'll use DDTarget. Lastly, we'll use different drag drop groups to help enforce the
requirement that cars and trucks can only be dropped into their respective "available" containers. The HTML and CSS for this example is already constructed and can be downloaded here. With that downloaded, we can begin coding by adding drag operations to the
cars and trucks.
第一步:开始拖动 Step 1: Starting with drag
要使得汽车所在的 div 可拖动,当然得先要获取这些 div 集合。获取成功的集合是一个数组,我们遍历数组为逐个元素建立“拖放 DD 实例”。下面的源码是该步骤的详细过程。
To configure the vehicle DIVs elements as dragable, we'll need to obtain a list and loop through it to instantiate new instances of DD. Here's how we do it.
// 创建一个重写拖动行为的对象,稍后再试。 Create an object that we'll use to implement and override drag behaviors a little later
var overrides = {};
// 配置cars可拖动的 Configure the cars to be draggable
var carElements = Ext.get('cars').select('div');
Ext.each(carElements.elements, function(el) {
    var dd = new Ext.dd.DD(el, 'carsDDGroup', {
        isTarget  : false
    });
    // 复制 overrides 对象到刚刚创建的 DD 实例 Apply the overrides object to the newly created instance of DD
    Ext.apply(dd, overrides);
});

var truckElements = Ext.get('trucks').select('div');
Ext.each(truckElements.elements, function(el) {
    var dd = new Ext.dd.DD(el, 'trucksDDGroup', {
        isTarget  : false
    });
    Ext.apply(dd, overrides);
});
所有制定拖放类的模式皆是“方法重写(methods overridings)”这种模式。上述代码声明了一个空的 overrides 的对象,所有制定拖放类的模式皆是“方法重写(methods overridings)”这种模式。上述代码声明了一个空的 overrides 的对象,为了是以后拿来保存动作的方法,具体说就是覆盖方法到这个对象身上。所谓强调“代码签名(code segment)“正体现于此。要把 cars 容器里面凡是 div 的元素都获取回来,我们可使用 DomQuery
查询的函数。要把 cars 和 trucks 元素赋予可拖动的(dragable)的特性,我们创建了新的 DD 实例,实例化所传入的参数就是 cars 和 trucks 其 DOM 元素,另外还有说明该对象所隶属于的拖放组,也就是说小汽车应对着小汽车拖放组、卡车应对应着卡车拖放组。拖放组(group)是什么呢?先买个关子——等下我们便知道拖放组怎么设置有多重要了,特别在定义 rented 与 repair 置下目标的时候。注意我们重写 DD 对象的时候使用了 Ext.apply 函数,这是一个用于增加对象的属性或方法的函数,使用起来十分方便。
在继续下一步之前,我们得花点时间分析一下,元素被拖动时屏幕将会发生些什么,在明白所以然的前提下,才能理解接下来的代码,甚至游刃有余。
All drag and drop classes are designed to be implemented by means of overriding its methods. That's why in the above code segment, we have create an empty object called overrides, which will be filled in later with overrides specific to the action we need.
We get of list of car and truck elements by leveraging the DomQuery select method to query the cars container for all the child div elements. To make the cars and truck elements dragable, we create a new instance of DD, passing in the car or truck element
to be dragged and the drag drop group that it is to participate in. Notice that the vehicle types have their own respective drag drop group. This will be important to remember later when we setup the rented and repair containers as drop targets. Also notice
that we're applying the overrides object to the newly created instances of DD using Ext.apply., which is a handy way to add properties or methods to an existing object. Before we can continue with our implementation, we need to take a quick moment to analyze
what happens when you drag an element on screen. With this understanding, the rest of the implementation will fall into place.
从简单到复杂,所以这时候的例子正是纯粹的“拖动(drag)”,也就是说我们把拖放的过程分得很细来说明。那么移动或拖动到某个目的地是不是真的是一个合法之目的地,符不符合我们程序限定之要求呢?这就是有效置下与无效置下的区别了。从逻辑上讲,我们仅此理解了“无效置下(invaliddrop)”便可清楚有效置下的逻辑。下面插图来自调试工具 FireBug 的 HTML 检测面板,透过高亮的效果告知用户正在拖动的 div元素,即 Camaro 元素(估计是某个汽车品牌)。
The first thing you'll notice when dragging the car or truck elements around is that they will stick wherever they are dropped. This is OK for now because we've just begun our implementation. What is important is to understand how the drag nodes are being
affected. This will aid us in coding for the return to their original positions when they are dropped on anything that is a valid drop target, which is known as an "invalid drop". The below illustration uses FireBug's HTML inspection panel and highlights the
changes being made by when a drag operation is applied to the Camaro element.
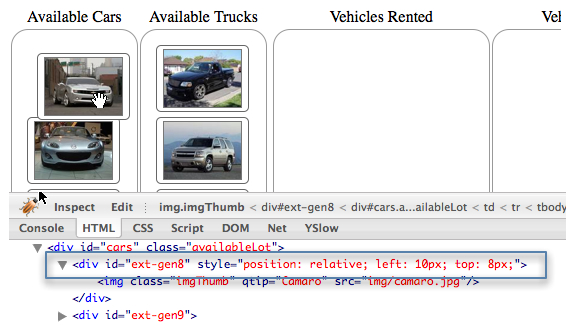
点击上面的图片以测试拖动操作。请注意在拖动的过程中,我们观察到元素的 style 样式属性有了三个新 CSS 值:position、top 和 left,其中定义 position 为“相对位置 relative”便可以允许元素在页面上“移来移去”。移动之时,top、left 的数值也作变化,不断更新(此二值为元素的参照坐标)。由此可见,拖动的原理实际在于这三项值之变化的问题上。拖动手势完成之后,style 属性保持不变。再拖动的话,当然 style 又会作新变化。不过考虑到无效置下的情况,应该是令元素回归到原来的位置。在设置好合法置下目标之前,其他任何置下的动作都可被认为是无效的置下
drop。
Click the above image to test the drag operation. While inspecting the drag element during a drag operation, we can see a style attribute added to the element with three CSS values populated: position, top and left. Further inspection reveals that the position
attribute set to relative and top and left attributes updating while the node is being dragged around. After a the drag gesture completes, the style attribute remains along with the styles contained therein. This is what we have to clean up when we code for
the repair of an invalid drop. Until we setup proper drop targets, all drop operations are considered invalid.
第二步:修复无效置下 Step 2: Repairing an invalid drop
我们把拖动的元素“归到原位”这一动作过程称为“修复无效的置下 drop”。怎么个“归位”法?既然前面修改了元素的 style 样式,那么“归位”就是恢复 style 为拖动之前的数值。最简单的制作方法,便是在鼠标按钮松开的事件触发后,拖动着的那个元素马上消失,然后在原来的位置重新出现。照这样简单的做法不是不行,却是显得比较生硬,最好的方法还是采用 Ext.Fx 产生出渐变的过程,从而使得整个过程显得平滑一些。
提一提哪些方法我们要重写的 repair 方法,分别是:b4StartDrag, onInvalidDrop 及 endDrag。
对 overrides 对象则加入下列的方法:
The path of least resistance is to repair an invalid drop by reseting the style attribute that is applied during the drag operation. This means that the drag element would disappear from under the mouse and reappear where it originated and would be quite
boring. To make it smoother, we'll use Ext.Fx to animate this action. Remember that the drag and drop classes were designed to have methods overridden. To implement repair, we'll need to override the b4StartDrag, onInvalidDrop and endDrag methods. Lets add
the following methods to our overrides object above and we'll discuss what they are and do.
// 获取在拖动的那个元素 Called the instance the element is dragged.
b4StartDrag : function() {
    // 缓存拖动元素 Cache the drag element
    if (!this.el) {
        this.el = Ext.get(this.getEl());
    }

    // 先记下原始坐标,后面有用 Cache the original XY Coordinates of the element, we'll use this later.
    this.originalXY = this.el.getXY();
},
// 不在一个拖放组里面的就是无效 drop。Called when element is dropped not anything other than a dropzone with the same ddgroup
onInvalidDrop : function() {
    // 设置一标记以便产生修复动画 Set a flag to invoke the animated repair
    this.invalidDrop = true;
},
// 拖动操作结束后执行 Called when the drag operation completes
endDrag : function() {
    // 无效置下真正的逻辑 Invoke the animation if the invalidDrop flag is set to true
    if (this.invalidDrop === true) {
        // 移除置下 Remove the drop invitation
        this.el.removeClass('dropOK');

        // 定义动画的配置项对象 Create the animation configuration object
        var animCfgObj = {
            easing   : 'elasticOut',
            duration : 1,
            scope    : this,
            callback : function() {
                // Remove the position attribute
                this.el.dom.style.position = '';
            }
        };

        // 产生动画 Apply the repair animation
        this.el.moveTo(this.originalXY[0], this.originalXY[1], animCfgObj);
        delete this.invalidDrop;
    }
},
讲解一下上述代码。首先是 b4StartDrag 方法。顾名思义,它开始拖放前被调用。某种程度上也是一个事件。它的作用是记下元素原来的 XY 坐标,也就是被拖动前的位置。归位的时候就凭着这个坐标归位;其次 endDrag 则是一个无效置下 invalidDrop 的通知方法。无效 drop 前面已经说过了,表示在不同一个 DD 组的区域投放,通通视作无效的投放。这里只是设置实例属性 invalidDrop 为 true,进行简单地标识一下;最后一个重写的方法 endDrag ,每一次结束拖动的时候都会调用,此时元素不能通过鼠标的控制进行拖动了。如果不是成功地到达目的地,应该根据
XY 的坐标回到原来的位置。该例子中我们采用了动画特效 elasticOut 来美化一下效果。
In the above code, we begin by overriding the b4StartDrag method, which is called the instant the drag element starts being dragged around screen and makes it an ideal place to cache the drag element and original XY coordinates - which we will use later
on in this process. Next, we override onInvalidDrop, which is is called when a drag node is dropped on anything other than a drop target that is participating in the same drag drop group. This override simply sets a local invalidDrop property to true, which
will be used in the next method. The last method we override is endDrag, which is called when the drag element is no longer being dragged around screen and the drag element is no longer being controlled by the mouse movements. This override will move the drag
element back to its original X and Y position using animation. We configured the animation to use the elasticOut easing to provide a cool and fun bouncy effect at end of the animation.

点击上面的图片即可看到动画修饰过的修改过程。OK,修复 drop 的过程就到此完成了。接下来的步骤是 创建置下对象,相当于“目的地、目标(drop target)”,形成置下的接纳点,并定义有效地置下过程。
Click the above image to view the animated repair operation in action. OK, now we have the repair operation complete. In order for it to work on the drop invitation and valid drop operations, we need to setup the drop targets.
第三步:设置置下目标 Step 3: Configuring the drop targets
先明确下需求是怎么样的:除了 rented 和 repair 为可接纳拖动元素外,包括 cars 和 trucks 本身也是可以的。总之透过 DDTarget 来负责置下 drop 的目标。其代码如下:
Our requirements dictate that we will allow cars and trucks to be in be dropped in the rented and repair containers as well as their respective original containers. To do this, we'll need to instantiate instances of the DDTarget class. Here's how its done.
// 实例化置下目标 Instantiate instances of Ext.dd.DDTarget for the cars and trucks container
var carsDDTarget    = new Ext.dd.DDTarget('cars','carsDDGroup');
var trucksDDTarget = new Ext.dd.DDTarget('trucks', 'trucksDDGroup');

// 实例化置下目标 Instantiate instnaces of DDTarget for the rented and repair drop target elements
var rentedDDTarget = new Ext.dd.DDTarget('rented', 'carsDDGroup');
var repairDDTarget = new Ext.dd.DDTarget('repair', 'carsDDGroup');

// 保证 rented 和 repair 的 DDTargets 会参与到 trucksDDGroup。Ensure that the rented and repair DDTargets will participate in the trucksDDGroup
rentedDDTarget.addToGroup('trucksDDGroup');
repairDDTarget.addToGroup('trucksDDGroup');
上述代码中,为 cars、trucks、rented 和 repair 创建了置下目标。注意 cars 容器的元素只能参与“carsDDGroup”的拖动,trucks 容器的元素只能参与“trucksDDGroup”的拖动。接着是对 rented 和 repair 的 DDTarget 设置,这里既有构造器的定义 carsDDGroup,也有透过 addToGroup 方法加入的 trucksDDGroup,两种途径皆可。OK,已经设置好置下目标了。下面是有效置下这一动作的效果。
In the above code snippet, we have setup drop targets for the cars, trucks, rented and repair elements. Notice that the cars container element only participates in the "carsDDGroup" and the trucks container element participates in the "trucksDDGroup". This
helps enforce the requirement that cars and trucks can only be dropped in their originating container. Next, we instantiate instances DDTarget for the rented and repair elements. Initially, they are configured to only participate in the "carsDDGroup". In order
to allow them to participate in the "trucksDDGroup", we have to add it by means of addToGroup. OK, now we've configured our drop targets. Lets see what happens when we drop the cars or trucks on a valid drop element.
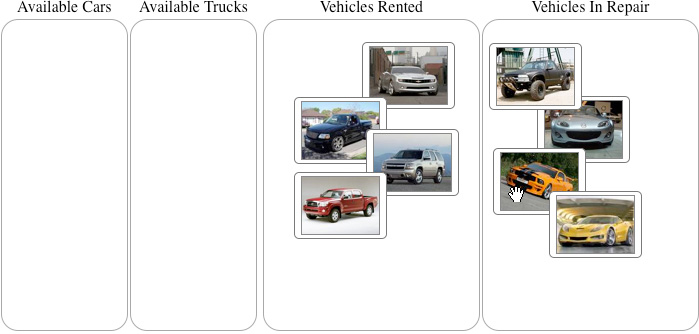
点击图片打开演示。我们看见拖动元素的确是成功到达目的地,可是图片摆放的乱七八糟,还是需要整理一下才行,也就是继续所说的“完成置下 complete drop”的这一步骤,同样也是重写 DD 实例的方法。
Click the above image see the progress thus far. In exercising the drop targets, we see that the drag element stays exactly its dropped. That is, images can be dropped anywhere on a drop target and stay there. This means that our drop implementation is not
complete. To complete it, we need to actually code for the "complete drop" operation, by means of another override for the instances of DD that we created some time ago.
第四步:完成置放 Step 4: Completing the drop
实质是用 DOM 方法把始发点的元素改换到目标父级元素上。重写下面的 onDragDrop 方法。
To complete the drop, we will need to actually drag the element from its parent element to the drop target element using DOM tools. This is accomplished by overriding the DD onDragDrop method. Add the following method to the overrides object.
// 拖放过程成功了就执行该方法。Called upon successful drop of an element on a DDTarget with the same
onDragDrop : function(evtObj, targetElId) {
// 建立置下目标的 Ext.Element 实例 Wrap the drop target element with Ext.Element
var dropEl = Ext.get(targetElId);

// 不在同一 drop 区域里面的才算完成 drop。同一个 target 目标没意义。Perform the node move only if the drag element's
// parent is not the same as the drop target
if (this.el.dom.parentNode.id != targetElId) {

        // 移动元素 Move the element
        dropEl.appendChild(this.el);

        // 清除拖动邀请 Remove the drag invitation
        this.onDragOut(evtObj, targetElId);

        // 清除样式 Clear the styles
        this.el.dom.style.position ='';
        this.el.dom.style.top = '';
        this.el.dom.style.left = '';
    }
    else {
        // 无效的drop。This was an invalid drop, initiate a repair
        this.onInvalidDrop();
}
不在同一 drop 区域里面的才算完成投放置下。同一个 target 目标则没意义,被视作无效 drop,故执行 this.onInvalidDrop。
In the above override, the drag element is moved to the drop target element, but only if it is not the same as the drag element's parent node. After the drag element is moved, the styles are cleared from it. If the drop element is the same as the drag element's
parent, we ensure a repair operation occurs by calling this.onInvalidDrop.
点击以上图片 观看完整的置下操作。 只要可以成功置下父级元素辖下的元素便不复存在,移动到置下目标上。如果拖动的时候进入了有效地目标范围内,用户是不是应给予他们一点提示呢?下面的便是一个 drop 邀请,意思是告诉用户您快来吧,可以置下喽。
Click the above image to see the complete drop operation in action. Upon a successful drop, the drag elements will now will be moved from their parent element to the drop target. How does the user know if they are hovering above a valid drop target? We'll
give the user some visual feedback by configuring the drop invitation.
第五步:加入邀请置下(drop invitation) Step 5: Adding drop invitation
如上述,此时此刻我们重写的是 onDragEnter 以及 onDragOut 方法。
In order to make drag and drop a bit more useful, we need to provide feedback to the user on whether or not a drop operation can successfully occur. This means that we'll have to override the onDragEnter and onDragOut methods Add these last two methods to
the overrides object.
// 进入了置下目标区域了就执行该方法。Only called when the drag element is dragged over the a drop target with the same ddgroup
onDragEnter : function(evtObj, targetElId) {
    // 添加CSS颜色 Colorize the drag target if the drag node's parent is not the same as the drop target
    if (targetElId != this.el.dom.parentNode.id) {
        this.el.addClass('dropOK');
    }
    else {
        // 移除邀请 Remove the invitation
        this.onDragOut();
    }
},
// 离开拖动范围的时候触发 Only called when element is dragged out of a dropzone with the same ddgroup
onDragOut : function(evtObj, targetElId) {
    this.el.removeClass('dropOK');
}
当然了,onDragEnter 以及 onDragOut 只会隶属于同一个 DD 组里面的交互才会生效。 onDragEnter 方法在鼠标指针刚刚碰到置下区域其边缘的时候就会触发,反之,onDragOut 方法就是离开边缘的时候就会立刻触发。
In the above code, we override the onDragEnter and onDragOut methods, both of which are only utilized when the drag element is interacting with a drop target participating in the same drag drop group. The onDragEnter method is only called when the mouse
cursor first intersects the boundaries of a drop target while a drag item is in drag mode. Likewise, onDragOut is called when the mouse cursor is first dragged outside the boundaries of the drop target while in drag mode.
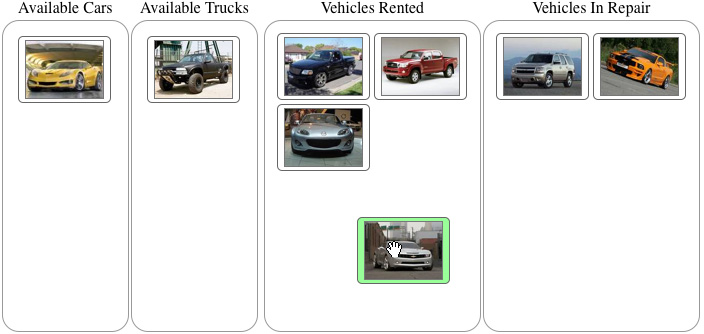
点击以上的图片演示 drop 邀请。
通过演示,我们可以看进入可投下的区域的时候就会高亮的现实效果(周围是绿色的),离开该一区域就不会显示。
Click the above image to see the drop invitation. By adding overrides to the onDragEnter and onDragOut methods we can see that the background of the drag element will turn green when the mouse cursor first intersects a valid drop target and will lose its
green background when it leaves the drop target or is dropped. This completes our implementation of drag and drop with DOM elements.
继续…… It doesn't stop here
ExtJS 框架中很多组件都可以使用拖放,总之不一而足。通过下面不同的例子来继续进一步深化拖放操作的学习(官方的):
Drag and drop can be a can be applied to mostly everything in the Ext JS framework. Here are a few examples that you can use to learn how to implement drag and drop with various widgets:
- GridPanel to GridPanel
- Grid to FormPanel
- Ext.form.Field to GridPanel cell
- Use of DragZone and DropZone
- DataView to TreePanel
摘要 Summary
今天的学习过程中,我们了解了怎么使用最底层的拖放类实现来进行 DOM 节点的完整拖放。希望你能收获到 DD 操作的一些基本操作方法,并且我们希望在以后的日子,可以就该方面写更多的文章,奉献给大家!
Today, we learned how to implement end to end drag and drop of DOM nodes using the first-level drag and drop implementation classes. From a high-level, we defined and discussed what drag and drop is and how to think about it in terms of the framework. We
also learned that the drag and drop classes can be grouped by drag or drop behaviors and whether or not they support single or multiple drag or drop operations. While implementing this behavior, we illustrated that the dd classes help make some of the behavioral
decisions, and that we are responsible for coding the end-behaviors. We hope you've enjoyed this thorough look at some fundamental drag and drop operations with DOM nodes. We look forward to bringing you more articles about this topic in the future.
注:该文章发表过在博客上,现在纳为官方指南。