from: http://phantomjs.org
from : http://bluehua.org/tag/phantomjs
|
Applies to: PhantomJS 1.6. This instruction assumes that PhantomJS is All of the examples given here are available in the Consult also the API reference. Hello, world!Create a new text file that contains the following two lines: console.log('Hello, world!'); phantom.exit(); Save it as hello.js and the run it:
The output is:
In the first line, console.log will print the passed string to the terminal. In the second line,phantom.exit terminates the execution. It is very important to call DelayTo have an asynchronous (non-blocking) delay, use the usual var fibs = [0, 1]; var ticker = window.setInterval(function () { console.log(fibs[fibs.length - 1]); fibs.push(fibs[fibs.length - 1] + fibs[fibs.length - 2]); if (fibs.length > 10) { window.clearInterval(ticker); phantom.exit(); } }, 300); Because setTimeout/setInterval is non-blocking, do not call Script ArgumentsUsing the args array from the Consider the following arguments.js example: var system = require('system'); if (system.args.length === 1) { console.log('Try to pass some args when invoking this script!'); } else { system.args.forEach(function (arg, i) { console.log(i + ': ' + arg); }); } phantom.exit(); If it is invoked using the following command:
then the output will be: 0: arguments.js 1: The 2: quick 3: brown 4: fox LoadingThe script invoked by PhantomJS initially runs on an empty web page. This is not so useful, thus PhantomJS offers the possibility of loading arbitrary URL viaphantom.open function A specific URL can be loaded using its var page = require('webpage').create(); page.open(url, function (status) { // do something }); The callback in the open() is executed when the page loading is completed, with status equals to "success" if there is no error and "failed" is error has occurred. The above construct is a convenient version of the following: var page = require('webpage').create(); page.onLoadFinished = function (status) { // do something }; page.open(url); Beside var page = require('webpage').create(); page.onLoadStarted = function () { console.log('Start loading...'); }; page.onLoadFinished = function (status) { console.log('Loading finished.'); }; page.open(url); The following loadspeed.js script loads a specified URL (do not forget the http protocol) and measures the time it takes to load it. var page = require('webpage').create(), t, address; if (phantom.args.length === 0) { console.log('Usage: loadspeed.js <some URL>'); phantom.exit(); } else { t = Date.now(); address = phantom.args[0]; page.open(address, function (status) { if (status !== 'success') { console.log('FAIL to load the address'); } else { t = Date.now() - t; console.log('Loading time ' + t + ' msec'); } phantom.exit(); }); } Run the script with the command:
It outputs something like: Loading http://www.google.com Loading time 719 msec Page settingsThe behavior of the web page can be set via its settings object which can contain properties such as:
For the full list, refer to the complete The initial values for the settings are from the As an example, here is how to change the user agent: var page = require('webpage').create(); page.settings.userAgent = 'Dragonless Phantom'; page.open(url, function (status) { // do something }); RenderingA web page can be rasterized to an image or a PDF file using This rasterize.js is all it takes to capture a web site. var page = require('webpage').create(), address, output, size; if (phantom.args.length < 2 || phantom.args.length > 3) { console.log('Usage: rasterize.js URL filename'); phantom.exit(); } else { address = phantom.args[0]; output = phantom.args[1]; page.viewportSize = { width: 600, height: 600 }; page.open(address, function (status) { if (status !== 'success') { console.log('Unable to load the address!'); } else { window.setTimeout(function () { page.render(output); phantom.exit(); }, 200); } }); } An example to produce the rendering of the famous Tiger (from SVG):
which gives the following tiger.png:
Another example: show the
Producing PDF output is also possible, e.g. from a Wikipedia article:
or when creating printer-ready cheat sheet:
Code EvaluationTo evaluate JavaScript or CoffeeScript code in the context of the web page, useevaluate() function. The execution is sandboxed, there is no way for the code to access any JavaScript objects and variables outside its own page context. An object can Here is an example to show the title of a web page: var page = require('webpage').create(); page.open(url, function (status) { var title = page.evaluate(function () { return document.title; }); console.log('Page title is ' + title); }); Any console message from a web page, including from the code inside evaluate(), will not be displayed by default. To override this behavior, use theonConsoleMessage callback. The previous example can be rewritten to: var page = require('webpage').create(); page.onConsoleMessage = function (msg) { console.log('Page title is ' + msg); }; page.open(url, function (status) { page.evaluate(function () { console.log(document.title); }); }); CanvasCanvas can be easily constructed and utilized. The following colorwheel.js produces the color wheel. var page = new WebPage; page.viewportSize = { width: 400, height : 400 }; page.content = '<html><body><canvas id="surface"></canvas></body></html>'; page.evaluate(function() { var el = document.getElementById('surface'), context = el.getContext('2d'), width = window.innerWidth, height = window.innerHeight, cx = width / 2, cy = height / 2, radius = width / 2.3, imageData, pixels, hue, sat, value, i = 0, x, y, rx, ry, d, f, g, p, u, v, w, rgb; el.width = width; el.height = height; imageData = context.createImageData(width, height); pixels = imageData.data; for (y = 0; y < height; y = y + 1) { for (x = 0; x < width; x = x + 1, i = i + 4) { rx = x - cx; ry = y - cy; d = rx * rx + ry * ry; if (d < radius * radius) { hue = 6 * (Math.atan2(ry, rx) + Math.PI) / (2 * Math.PI); sat = Math.sqrt(d) / radius; g = Math.floor(hue); f = hue - g; u = 255 * (1 - sat); v = 255 * (1 - sat * f); w = 255 * (1 - sat * (1 - f)); pixels[i] = [255, v, u, u, w, 255, 255][g]; pixels[i + 1] = [w, 255, 255, v, u, u, w][g]; pixels[i + 2] = [u, u, w, 255, 255, v, u][g]; pixels[i + 3] = 255; } } } context.putImageData(imageData, 0, 0); document.body.style.backgroundColor = 'white'; document.body.style.margin = '0px'; }); page.render('colorwheel.png'); phantom.exit();
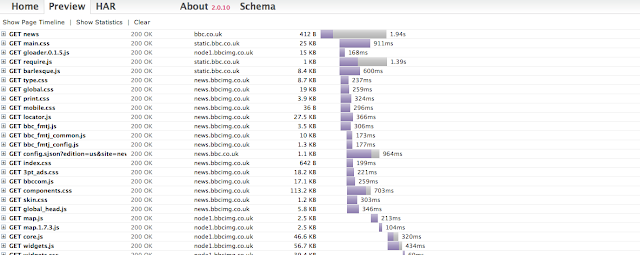
DOM ManipulationSince the script is executed as if it is running on a web browser, standard The following useragent.js example demonstrates reading the innerText property of the element whose id ismyagent: var page = require('webpage').create(); console.log('The default user agent is ' + page.settings.userAgent); page.settings.userAgent = 'SpecialAgent'; page.open('http://www.httpuseragent.org', function (status) { if (status !== 'success') { console.log('Unable to access network'); } else { var ua = page.evaluate(function () { return document.getElementById('myagent').innerText; }); console.log(ua); } phantom.exit(); }); The above example also demonstrates the use of Here is another example: finding pizza in Mountain View. var page = require('webpage').create(), url = 'http://lite.yelp.com/search?find_desc=pizza&find_loc=94040&find_submit=Search'; page.open(url, function (status) { if (status !== 'success') { console.log('Unable to access network'); } else { var results = page.evaluate(function() { var list = document.querySelectorAll('span.address'), pizza = [], i; for (i = 0; i < list.length; i++) { pizza.push(list[i].innerText); } return pizza; }); console.log(results.join('\n')); } phantom.exit(); }); An illustration of the use of var page = require('webpage').create(); page.onConsoleMessage = function(msg) { console.log(msg); }; page.open(encodeURI("http://mobile.twitter.com/Sencha"), function (status) { if (status !== "success") { console.log("Unable to access network"); } else { page.evaluate(function() { var list = document.querySelectorAll('span.status'); for (var i = 0; i < list.length; ++i) { console.log((i + 1) + ": " + list[i].innerHTML.replace(/<.*?>/g, '')); } }); } phantom.exit(); }); Network trafficAll the resource requests and responses can be sniffed using the onResourceRequested andonResourceReceived. An example to dump everything is: var page = require('webpage').create(); page.onResourceRequested = function (request) { console.log('Request ' + JSON.stringify(request, undefined, 4)); }; page.onResourceReceived = function (response) { console.log('Receive ' + JSON.stringify(response, undefined, 4)); }; page.open(url); The included examples/netsniff.js shows how to capture and process all the resource requests and responses and export the result inHAR format. The following shows the waterfall diagram obtained from BBC website:
|